Advertisement
Quick Links
PowPak
| Installation
TM
CCO Module
Part of the Energi TriPak
Part of the Energi TriPak
Family
Family
TM
TM
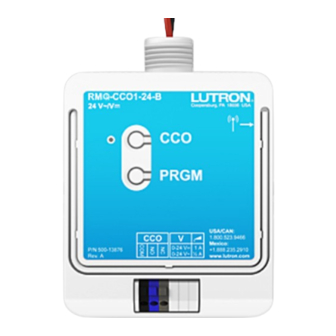
RMM-CCO1-24-B
24 V~ 45 mA
SELV
24 V- 35 mA
RMQ-CCO1-24-B
Important Notes:
Please read before installing.
•
For installation by a qualified electrician in accordance with all local and
national electrical codes.
•
Note: Use copper conductors only.
•
Check to see that the device type and rating is suitable for the application.
•
DO NOT install if product has any visible damage.
•
If moisture or condensation is evident, allow the product to dry completely
before installation.
•
Operate between 0 °C and 55 °C.
•
0% to 90% humidity, non-condensing.
•
For indoor use only.
PowPak
TM
CCO Module
Install in center of room to
maximize RF coverage.
Radio
Powr Savr
TM
Occupancy
Sensor
10 m
Maximum
Pico
®
Wireless
Transmitter
12 m
All Wireless Transmitters must be installed within
10 m of the PowPak
CCO Module.
TM
CCO Information
• This product features a single contact closure output with both
normally open (NO) and normally closed (NC) dry contacts.
• The CCO incorporates maintained output behavior only.
• The CCO is rated to switch resistive
Switching
Resistive
loads at voltages up to 24 V only. To
Voltage
Load
properly control inductive load types
0-24 V-
1.0 A
such as relays, solenoids, or motors,
0-24 V~
0.5 A
refer to Application Note #434.
Transmitting Device
Transmitted Command
CCO Default Action
Pico
On
NO = Close, NC = Open
®
Wireless
Off
NO = Open, NC = Close
Transmitter
Raise
No Action
Lower
No Action
Preset
NO = Close, NC = Open
Radio Powr Savr
Radio Powr Savr
Radio Powr Savr
Radio Powr Savr
Occupied
Occupied
NO = Close, NC = Open
NO = Close, NC = Open
TM
TM
TM
Occupancy Sensor
Occupancy Sensor
Unoccupied
Unoccupied
NO = Open, NC = Close
NO = Open, NC = Close
Radio Powr Savr
Occupied
No Action
TM
Vacancy Sensor
Unoccupied
NO = Open, NC = Close
Radio Powr Savr
Radio Powr Savr
Radio Powr Savr
Radio Powr Savr
Ambient light below target level
Ambient light below target level
NO = Close, NC = Open
NO = Close, NC = Open
TM
TM
TM
Daylight Sensor
Daylight Sensor
Ambient light above target level
Ambient light above target level
NO = Open, NC = Close
NO = Open, NC = Close
Lutron Electronics Co., Inc. | 7200 Suter Road
Coopersburg, PA 18036-1299 | U.S.A.
Required Components
For each system ensure you have:
At Least One PowPak
CCO Module.
041-353
TM
Rev. A
12/2011
CCO
CCO Toggle
Status
LED
Advanced
Operations
Contact
Closure
Output
(CCO)
(SELV)
PowPak
CCO Module
TM
Start Here
1
Install PowPak
CCO Module
TM
When installing a PowPak
Module, use the supplied mounting
screws and wire the module as shown.
Suggested Installation Location:
Install in center of room.
This ensures proper RF coverage of area.
Note: PowPak
CCO Module may also be
TM
mounted on or inside a junction box.
If installing unit inside a junction box please
see Application Note #423.
For more information:
www.lutron.com/powpakcco
Associate Wireless Transmitters to PowPak
2
Before beginning this step, make sure that there are no other PowPak
from other systems can be incorrectly associated to this system.
R
Permanently install
3
Wireless Transmitters
Link
Test
Note: Please consult individual
component installation guides
for information.
Need Help? www.lutron.com | +86.21.51533628
At least one Wireless Transmitter.
+
Radio Powr Savr
TM
Occupancy Sensor
(6 maximum)
Supply Voltage
CCO
TM
24 V~ / 24 V-
Wire nut
(2 Supplied)
COM
(Common)
NC
NO
(Normally Closed)
(Normally Open)
CCO Module
TM
modules being set up within the same building. It is possible that Wireless Transmitters
TM
A
Hold the CCO Toggle
B
Hold the indicated button on a Wireless Transmitter for
button on the PowPak
6 seconds to associate the device.
TM
CCO Module for 6 seconds
Repeat for any additional Wireless Transmitters.
to enter association mode.
Note: The CCO will open and close
Hold the CCO Toggle button on the PowPak
C
once after each step to confirm
CCO Module for 6 seconds to save association(s).
successful completion.
Note: Only complete step 4 if using a Daylight Sensor with the CCO Module
4
Daylight Sensor setup
to control a device that is switching a lighting source.
Calibration
A
Turn lights in room on using the
CCO Toggle button on the PowPak
TM
CCO Module or an associated Pico
.
®
Press & hold "Cal." on the associated
B
Daylight Sensor for 6 seconds.
Exit room for 5 minutes to allow
C
calibration to be completed.
Note: When calibration has completed, all lights
will flash and the system will begin daylighting.
Link
Cal.
Test
Radio Powr Savr
Pico
Wireless
TM
®
Daylight Sensor
Transmitter
(1 maximum)
(9 maximum)
Note: CCO Module supply wires can be
connected in any polarity.
Mounting screw
(2 Supplied)
To CCO-controlled device.
Note: When wiring CCO output,
use 0.5 to 1.5 mm
solid or stranded wire.
2
Test
Link
TM
Tuning (Optional)
A
To have multiple zones of lights turn on
at different daylight levels (using multiple
Link
Cal.
Test
CCO Modules with one Daylight Sensor)
follow the Tuning procedure described
in the Daylight Sensor
(LRF4-DCRB or
installation instructions.
LRF7-DCRB)
Use the CCO Toggle button in place of
the Dimmer/Switch tap button referenced
in the document.
| 800.901.849
| +1.610.282.3800
China
Hong Kong
Others
Limited Warranty
Lutron will, at its option, repair or replace any unit that is
defective in materials or manufacture within one year after
purchase. For warranty service, return unit to place of
purchase or mail to Lutron at 7200 Suter Rd., Coopersburg,
PA 18036-1299, postage pre-paid.
This warranty is in lieu of all other express warranties, and
the implied warranty of merchantability is limited to one year
from purchase. This warranty does not cover the cost of
installation, removal or reinstallation, or damage resulting
from misuse, abuse, or damage from improper wiring or
installation. This warranty does not cover incidental or
consequential damages.
LUTRON'S LIABILITY ON ANY CLAIM FOR DAMAGES
ARISING OUT OF OR IN CONNECTION WITH THE
MANUFACTURE, SALE, INSTALLATION, DELIVERY,
OR USE OF THE UNIT SHALL NEVER EXCEED THE
PURCHASE PRICE OF THE UNIT.
This warranty gives you specific legal rights, and you may
have other rights which vary from state to state. Some states
do not allow the exclusion or limitation of incidental or
consequential damages, or limitation on how long an implied
warranty may last, so the above limitations may not apply
to you. Lutron,
, and Pico are registered trademarks and
PowPak, Radio Powr Savr and Energi TriPak are trademarks
of Lutron Electronics Co., Inc.
©2011 Lutron Electronics Co., Inc.
Reset Factory Defaults
Note: In some instances it may be necessary to reset the
PowPak
CCO Module back to factory default settings.
TM
A
Triple-tap the Advanced Operations button, "ADV"
on the PowPak
CCO Module and hold until the
TM
LED begins to flash slowly.
B
Within 3 seconds of flashing, release and triple-tap
the button again and the LED will flash rapidly
indicating that the unit has been reset to
factory defaults.
Note: Any associations or programming previously set
Cal.
up with the unit will be lost and will need to be
Test
re-programmed.
Troubleshooting
www.lutron.com
CCO-controlled
• Ensure power to the PowPak
CCO
TM
device does
Module is properly applied.
not respond
• Ensure the CCO-controlled device has
to Wireless
been properly wired to the PowPak
Transmitter(s).
CCO Module.
• Ensure Wireless Transmitter is properly
associated to PowPak
CCO Module.
TM
• Ensure Wireless Transmitter's battery is
installed correctly.
Wireless
• The maximum number of Wireless
Transmitters have been associated to
Transmitter(s)
the PowPak
CCO Module. To remove
cannot be
TM
a previously set up Wireless Transmitter,
associated to
tap the button used for association on
PowPak
TM
the Wireless Transmitter three times, on
CCO Module.
the third tap hold for three seconds
and then tap three more times.
TM
Advertisement

Related Manuals for Lutron Electronics PowPak RMM-CCO1-24-B


Summary of Contents for Lutron Electronics PowPak RMM-CCO1-24-B
- Page 1 Note: When calibration has completed, all lights the third tap hold for three seconds in the document. for information. Lutron Electronics Co., Inc. | 7200 Suter Road will flash and the system will begin daylighting. and then tap three more times. Coopersburg, PA 18036-1299 | U.S.A.
- Page 2 CCO 模块连接。如需移除之前装配的 退离并空置房间 5 秒钟, 环境光线亮度高于目标级别 环境光线亮度高于目标级别 NO = 打开,NC = 关闭 NO = 打开,NC = 关闭 的调光/开关按钮。 注: 请查阅每个组件的安装指南 模块连接。 无线发射机,轻按用于连接无线发射 以完成校准。 以了解相关信息。 机的按钮三次,在最后一次时按住并 注:校准完成后,所有灯将会闪烁, Lutron Electronics Co., Inc. | 7200 Suter Road 保持三秒钟,然后再轻按三次。 系统开始采用日光照明。 Coopersburg PA, 18036-1299 | U.S.A.
Need help?
Do you have a question about the PowPak RMM-CCO1-24-B and is the answer not in the manual?
Questions and answers