Advertisement
Available languages
Available languages
Quick Links
PowPakR | Installation
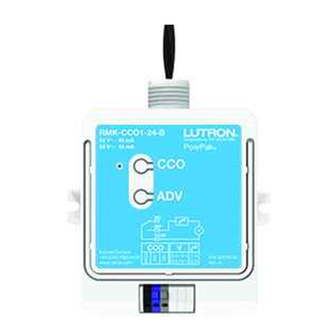
CCO Module
Part of the Energi TriPakR Family
RMK-CCO1-24-B
24 V~ 45 mA
RMN-CCO1-24-B
24 V- 35 mA
Important Notes:
Please read before installing.
For installation by a qualified electrician in accordance with all local and
national electrical codes.
Note: Use copper conductors only.
Check to see that the device type and rating is suitable for the application.
DO NOT install if product has any visible damage.
If moisture or condensation is evident, allow the product to dry completely
before installation.
Operate between 0 °C and 55 °C.
0% to 90% humidity, non-condensing.
For indoor use only.
R
PowPak
CCO Module
Install in center of room to
maximize RF coverage.
Radio Powr
T
Savr
Occupancy
Sensor
10 m
Maximum
R
Pico
Wireless
Control
12 m
All Wireless Transmitters must be installed within
10 m of the PowPakR CCO Module.
Limited Warranty
Lutron EA Ltd. ("Lutron EA") warrants each unit to be free from defects in
material and workmanship and to perform under normal use and service.
To the extent permitted by law, Lutron EA and Lutron Electronics Co. Inc.
("Lutron") make no warranties or representations as to the units except as
set forth herein. This warranty shall run for a period of two years from the
date of purchase and Lutron's obligations under this warranty are limited to
remedying any defect, replacing any defective part or replacement (at Lutron
EA's sole option) and shall be effective only if the defective unit is shipped
to Lutron EA postage prepaid within 24 months after purchase of the unit.
Repair or replacement of the unit does not affect the expiry date of the
warranty. This warranty does not cover damage or deficiencies due to abuse,
misuse, inadequate wiring or insulation or use or installation other than in
accordance with instructions accompanying the unit.
To the extent permitted by law, neither Lutron EA nor Lutron shall be liable
for any other loss or damage including consequential or special loss or
damages, loss of profits, loss of income, or loss of contracts arising out of
or relating to the supply of the unit or the use of the unit and the purchaser
assumes and will hold harmless Lutron EA and Lutron in respect of all such
loss or damage. Nothing in this warranty shall have the effect of limiting or
excluding Lutron EA's or Lutron's liability for fraud or for death or personal
injury resulting from its own negligence, or any other liability, if and to the
extent that the same may not be limited or excluded as a matter of law.
This warranty does not affect the statutory rights of consumer
purchasers of this product.
Although every attempt is made to ensure that catalogue information is
accurate and up-to-date, please check with Lutron EA before specifying or
purchasing this equipment to confirm availability, exact specifications, and
suitability for your application.
Lutron, Pico, PowPak, Energi TriPak and
are registered trademarks and
Radio Powr Savr is a trademark of Lutron Electronics Co., Inc.
©2012 Lutron Electronics Co., Inc.
Lutron EA Ltd | 6 Sovereign Close
London, E1W3JF, UK
Required Components
For each system ensure you have:
041399
At Least One PowPakR CCO Module.
Rev. A
12/2012
CCO
CCO Toggle
Status
LED
Advanced
Operations
Contact
Closure
Output
(CCO)
PowPakR CCO Module
Start Here
R
1
Install PowPak
CCO Module
R
The PowPak
CCO Module should
be installed using the mounting
tabs on the enclosure (screws not
R
provided). The PowPak
CCO Module
can be installed in a junction box or
marshalling box (optional) using the
conduit nut (provided). Consult local
and national electrical codes for
proper installation.
Suggested Installation Location:
Install in center of room.
This ensures proper RF coverage of area.
Associate Wireless Transmitters to PowPakR CCO Module
2
Before beginning this step, make sure that there are no other PowPakR modules being set up within the same building.
It is possible that Wireless Transmitters from other systems can be incorrectly associated to this system.
A
On the PowPak
Module, hold the CCO
toggle button for 6 seconds
to enter association mode.
Note: The CCO will open and close
once after each step to confirm
successful completion.
Permanently Install
3
Wireless Transmitters
Link
Test
Note: Please consult individual component
installation guides for information.
Need Help? www.lutron.com or call the Lutron Technical Support Center, at +44.(0)20.7680.4481
At least one Wireless Transmitter.
Radio Powr SavrT Occupancy/Vacancy Sensor
(6 maximum)
Supply Voltage
24 V~ / 24 V-
21 mm
knockout
opening
COM
(Common)
NO
NC
(Normally Open)
(Normally Closed)
R
CCO
B
Hold the indicated button on a Wireless Transmitter for
6 seconds to associate the device.
Repeat for any additional Wireless Transmitters.
C
Hold the CCO Toggle button on the PowPak
Module for 6 seconds to save association(s).
Note: Only complete step 4 if using a Daylight Sensor with the CCO Module
Daylight Sensor setup
4
to control a device that is switching a lighting source.
Calibration
A
Turn lights in room on using the CCO Toggle
button on the PowPakR CCO Module or an
Link
Cal.
Test
associated PicoR Wireless Control.
B
Press & hold "Cal." on the associated
Daylight Sensor for 6 seconds.
Exit room for 5 minutes to allow
C
calibration to be completed.
Note: When calibration has completed, all lights
will flash and the system will begin daylighting.
Cal.
Link
Test
PicoR Wireless
Radio Powr SavrT
Control
Daylight Sensor
(9 maximum)
(1 maximum)
Wiring a Lever Operated Connector (shown)
When wiring lever operated
1
connectors (2 supplied) use
3
2.5 mm
2
to 4.0 mm
2
10 mm
2
(14 to 12 AWG) solid or
stranded copper wire.
For Model No.
use
RMN-CCO1-24-B
supplied Twist-on wire connectors.
(2 supplied)
Note: CCO Module supply wires can be
connected in any polarity.
Conduit Nut
To CCO-controlled device.
Note: When wiring CCO output,
use 0.5 to 1.5 mm
2
(20 to 16 AWG)
solid or stranded wire.
Cal.
Link
Test
R
CCO
Tuning (Optional)
A
If it is desired to have multiple zones of
lights turn on at different daylight levels
(using multiple CCO Modules with one
Daylight Sensor) follow the Tuning
procedure described in the Daylight
Sensor
(LRF3-DCRB, LRF5-DCRB)
installation
instructions.
Use the CCO Toggle button in place of the
Dimmer/Switch tap button referenced in
the document.
CCO Information
This product features a single contact closure output with both normally
open (NO) and normally closed (NC) dry contacts.
The CCO incorporates maintained output behavior only.
The CCO is rated to switch resistive loads at
Switching
Resistive
voltages up to 24 V only. To properly control
Voltage
Load
R
inductive load types such as relays, solenoids,
0-24 V-
1.0 A
or motors, refer to Application Note #434.
0-24 V~
0.5 A
Transmitting Device Transmitted Command CCO Default Action
Pico
Wireless
On
NO = Close, NC = Open
®
Control
Off
NO = Open, NC = Close
Raise
No Action
Lower
No Action
Preset
NO = Close, NC = Open
Radio Powr Savr
Occupied
NO = Close, NC = Open
TM
Occupancy Sensor
Unoccupied
NO = Open, NC = Close
Radio Powr Savr
Occupied
No Action
TM
Vacancy Sensor
Unoccupied
NO = Open, NC = Close
Radio Powr Savr
Ambient light below
NO = Close, NC = Open
TM
Daylight Sensor
target level
Ambient light above
NO = Open, NC = Close
target level
Unaffected Mode
Unaffected mode allows a system with an Occupancy Sensor
associated to multiple CCO Modules to be set up such that only
selected loads turn on automatically. Other loads will require a
manual turn-on with a PicoR Wireless Transmitter. All loads will turn
off automatically when the room is vacated.
On a CCO Module, press and hold both the CCO
A
Toggle and Advanced Operations ("ADV") buttons for
6 seconds until the LED begins flashing quickly.
On the associated Occupancy Sensor, press and hold
B
the "Test" button* for 6 seconds until the lens flashes.
Unaffected mode will be exited automatically. This
C
CCO Module will now be unaffected by occupancy
commands. Repeat procedure for any additional
devices.
* If no "Test" button, hold "Lights On" button.
Reset Factory Defaults
Note: In some instances it may be necessary to reset the
PowPakR CCO Module back to factory default settings.
A
Triple-tap the Advanced Operations button, "ADV"
on the PowPakR CCO Module and hold until the
LED begins to flash slowly.
B
Within 3 seconds of flashing, release and triple-tap
the button again and the LED will flash rapidly
indicating that the unit has been reset to factory
defaults.
Note: Any associations or programming previously set
up with the unit will be lost and will need to be
re-programmed.
Troubleshooting
www.lutron.com
CCO-controlled
Ensure power to the PowPakR CCO
device does
Module is properly applied.
not respond
Ensure the CCO-controlled device has
to Wireless
been properly wired to the PowPakR
Transmitter(s).
CCO Module.
Ensure Wireless Transmitter is properly
associated to PowPakR CCO Module.
Ensure that the Wireless Transmitter
battery is installed correctly.
Wireless
Transmitters have been associated to
Transmitter(s)
the PowPakR CCO Module. To remove
cannot be
a previously set up Wireless Transmitter,
associated to
tap the button used for association on
PowPakR CCO
the Wireless Transmitter three times, on
Module.
the third tap hold for three seconds and
then tap three more times.
Advertisement

Related Manuals for Lutron Electronics PowPak RMK-CCO1-24-B


Summary of Contents for Lutron Electronics PowPak RMK-CCO1-24-B
- Page 1 LED begins to flash slowly. material and workmanship and to perform under normal use and service. To the extent permitted by law, Lutron EA and Lutron Electronics Co. Inc. Within 3 seconds of flashing, release and triple-tap (“Lutron”) make no warranties or representations as to the units except as the button again and the LED will flash rapidly...
- Page 2 En la medida permitida por la ley, para acceder al modo lentamente. Lutron EA y Lutron Electronics Co. Inc. (“Lutron”) no asumen garantías o responsabilidades más allá de lo que aquí se indica. Esta garantía tendrá una Antes de que hayan transcurrido 3 segundos de de asociación.
- Page 3 Utiliser le bouton de bascule de sortie à contact sec module sortie pour l’association de l’émetteur sans fil, Radio Powr Savr est une marque de commerce de Lutron Electronics Co., Inc. pour permettre la réalisation complète (CCO) au lieu du bouton à effleurement de gradation/ maintenir la pression du troisième appui...
- Page 4 Funktionen („ADV“) drücken und die Taste Zuordnungsmodus zu EA und Lutron Electronics Co. Inc. („Lutron“) keinerlei Garantien bezüglich der Geräte, gedrückt halten, bis die LED langsam blinkt. die über die hier festgelegten Gewährleistungen hinausgehen. Diese Garantie gilt für aktivieren.
- Page 5 Radio Powr Savr è “Cal.” sul sensore di luce solare abbinato. abbinare la/le wireless è stato abbinato al Modulo CCO un marchio di Lutron Electronics Co., Inc. installazione del sensore di luce solare Link trasmittente/i PowPakR. Per rimuovere una trasmittente...
-
Page 6: Solução De Problemas
Até o limite permitido Dentro de 3 segundos do início de piscar do LED, por lei, a Lutron EA e a Lutron Electronics Company, Inc. (“Lutron”) não oferecem de associação.
Need help?
Do you have a question about the PowPak RMK-CCO1-24-B and is the answer not in the manual?
Questions and answers