Table of Contents
Advertisement
Quick Links
User Manual of Product 1:
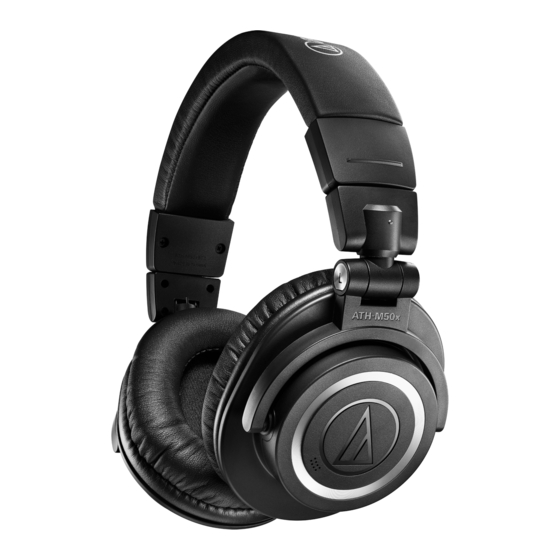
Audio-Technica M50x Professional Studio Headphones for
studio recording, creators, DJs, gaming, podcasts and
everyday listening - Black
User Manual of Product 2:
Focusrite Scarlett Solo 3rd Gen USB Audio Interface, for the
Guitarist, Vocalist, Podcaster or Producer, Studio Quality
Sound, Red
Advertisement
Table of Contents

Subscribe to Our Youtube Channel
Related Manuals for Audio Technica M50x


Summary of Contents for Audio Technica M50x
- Page 1 User Manual of Product 1: Audio-Technica M50x Professional Studio Headphones for studio recording, creators, DJs, gaming, podcasts and everyday listening - Black User Manual of Product 2: Focusrite Scarlett Solo 3rd Gen USB Audio Interface, for the Guitarist, Vocalist, Podcaster or Producer, Studio Quality...
- Page 2 ATH-M50xBT2 Wireless Headphones User Manual English...
-
Page 3: Safety Precautions
Safety precautions Although this product was designed to be used safely, failing to use it correctly may result in an accident. To ensure safety, observe all warnings and cautions while using the product. Cautions for the product Do not use the product near medical equipment. Radio waves may affect cardiac pacemakers and medical electronic equipment. -
Page 4: For Customers In The Usa
Safety precautions To avoid leakage, generation of heat or explosion: Never heat, disassemble or modify the battery, nor dispose of it in a fire. Do not attempt to pierce with a nail, hit with a hammer or step on the battery. Do not drop the product or subject it to strong impact. -
Page 5: For Customers In Canada
Safety precautions RF Exposure Statement This device complies with FCC radiation exposure limits set forth for an uncontrolled environment and meets the FCC radio frequency (RF) Exposure Guidelines. This equipment has very low levels of RF energy that is deemed to comply without testing of specific absorption rate (SAR). -
Page 6: Notes On Use
Notes on use Be sure to read the connected device’s user manual before use. Audio-Technica will not be liable in any way for any loss of data in the unlikely event that such losses should occur while using the product. On public transportation or in other public places, keep the volume low so as not to disturb other people. -
Page 7: For A More Comfortable Bluetooth Communication Experience
For a more comfortable Bluetooth communication experience The effective communication range of this product varies depending on obstructions and radio wave conditions. For a more enjoyable experience, please use the product as close as possible to the Bluetooth device. To minimize noise and sound disruptions, avoid placing your body or other obstacles between the product’s antenna (L side) and the Bluetooth device. -
Page 8: Part Names And Functions
Part names and functions Headphones L/R (left/right) indicator Earpad Headband Slider Joint Housing Microphones... -
Page 9: Operation Area
Part names and functions Operation area Battery jack Use to connect the included USB charging cable and charge the product. Indicator lamp Displays the operating status and battery level of the product. Connector jack Use to connect the included cable for wired connection. Power supply / control button Use to turn the power supply ON/OFF, play/pause music, and answer phone calls. - Page 10 Part names and functions Accessories ™ USB charging cable (30 cm (12"), USB Type-A / USB Type-C Cable (1.2 m (3.9’) / 3.5 mm (1/8“) gold-plated stereo mini-plug/L-shaped) Pouch...
-
Page 11: Charging The Battery
Charging the battery Fully charge the battery when using for the first time. When the rechargeable battery is running low, the voice guidance will play the message “Low battery”, and the indicator lamp will flash in red. Charge the battery as soon as possible. It takes about 3.5 hours maximum to charge the battery fully. - Page 12 Charging the battery When charging, make sure to use the included USB charging cable. The product may not charge with cables other than the included USB charging cable.
-
Page 13: Power Supply On/Off
Power supply ON/OFF Turning on the product Press and hold the power supply/control button (about 2 seconds). The indicator lamp lights in white, and then flashes. Voice guidance is played. It may take several seconds for the indicator lamp to light. See "Voice guidance"... -
Page 14: Connecting Via Bluetooth
Connecting via Bluetooth To connect the product to a Bluetooth device, the product needs to pair (register) with the device. Pairing a Bluetooth device Read the user manual for the Bluetooth device. Place the Bluetooth device within 1 m (3.3') of the product to perform pairing correctly. Wear the product to hear voice guidance during pairing. -
Page 15: About Pairing
Connecting via Bluetooth Turn on the Bluetooth function on an Android device configured with a Google account. Turn on the product and bring the product close to the Android device. For information about using your Bluetooth device, refer to the device’s user manual. Touch the pairing notification that appears on your Android device. -
Page 16: Wearing The Product
Wearing the product Put the side of the product marked “L” (LEFT) onto the left ear and the side marked “R” (RIGHT) onto the right ear, slide the slider up and down so that the earpads cover the ears, and then adjust the headband. Reversing the housing You can turn the housing about 180 degrees from the point where the arm is attached to the fulcrum. - Page 17 Wearing the product Compact folding You can fold the housing into the inner side of the headband using the joints at the fulcrum. Be careful so as not to get your fingers caught in the joints. When using the product, make sure to return the housings to their original positions. Joint...
-
Page 18: Using The Product
Using the product The product can use Bluetooth wireless technology to connect to your device and play music, receive phone calls, etc. Use the product for whichever of these purposes suits your needs. Note that Audio-Technica cannot guarantee the operation of displays, such as the battery level display, or applications via Bluetooth devices. Listening to music To connect for the first time, pair the product and your device via Bluetooth wireless technology. -
Page 19: Talking On The Phone
Using the product Operation of volume buttons Volume buttons Operation Function [1][2] Press Increases/decreases the volume by 1 level. Plays the next track. Press and hold (about 2 seconds) Plays the previous track / returns to the start of the track. [1] A beep is heard when the volume is at the maximum or minimum level. - Page 20 Using the product Operation of power supply / control button Power supply / control button Operation Function Receiving a call: Answers the call. Press Making a call: Cancels the call. During a call: Ends the call. Press and hold (about 2 seconds) Receiving a call: Rejects the call.
-
Page 21: Wired Connection (Playthrough Function)
Using the product The speech recognition feature (such as Google Assistant or Siri) is activated. Wired connection (playthrough function) The product has a playthrough function that allows you to use it as portable headphones and play back music even when there is no battery power. You can connect the connector plug of the included cable to the product’s connector jack, and then connect the input plug into a portable audio player. - Page 22 Using the product What you can do with the app The app allows you to use the following functions. For details, refer to the app screen. Function Description. Audio Codecs You can change the connection codec. Low latency mode reduces sound delay when playing games or watching Low Latency Mode videos.
-
Page 23: Indicator Lamp Display
Indicator lamp display The indicator lamp of the product indicates the product’s status. Pairing Status Indicator lamp display pattern ○ - ○ - ○ ・ ・・ Searching for devices Flashing white (gradually lighting up) Connecting Status Indicator lamp display pattern ○--------○--------○ ・ ・・ Waiting to be connected Flashing white in 8-second intervals ○----○----○ ... -
Page 24: Voice Guidance
Voice guidance The product plays English voice guidance in the following situations. Situation Voice guidance Voice guidance varies depending on the battery level: Battery level high Power is turned on Battery level medium Battery level low Bluetooth is connected Bluetooth connected Bluetooth is disconnected Bluetooth disconnected Music is played... - Page 25 Cleaning Get into the habit of regularly cleaning the product to ensure that it will last for a long time. Do not use alcohol, paint thinners, or other solvents for cleaning purposes. Use a dry cloth to clean the headphones. To clean the earpads and headband, wipe with a dry cloth.
- Page 26 Forced pairing mode / reset If the product does not connect to a device (forced pairing mode) If pairing cannot be cancelled or is not successful, you can use forced pairing mode to perform pairing again. With the product turned on, press and hold (about 3 seconds) the volume buttons (+/–) at the same time.
- Page 27 Troubleshooting Power is not supplied Charge the product. Unable to pair Confirm that the Bluetooth device communicates using Ver. 2.1+EDR or higher. Place the product and the Bluetooth device within 1 m (3.3') of each other. Set the profiles for the Bluetooth device. For procedures on how to set profiles, refer to the Bluetooth device’s user manual.
- Page 28 Troubleshooting Cannot hear the voice of the caller / Voice of the caller is too quiet Turn on the power of the product and the Bluetooth device. Turn up the volume on the product and the Bluetooth device. Confirm that the product and Bluetooth device are connected via HFP/HSP (or phone connection). Disable pairing for the product and the Bluetooth device, then pair the product with this device again.
-
Page 29: Communication Specifications
Specifications Headphones Type Closed-back dynamic Driver 45 mm Sensitivity 99 dB/mW Frequency response 15 to 28,000 Hz 38 ohms Impedance Microphone Type MEMS type Polar pattern Omnidirectional -38 dB (1 V/Pa, at 1 kHz) Sensitivity Frequency response 85 to 15,000 Hz Communication specifications Communication system Bluetooth version 5.0... - Page 30 Specifications Other Power supply DC 3.7 V lithium polymer battery Charging time Approx. 3.5 hours Operating time Continuous transmission time (music playback): Max. approx. 50 hours Weight Approx. 307 g (10.8 oz) 5°C to 40°C (41°F to 104°F) Operating temperature USB charging cable (30 cm (12”), USB Type-A / USB Type-C), Cable (1.2 m Accessories (3.9’) /3.5 mm (1/8”) gold-plated stereo mini-plug (L-shaped)), Pouch...
- Page 31 Trademarks ® The Bluetooth word mark and logos are registered trademarks owned by Bluetooth SIG, Inc., and any use of such marks by Audio-Technica Corporation is under license. Other trademarks and trade names are those of their respective owners. ™ USB Type-C is a trademark of USB Implementers Forum.
- Page 32 株式会社オーディオテクニカ 〒194-8666 東京都町田市西成瀬2-46-1 www.audio-technica.co.jp Audio-Technica Corporation 2-46-1 Nishi-naruse, Machida, Tokyo 194-8666, Japan www.audio-technica.com ©2021 Audio-Technica Corporation Global Support Contact: www.at-globalsupport.com 132417580-02-01 ver.1 2021.08.15...
- Page 33 User Guide www.focusrite.com Version 1.0...
-
Page 34: Table Of Contents
TABLE OF CONTENTS OVERVIEW . . . . . . . . . . . . . . . . . . . . . . . . . . . . . . . . . . . . . . . . . . . . . . . . . . . . . . . . . . . . . . . . . . . . . 3 Introduction . -
Page 35: Overview
OVERVIEW Introduction Thank you for purchasing this Third Generation Scarlett Solo, one of the family of Focusrite professional computer audio interfaces incorporating high quality Focusrite analogue preamps. You now have a simple and compact solution for routing high quality audio to and from your computer and you will also be able to download some exciting new software plug-ins once you’ve registered the product. -
Page 36: Box Contents
Box Contents Along with your Scarlett Solo you should have: • USB cable, Type ‘A’ to Type ‘C’ • Getting Started Information (printed on inside of box lid) • Important Safety Information System Requirements The easiest way to check that your computer’s operating system (OS) is compatible with the Scarlett Solo is to use our online OS Checker at https://customer.focusrite.com/downloads/os. -
Page 37: Getting Started
GETTING STARTED With the Third Generation, Scarlett interfaces introduce a new, faster way of getting up and running, using the Scarlett Quick Start tool. All you need to do is connect your Scarlett Solo to your computer. Once connected, you will see that the device is recognised by your PC or Mac and the Quick Start tool will guide you through the process from there. - Page 38 Double-click on the icon to open the Finder window shown below: Double-click on the “Click Here to Get Started.url” icon. This will redirect you to the Focusrite website, where we recommend that you register your device: Click on “Let’s get you started”, and you’ll be presented with a form which will be partly prefi lled for you automatically.
-
Page 39: Windows Users Only
Windows users only: On connecting your Scarlett Solo to your PC, a Scarlett icon will appear on the desktop: (Note that the drive letter may be something other than D:, depending on what other devices you have connected to your PC.) Double-click on the pop-up message to open the dialogue box shown below: Double-click on “Open folder to view fi les”: this will open an Explorer window: Double-click “Click Here to Get Started”. - Page 40 TClick on “Let’s get you started”, and you’ll be presented with a form which will be partly prefilled for you automatically. On submitting the form, options will be presented to either go straight to the downloads to get the software for your Scarlett, or to follow a step-by-step setup guide based on your choices.
-
Page 41: All Users
All users: Note that a second file - “More Info & FAQs” - is also available during the initial set-up process. This file contains some additional information about the Focusrite Quick Start tool which you may find helpful if you have any issues with the procedure. Once registered, you will have immediate access to the following resources: •... -
Page 42: Audio Setup In Your Daw
Audio Setup in your DAW The Scarlett Solo is compatible with any Windows-based DAW that supports ASIO or WDM or any Mac-based DAW that uses Core Audio. After following the Getting Started procedure described above, you can start using your Scarlett Solo with the DAW of your choice. To allow you to get started if you do not already have a DAW application installed on your computer, both ProTools | First and Ableton Live Lite are included;... - Page 43 Once the Scarlett Solo is set as the preferred Audio Device* in your DAW, its inputs and outputs will appear in your DAW’s Audio I/O preferences. Depending on your DAW, you may need to enable certain inputs or outputs before use. The two examples below show two Inputs and two outputs enabled in the Ableton Lite Audio Preferences.
-
Page 44: Examples Of Use
Examples of use Scarlett Solo is an ideal audio interface for many DAW applications running on a laptop or other computer, PC or Mac. A typical set of connections is illustrated below. Connecting a microphone/instrument RIGHT LEFT This setup illustrates a typical configuration for recording using DAW software on your Mac or PC. In this case, you would record vocals through Input 1 and guitar through Input 2 into your recording application, while monitoring the playback via headphones. -
Page 45: Using Direct Monitoring
other types, e.g., dynamic or ribbon, will not be damaged by the inadvertent application of phantom power, but note that some older mics may be; if you have any doubt, please check the specification of your mic to ensure that it is safe to use. Input 2 uses a ¼”... -
Page 46: Connecting Scarlett Solo To Loudspeakers
Connecting Scarlett Solo to loudspeakers The ¼” jack outputs on the rear panel can be used to connect monitoring speakers. Self-powered monitors incorporate internal amplifiers with a volume control, and may be connected directly. Passive loudspeakers will require a separate stereo amplifier; in this case, the rear panel outputs should be connected to the amplifier’s inputs. - Page 47 Professional power amplifiers will generally have balanced inputs; we highly recommend using balanced cables to connect these to the outputs of the Scarlett Solo. NOTE: You run the risk of creating an audio feedback loop if loudspeakers are active at the same time as a microphone! We recommend that you always turn off (or turn down) monitoring loudspeakers while recording, and use headphones when overdubbing.
-
Page 48: Hardware Features
HARDWARE FEATURES Front Panel The front panel includes the input connectors for mic and line/instrument signals, and the input gain and monitoring controls. Input 1 – electronically balanced input via 3-pin XLR socket for microphones. GAIN 1 – adjust the gain for the microphone signal at Input 1. The gain controls have concentric tri-colour LED ‘rings’... -
Page 49: Back Panel
Back Panel RIGHT LEFT 12. K (Kensington security lock) – secure your Scarlett Solo to a suitable structure if desired. USB 2.0 port – Type C connector; connect to your laptop or computer with the USB cable supplied. 14. LINE OUTPUTS: LEFT and RIGHT – 2 x ¼” (6.35 mm) TRS jack sockets; +10 dBu output level (variable), electronically balanced. -
Page 50: Specifications
SPECIFICATIONS Performance Specifications NOTE: All performance figures measured in accordance with the provisions of AES17, as applicable. Clock Source Internal Supported sample rates 44.1 kHz, 48 kHz, 88.2 kHz, 96 kHz, 176.4 kHz, 192 kHz Microphone Input Dynamic Range 111 dB (A-weighted) Frequency Response 20 Hz to 20 kHz ±0.1 dB <0.0012% (minimum gain, -1 dBFS input with 22 Hz/22 kHz... -
Page 51: Physical And Electrical Characteristics
Physical and Electrical Characteristics Analogue Input 1 Connector Balanced, via female 3-pin XLR on front panel Phantom power 48 V phantom power switch AIR function Front panel switch or via Focusrite Control Analogue Input 2 ¼” (6.35 mm) jack socket on front panel Connector INST mode: unbalanced, 2-pole (TS) LINE mode: balanced (TRS) -
Page 52: Troubleshooting
TROUBLESHOOTING Your Scarlett Solo has a two year warranty. Wherever you are in the world, you can rely on our warranty should any Focusrite hardware need repairing or replacing due to a manufacturing fault. For all troubleshooting queries, please visit the Focusrite Help Centre at http://support.focusrite.com/ where you will find articles covering numerous troubleshooting examples.
Need help?
Do you have a question about the M50x and is the answer not in the manual?
Questions and answers