Table of Contents
Advertisement
Quick Links
Advertisement
Table of Contents

Subscribe to Our Youtube Channel
Related Manuals for ECOWITT WS2910


Summary of Contents for ECOWITT WS2910
- Page 1 Weather Station Console Manual Model: WS2910 https://s.ecowitt.com/GJBUKF...
-
Page 2: Table Of Contents
4.1 Power on ..................... 6 4.2 Install the Ecowitt App ................7 4.3 Wi-Fi Configuration ................... 7 4.3.1 Connect the Station to Wi-Fi via Ecowitt App ........8 4.3.2 Via WebUI 192.168.4.1 ..............12 4.4 Device Location, Timezone, DST, and Data Public .........14 4.5 Replacing Wi-Fi Router ................15... - Page 3 5.7.1 Via Ecowitt App ................43 5.7.2 Via WebUI 192.168.4.1 ..............43 6. Optional Sensors ....................44 6.1 Sensor Data Can be Displayed on the WS2910 ........45 6.2 Sensor Data Can Only be Uploaded to the Cloud ........45 7. Specifications ...................... 46 8.
-
Page 4: Package
1. Package Item WS2910 Display Console DC to USB Cable(adapter & batteries are not included) User Manual Bracket Table 1 2. Construction Figure 1: Size... -
Page 5: Brief Instruction
WS2910 supports 2.4 GHz Wi-Fi for viewing weather data remotely from anywhere on your phone, tablet, or computer via a browser, all for free. Note: The WS2910 requires optional sensors to collect outdoor data and is not a standalone product. -
Page 6: First Use
4. First Use 4.1 Power on Figure 3 The WS2910 supports both power supply via a 5V 1A DC and 3 AAA batteries. However, since the upcoming steps involve connecting to Wi-Fi and uploading data, the DC power supply must be used. -
Page 7: Install The Ecowitt App
Visit the App Store or Google Play Store or scan the QR code below to download the free Ecowitt App onto your mobile device. Open the Ecowitt App, follow the on-screen setup instructions to create an account, add a new device, and refer to Section 4.3... -
Page 8: Connect The Station To Wi-Fi Via Ecowitt App
4.3.1 Connect the Station to Wi-Fi via Ecowitt App (1) Open Ecowitt App →"My Devices"→"Add New Devices"→click WS2910 icon→choose WiFi Provisioning: Figure 5... - Page 9 Wi-Fi icon will flash fast on the screen. Use mobile phone to connect to the hotspot "EasyWeatherPro-xx xxxx" emitted by WS2910. Then tick "Operation Completed"→"Next". Note: Wi-Fi will be disabled when the device is powered solely by batteries.
- Page 10 Figure 7 (4) Now the gateway setup is successful. Switch the network of phone to the same Wi-Fi WS2910 is connected to. WS2910 has been successfully added to the App, then the data can be viewed on the App or ecowitt.net.
- Page 11 Note: If you are unable to connect the WS2910 to Wi-Fi using the Ecowitt App, we recommend using the setup via WebUI 192.168.4.1 on the next page. Figure 8...
-
Page 12: Via Webui 192.168.4.1
URL: 192.168.4.1. No password is set by default. Click login. Figure 9 (2) Click Local Network. Input the name(SSID) and password of the router. Now the WS2910 is successfully connected to the Wi-Fi router. Copy the MAC address for the following steps. - Page 13 Figure 10 (3) Switch the network of phone to the same Wi-Fi WS2910 is connected to. Open Ecowitt App →"My Devices"→"Add New Devices"→click WS2910 icon→choose Manually Adding. Figure 11...
-
Page 14: Device Location, Timezone, Dst, And Data Public
1. Click on "My Devices". 2. Click on the "..." icon. 3. Set the Device's location and Timezone on this interface. Tick "Auto DST" and "Is Public" when necessary. 5. Click "Save", then reboot the device, the WS2910 will automatically synchronize time and DST. -
Page 15: Replacing Wi-Fi Router
Figure 13 Note: After completing the above Wi-Fi configuration and related settings, the WS2910 screen will display a stable Wi-Fi signal tower, auto time zone, and DST (when necessary). 4.5 Replacing Wi-Fi Router If you want to change your router, follow Section 4.3... -
Page 16: Upload Data To Server
A. ecowitt.net (Default upload to this server) B. wunderground.com C. weathercloud.net D. wow.metoffice.gov.uk E. Customized servers Upload servers management: Ensure that the phone and WS2910 receiver are using the same Wi-Fi. Ecowitt App → "..." at the top right corner → "Others" → "DIY Upload... -
Page 17: Weather Underground
Servers". Figure 15 4.7.1 Weather Underground If you need to upload data to a third-party website, you can follow the steps below, here we take wunderground.com as an example: 1. Visit wunderground.com and click Log in to create an account:... - Page 18 Figure 16 2. Click My Profile→My Devices. Figure 17...
- Page 19 3. Select Add New Device. Figure 18 4. Find Personal Weather Station, select other and click Next. Figure 19...
- Page 20 5. Select Address or Manual, and find your local position. Press Next. Figure 20 6. Fill out the details and go ahead. Figure 21...
- Page 21 7. Then registration complete, you will see Station ID and Station key. Figure 22 8. Enter the Station ID & Station Key and select Save on the ecowitt App. The data can then be viewed on wunderground.com. Figure 23...
-
Page 22: Factory Reset / Clear Memory
Support backlight adjustment under DC power supply Automatically save user set parameters (unit, calibration, alarm...) Support uploading data to the weather station server after connecting to the Wi-Fi network, please refer to Section 4.7 Data storage and export on the Ecowitt server: https://ecowitt.net... -
Page 23: Screen Display
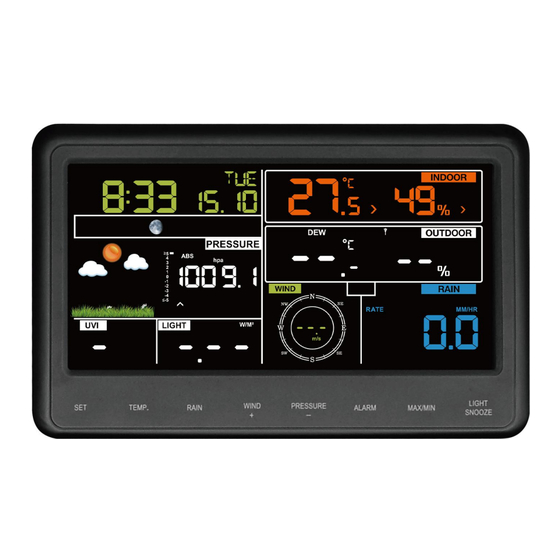
5.2 Screen Display Figure 24 Time Moon phase ABS/REL pressure Weather forecast Rate of Change of Pressure Tendency indicator of pressure Graph UV index Solar Radiation (Light) High alarm of gust speed Wind speed/Gust/Direction 11 High alarm of wind speed MAX/MIN daily 13 Rain Rate/Event/Daily/ High alarm of rain rate &... -
Page 24: Date & Time
21 Tendency indicator of Indoor humidity indoor humidity 23 High/Low alarm of indoor Low battery power/no battery humidity indicator for WS2910 25 RF signal bar for WS69 Tendency indicator of indoor temperature 27 High/Low alarm of indoor Indoor temperature temperature 29 Outdoor temperature &... - Page 25 Please allow at least one month for the weather station to learn the barometric pressure and then predict the upcoming day's weather based on pressure changes. When the outdoor temperature is below 0°C (32°F) and the weather forecast is Rainy or Stormy, the LCD will display the Snowy. Sunny Partly Sunny Cloudy...
-
Page 26: Tendency Indicators
5.2.3 Tendency Indicators Tendency arrows allow you to quickly determine of temperature or pressure are rising and falling in a three hour update period, updated every 30 minutes. Eg. : At 3:00 - compare to 12:00 data; at 3:30 -compare to 12:30 ….. etc Figure 26 Tendency Condition... -
Page 27: Wireless Signal Strength Indicator
Received the signal once Figure 27 5.2.6 Indoor Temperature, Humidity, and Pressure WS2910 has a built-in temperature & humidity sensor, and a barometric pressure sensor, measuring indoor conditions every 60 seconds. If the temperature is lower/higher than the range, it will display --.-. -
Page 28: Outdoor Temp & Humidity, Chill, Dew Point And Heat
5.2.7 Outdoor Temp & Humidity, Chill, Dew point and Heat Outdoor temperature and humidity are displayed, and wind chill, dew point, and heat index (heat index is also known as feels like or apparent temperature) are calculated here. Press the button to switch. -
Page 29: Uvi & Light
Note 2: The external sensor will send the wind speed, wind direction and rainfall every 16s. 5.2.11 Moon Phase The WS2910 will be set to the Southern or Northern Hemisphere by default depending on the RF frequency: 915/868MHz: Northern Hemisphere. 433MHz: Southern Hemisphere... -
Page 30: Rate Of Change Of Pressure Graph
Northern Hemisphere: Waxing First Waxing Full Waning Third Waning Moon Crescent Quarter Gibbous Moon Gibbous Quarter Crescent Sorthern Hemisphere: Waxing First Waxing Full Waning Third Waning Moon Crescent Quarter Gibbous Moon Gibbous Quarter Crescent Table 5 5.2.12 Rate of Change of Pressure Graph The rate of change of pressure graphic is shown to the left of the barometric pressure and signifies the difference... - Page 31 1. Press to switch between Rain Rate, Rain Event, RAIN Rain Daily, Weekly, Monthly, Yearly and Total. 2. Hold the button for 2s to reset current display rain. 1. Press to switch between Wind Speed, Wind Gust WIND + and Wind Direction. 2.
-
Page 32: Modes
5.4 Modes 5.4.1 Normal Mode button: Press to display MAC address: E8:DB:84:E4:98:9F Figure 34 button: RAIN Press the button to view rain rate, event, daily, weekly, monthly, RAIN yearly and total. Hold the button 2s to reset current display rain. RAIN Note: Reset daily rain, will auto reset rate and event rain. -
Page 33: Setting Mode
Month rainfall reset time is MON Yearly rainfall reset time is MAY. That the daily rainfall will be reset to 0 at 8:00 every day, the weekly rainfall will be reset to 0 at 8:00 very Monday, the monthly rainfall will be reset to 0 at 8:00 on 1st each month, the yearly rainfall will be reset to 0 at 8:00 on May 1st every year. -
Page 34: Alarm Mode
5.4.3 Alarm Mode Display of alarm value: Press button to display high/low alarm: ALARM Figure 35 Note: - Press button to select display rain rate or rain daily alarm data. RAIN - Press button to select display wind or gust alarm data. WIND + Alarm mode setting: - Hold... -
Page 35: Max/Min Mode
Alarm Setting Order: (1) Time alarm setting (2) Indoor high temperature setting (3) Indoor low temperature setting (4) Indoor high humidity setting (5) Indoor low humidity setting (6) Outdoor high temperature setting (7) Outdoor low temperature setting (8) Outdoor high humidity setting (9) Outdoor low humidity setting (10) High wind setting (11) High gust setting... -
Page 36: Calibration Mode
Figure 36 5.4.5 Calibration Mode Note: The calibrated value can only be adjusted on the console. The remote sensor(s) always displays the un-calibrated or measured value. Hold buttons together for 5 seconds to enter TEMP MAX/MIN calibration mode. The CAL icon will be displayed. - Press the to adjust values. - Page 37 Yearly rainfall calibration (range 0~9999mm) Total rainfall calibration (range 0~9999mm) Light factor adjust, default 100% (range 30% to 250%) UVI factor adjust, default 100% (range 30% to 250%) Figure 37 5.4.5.2 Calibration Discussion The purpose of calibration is to fine-tune or correct any sensor error associated with the device's margin of error.
-
Page 38: Calibration Method
Parameter Type of Default Typical Calibration Calibration Source Temperature Offset Current Value Red Spirit or Mercury Thermometer (1) Humidity Offset Current Value Sling Psychrometer (2) Offset Current Value Calibrated laboratory grade Barometer barometer Offset Current Value Local airport (3) Barometer Wind Offset Current Value... - Page 39 thermometer, and allow the sensor to stabilize for 48 hours. Compare this temperature to the fluid thermometer and adjust the console to match the fluid thermometer. (2) Humidity Calibration Potential Errors: Humidity is a difficult parameter to measure electronically and drifts over time due to contamination.
- Page 40 greater than 29.92inHg (1013mb) are considered high pressure and relative pressure measurements less than 29.92inHg are considered low pressure. Find an official reporting station (using sites like Weather.gov, Weather.com or Wunderground.com), and set your weather station to match the official reporting station. (4) Wind Direction Calibration When to Calibrate: This is only needed if the weather station sensor array was installed...
-
Page 41: Backlight
(5) Wind Speed Calibration Potential Errors: Wind speed measurements are highly sensitive to installation constraints. The general rule is that the distance from the tallest obstruction should be 4 times the obstruction's height. For example, if your house is 20ft(6.10m) tall and you mount the sensor on a 5ft or 1.52m pole: Distance = 4 x (20 –5)ft = 60ft or =4 x (6.10-1.52)=18.32m. -
Page 42: When Only Batteries Powered
LIGHT SNOOZE backlight at High brightness. 5.6 Historical Data Export and Clear 5.6.1 Export History Data WS2910 doesn't support a memory card to store data, when the Wi-Fi Section 4.3) is completed, you can log in to configuration (refer to Ecowitt.net to export the data in xlsx file format. -
Page 43: Clear History Data
Figure 39 5.7 Wi-Fi Firmware Upgrade 5.7.1 Via Ecowitt App Open Ecowitt App → My Devices →"…" (Open the Edit Gateway page) → tap the firmware version number to upgrade if there is a new version available. 5.7.2 Via WebUI 192.168.4.1 Or choose "Automatically upgrade firmware"... -
Page 44: Optional Sensors
The following sensors can be purchased separately. For more information, please visit our website: http://www.ecowitt.com. Make sure to select the model of the units with the same RF frequency as your gateway or display... -
Page 45: Sensor Data Can Be Displayed On The Ws2910
Note: Max QTY of the following table means the maximum number of different sensors that can be connected to the WS2910. 6.1 Sensor Data Can be Displayed on the WS2910 Sensor Model Max QTY Picture Functions Outdoor temperature & WS69... -
Page 46: Specifications
7. Specifications Model WS2910 Name Weather Station Display Console Dimensions 188 x 127.2 x 21mm Screen Size 156.7 x 76.2mm Material of Plastic Casing Material of Screen HTN-LCD Temperature range -10°C – 60°C (14°F - 140°F) Temperature resolution 0.1°C, or 0.1°F... -
Page 47: Troubleshoot
Indoor Temperature -10 to 60℃ Barometric Pressure 300 to 1100 hPa Outdoor Temperature -40 to 60°C Humidity 1% to 99% Wind Speed 0 to 180km/h Wind Direction 0 to 359 degrees Rainfall 0 to 9999mm 0 to 15 Light 0 to 300Klux Table 11 8. - Page 48 within 4°F (±2°F accuracy), and humidity readings within 10% (±5% accuracy). 4. If they don’t match, use calibration offsets to adjust (see Section 5.4.5.2). Relative pressure does not 1. Relative pressure refers to sea-level agree with official temperature and should match equivalent reporting station official station readings closely.
-
Page 49: Warranty
data, not real time data. No Wi-Fi connection 1. Check for Wi-Fi symbol on the display, it should be always on. 2. Make sure you connect to 2.4G band but not 5G band of your Wi-Fi router. 3. Make sure you configured the correct SSID and password. - Page 50 including interference that may cause undesired operation. Changes or modifications not expressly approved by the party responsible for compliance could void the user's authority to operate the equipment. NOTE: This equipment has been tested and found to comply with the limits for a Class B digital device, pursuant to Part 15 of the FCC Rules.
-
Page 51: Care And Maintenance
1. This device may not cause interference. 2. This device must accept any interference, including interference that may cause undesired operation of the device. French: L’émetteur/récepteur exempt de licence contenu dans le présent appareil est conforme aux CNR d’Innovation, Sciences et Développement économique Canada applicables aux appareils radio exempts de licence. -
Page 52: Contact Us
11. Contact Us 11.1 After-sales Service Order Issues: If you encounter any missing or incorrect shipments of Ecowitt products purchased, please reach out to the respective platform's customer service from the store where you bought the product for assistance. Usage Inquiries: Our product is continuously changing and improving, particularly online services and associated applications.
Need help?
Do you have a question about the WS2910 and is the answer not in the manual?
Questions and answers