Table of Contents
Advertisement
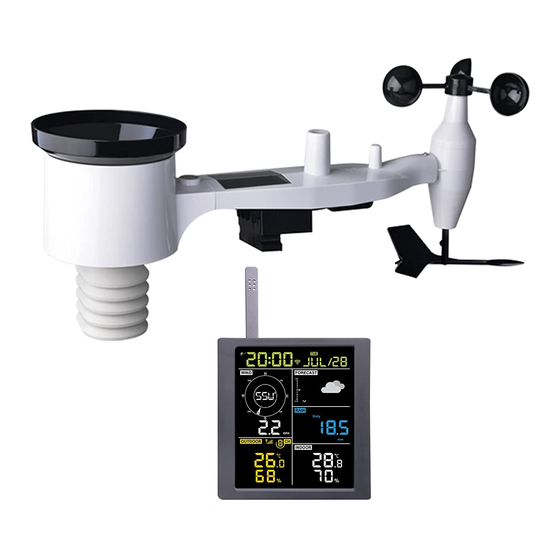
PROFESSIONAL WEATHER STATION
Table of Contents
1. Introduction ......................................................................... 3
2. Warnings and Cautions ......................................................... 3
3. Quick Start Guide .................................................................3
4. Pre-Installation Checkout and Site Survey .............................. 4
4.1 Pre Installation Checkout ................................................... 4
4.2 Site Survey ....................................................................... 4
5. Setting Started ..................................................................... 5
5.1 Contents ...........................................................................5
5.2 Sensor Array Set Up .......................................................... 5
5.2.1 Install U-bolts and mounting pole ................................. 6
5.2.2 Install wind vane ......................................................... 7
5.2.3 Install wind speed ........................................................8
5.2.4 Install Rain Gauge ....................................................... 8
5.2.5 Install Batteries ........................................................... 9
5.2.6 Mount assembled outdoor sensor package ................. 10
5.2.6.1 Before you mount ....................................10
5.2.6.2 Mounting ................................................10
5.2.7 Reset Button and Transmitter LED .............................. 11
5.3 Optional sensors ..............................................................11
5.5 Best Practices for Wireless Communication ....................... 15
5.6 Display console ...............................................................16
6. Display Console Operation ..................................................18
6.1 Screen Display ................................................................18
6.2 Initial Display Console Set Up ..........................................18
6.2.1 Key function ............................................................. 19
6.3 Setting mode ...................................................................20
6.4 Barometric Pressure Display ............................................ 22
6.4.1 Viewing Absolute vs. Relative Pressure ....................... 22
6.4.2 Rate of Change of Pressure Graph ...............................23
Operation Manual
Model: WN1900
1
Advertisement
Table of Contents

Related Manuals for ECOWITT WN1900


Summary of Contents for ECOWITT WN1900
-
Page 1: Table Of Contents
PROFESSIONAL WEATHER STATION Operation Manual Model: WN1900 Table of Contents 1. Introduction ................. 3 2. Warnings and Cautions ............3 3. Quick Start Guide ..............3 4. Pre-Installation Checkout and Site Survey ......4 4.1 Pre Installation Checkout ........... 4 4.2 Site Survey ............... 4 5. - Page 2 8.1 Configure Wi-Fi via BLE to connect the Weather Station Console ................36 8.1.1 Download mobile application ........38 8.1.2 Configure Wi-Fi via BLE ........... 38 8.1.2.1 ...............38 8.2 Ecowitt Weather ............39 9. Registering WeatherUnderground.com through the PC or Mac 42 11 Maintenance ..............49...
-
Page 3: Introduction
To download the latest manual and support@ecowitt.com additional help, please contact us at support.eu@ecowitt.net (EU/UK) 2. Warnings and Cautions Warning: Any metal object may attract a lightning strike, including your weather station mounting pole. Never install the weather station in a storm. -
Page 4: Pre-Installation Checkout And Site Survey
with sensor array Set date and time on console 6.4.5 Calibrate the relative pressure to sea-level 6.4.3 conditions (local airport) on console Mount the sensor array 5.2.6 Reset the rain to zero on console 6.4.8 Optional Configure Wi-Fi via BLE Register and upload to Weather Server Table 1: Quick Start Guide 4. -
Page 5: Setting Started
USB to 2.5*0.7mm DC 5V power plug connector cable User manual (this manual) Table 2: Package content If components are missing from the package, or broken, or any problem during operation, please contact customer service support@ecowitt.com or support.eu@ecowitt.net (EU/UK). to resolve the issue. 5.2 Sensor Array Set Up... -
Page 6: Install U-Bolts And Mounting Pole
Figure 1: Sensor assembly components 1 Wind speed cups 6 Antenna 2 Wind vane 7 U-Bolts 3 Thermo- and hygro-meter sensors 8 Battery compartment door 4 Rain collector 9 Reset button 5 Bubble level 10 LED (red) to indicate data transmission Table 3: Sensor assembly detailed items 5.2.1 Install U-bolts and mounting pole... -
Page 7: Install Wind Vane
Figure 2: U-Bolt installation Loosely screw on the nuts on the ends of the U-bolts. You will tighten these later during final mounting. Final assembly is shown in Figure 3. Figure 3: U-Bolts and nuts installed The plate and U-Bolts are not yet needed at this stage but doing this now may help avoid damaging wind vane and wind speed cups later on. -
Page 8: Install Wind Speed
Figure 4: Wind vane installation diagram 5.2.3 Install wind speed Push the wind speed cups into the shaft as shown in figure 5. Tighten the set screw with screw driver. Make sure the wind speed cups can spin freely. Figure 5: Wind speed cup installation diagram 5.2.4 Install Rain Gauge Install the rain gauge funnel. -
Page 9: Install Batteries
Figure 6: Rain gauge installation and maintenance 5.2.5 Install Batteries Insert 2XAA batteries in the battery compartment. The LED indicator on the back of the transmitter will turn on for four seconds and normally flash once every 16 seconds (the sensor transmission update period). Figure 7: Battery installation diagram Note: If no LED light up or is permanently on, make sure the batteries are inserted the correct way or a proper reset has happened. -
Page 10: Mount Assembled Outdoor Sensor Package
batteries backwards. You can permanently damage the outdoor sensor. Note: We recommend 1.5V lithium batteries for cold weather climates, but alkaline batteries are enough for most climates. We do not recommend rechargeable batteries. They have lower voltages, they do not operate well at wide temperature ranges, and do not last as long, resulting in poorer reception. -
Page 11: Reset Button And Transmitter Led
to the light sensor. You must rotate the whole sensor package until this arrow points due West. To achieve proper alignment, it is helpful to use a compass (many cell phones have a compass application). Once rotated in the correct orientation, lightly tighten the bolts a little more (use a wrench) to prevent further rotation. - Page 12 Item Number Description Image Number Channels WH41 4* PM2.5 Wireless Outdoor Particulate Monitor WH43 4* PM2.5 Wireless Indoor Particulate Monitor WH45 1 PM2.5, PM10 and CO Wireless Indoor Particulate Monitor WN51 8 Soil Moisture Sensor WH51 8 Soil Moisture Sensor WH57 1 Lightning Detector...
- Page 13 WH55 4 Leak Detector WS80 1 Ultrasonic Anemometers with Temp & Humidity sensor WH68 1 4-in-1 sensor Indoor temperature, indoor humidity, wind direction and wind speed WH40 1 Rain sensor WN34 8* WN34S stainless-steel probe therm ometer for soil WN34L wire probe thermometer for water WN35 8 Leaf wetness sensor...
-
Page 14: Indoor/Outdoor Thermo-Hygrometer, 8 Channel (Optional)
5.4 Indoor/Outdoor Thermo-Hygrometer, 8 Channel (optional) This device supports up to 8 additional thermo-hygrometer sensors (WH31), the data will scroll display on the console and sends the data to Ecowitt.net (requires to set the console uploading to ecowitt.net first). Note: Do not use rechargeable batteries. We recommend fresh alkaline batteries for outdoor temperature ranges between -4 °F and 140 °F and fresh... -
Page 15: Best Practices For Wireless Communication
Figure 11: Dip Switch diagram 7. Insert two AA batteries. 8. Verify the correct channel number (CH) and temperature units of measure (°F / °C) are on the display, as shown in Figure 12. Figure 12: sensor LCD display 1.Temperature units (°C/°F ) 3. -
Page 16: Display Console
experience intermittent communication between sensor and console, try turning off these other devices for troubleshooting purposes. You may need to relocate the transmitters or receivers to avoid the interference and establish reliable communication. The frequencies used by the sensors are one of (depending on your location): 433, 868, or 915 MHz (915 MHz for United States). - Page 17 Reference Figure 14. (1) Unfold the desk stand and place the console 5 to 10 feet away from the outdoor sensor. (2) Remove the battery door on the back of the console and insert 2 x AA good quality Alkaline or Lithium batteries per Figure 14. (3) Wait several minutes for the remote sensors to synchronize with the display console.
-
Page 18: Display Console Operation
6. Display Console Operation 6.1 Screen Display Figure 15: Display Console Screen Layout 1.Wind direction 9. Rainfall 2. Wind speed 10. Barometric Pressure graphic 3. RF signal icon 11. Weather forecast 4. 8 Channel Indoor/Outdoor Thermo-Hygrometer recycle icon 12. Date (optional) 5. -
Page 19: Key Function
The unit will turn on all segments of the LCD for 3 seconds after power reset, then the unit will start to register the outdoor channel for 3 minutes. Figure 16 6.2.1 Key function The console has five keys for easy operation Figure 17 Description MODE... -
Page 20: Setting Mode
WIND - Press to switch between average wind speed and, wind gust. Press and hold for two seconds to switch the wind direction to display in degrees or in letters. RAIN/PRE Press and hold for two seconds switch between Rain and ... - Page 21 [MODE] + Enter Set Press [TEMP +] or [WIND -] 2 seconds Mode, to switch OFF and ON. Beep On or Off This will prevent the beep from sounding when pressing any button. [MODE] Clear Press [TEMP +] or [WIND -] Max/Min to switch OFF and ON.
-
Page 22: Barometric Pressure Display
[MODE] Relative Press [TEMP +] or [WIND -] Pressure to adjust relative pressure up Calibration or down Reference Section 6.4.3 for details on calibration of relative pressure. [MODE] Temperatu Press [TEMP +] or [WIND -] re Units of to change temperature units Measure of measure between °F and °C. -
Page 23: Rate Of Change Of Pressure Graph
Figure 18 6.4.3 Relative Pressure Calibration Discussion The calibration was set on ecowitt app. To compare pressure conditions from one location to another, meteorologists correct pressure to sea-level conditions. Because the air pressure decreases as you rise in altitude, the sea-level corrected pressure (the pressure your location would be at if located at sea-level) is generally higher than your measured pressure. -
Page 24: Rain Display
6.5 Rain Display 6.5.1 Rain Increments of Measure Press and hold [RAIN/PRE] for two seconds switch between Rain and Pressure. While in Rain mode press the [RAIN/PRE] to switch between Rain Rate (in/hr), Rain Event, Rain Hourly, Daily Rain, Weekly Rain, Monthly Rain and Yearly Rain. -
Page 25: Temperature Display
6.7 Temperature Display If temperature is lower than minimum range, the temperature field will display dashes (--.-). If temperature is higher than maximum range, the temperature field will display dashes (--.-). 6.7.1 Wind Chill, Dew Point and Heat Index Display Press the [TEMP] button to switch between Outdoor Temperature, Wind Chill, Dew Point, Heat Index. -
Page 26: Setting High And Low Alarms
Figure 19 6.8.2 Setting High and Low Alarms While the High Alarm is displayed (reference Section 6.8.1), press and hold the MODE button for 2 seconds to enter the High Alarm Set Mode. While the Low Alarm is displayed (reference Section 6.8.1), press and hold the MODE button for 2 seconds to enter the Low Alarm Set Mode. - Page 27 Command Mode Settings [MODE] + Enter High Alarm Press [TEMP +] or [WIND -] to adjust 2 seconds Set Mode, Alarm alarm hour up or down. Hour Press [RAIN/PRE] to turn the time alarm on or off. When the alarm is on, the alarm time icon will appear.
- Page 28 [MODE] Alarm High Outdoor Press[TEMP +] or [WIND -] to adjust Temperature alarm value up or down. Press [RAIN/PRE] to turn the alarm on. The alarm icon will appear. Press [RAIN/PRE] to turn the alarm off. The alarm icon will disappear. [MODE] Alarm High Outdoor Press [TEMP +] or [WIND -] to adjust...
- Page 29 [MODE] Alarm Low Indoor Press [TEMP +] or [WIND - ]to adjust Temperature alarm value up or down. Press [RAIN/PRE] to turn the alarm on. The alarm icon will appear. Press [RAIN/PRE] to turn the alarm off. The alarm icon will disappear. [MODE] Alarm Low Indoor Press [TEMP +] or [WIND -] to adjust...
-
Page 30: Max/Min Mode
6.9 Max/Min Mode 6.9.1 Viewing Max/Min Values To view the max value, press the MODE button, and the max values will be displayed, as shown in Figure 20 (a). To clear the max values, press and hold the MODE button while the max values are displayed. To view the min value, press the MODE button again, and the min values will be displayed, as shown in Figure 20 (b). -
Page 31: Display Hourly Rain, Rain Rate
Press LIGHT button for 2s, will wake up Wi-Fi chip from power saving state, the date display will turn to show “WAK” , saying that at battery power supply state, the Wi-Fi existed power saving mode, as during Wi-Fi power saving mode, the system is not responding to ecowitt app commands quickly. -
Page 32: With Usb Cable (Included)
6.11.1 With USB cable (included) The backlight can only be continuously on when the console display is powered on with the USB cable. Press the LIGHT button to adjust the brightness between High, Middle, Low and Off. 6.11.2 Without USB Power supplied Press any button briefly to turn on the backlight temporarily for 15 seconds. -
Page 33: Weather Forecasting
6.14 Weather Forecasting The five weather icons are Sunny, Partly Cloudy, Cloudy, Rainy, Stormy and Snowy. The forecast icon is based on the rate of change of barometric pressure. Please allow at least one month for the weather station to learn the barometric pressure over time. -
Page 34: Specification
The reason the current conditions do not match the forecast icon is because the forecast is a prediction 24-48 hours in advance. In most locations, this prediction is only 70% accurate and it is a good idea to consult the National Weather Service for more accurate weather forecasts. -
Page 35: Live Internet Publishing
The supported services are shown in the table below: Hosting Website Description Service Ecowitt https://www.ecowitt. Ecowitt is a new weather server that Weather can host a bunch of sensors that other services don’t support. Weather WeatherUndeground. Weather Underground is a free Underground... -
Page 36: Configure Wi-Fi Via Ble To Connect The Weather Station Console
Supports uploading to your Website customized website, if the website has the same protocol with Wunderground or Ecowitt Table 13: Supported weather services 8.1 Configure Wi-Fi via BLE to connect the Weather Station Console To send weather data to these services you must configure console to be connected to your Wi-Fi router for internet access. - Page 37 Or it is necessary even to switch this option off:...
-
Page 38: Download Mobile Application
The following display will be on at the Date section on LCD: Please make sure ecowitt app installed on your phone has its location and WiFi access allowed. Otherwise the APP will lead to error result. -
Page 39: Ecowitt Weather
For example, the MAC address as shown in Figure 30 is 88:4A:18:13:89:77 8.2 Ecowitt Weather It’s recommended to use the Ecowitt Weather server to monitor and record your sensors’ data. Configure as follows: On the ecowitt.net uploading page, enable the ON button (displayed ... - Page 40 If you could not register on the ecowitt app, please go to the website to register and add the device. Viewing data on ecowitt.net You can observe your sensor’s data by using the ecowitt.net web site.
- Page 41 Graph display List display Weather Map...
-
Page 42: Registering Weatherunderground.com Through The Pc Or Mac
Email Alerts 9. Registering WeatherUnderground.com through the PC or Mac If you have not already done setup for wunderground.com during the Wi-Fi setup, you can do so later. Perform the following steps:... - Page 43 Wunderground.com and select the Join link at the top of the Visit page and sign up. Click My Profile and select My Devices to register your station Select Add New Device. Find Personal Weather Station. Select ‘other’ and click ‘Next’.
- Page 44 Select ‘Address’ or ‘Manual’ option, and find your local position. Press ‘Next’. This time you will be asked details about your weather station. Go ahead and fill out the form.
- Page 45 After completing the weather station, you will see station ID and key/password. Note: Your station ID will have the form: KSSCCCC###, where K is for USA station (I for international), SS is your state, CCCC is your city and ### is the station number in that city.
- Page 46 Viewing your Data on Wunderground.com You can also observe your weather station’s data by using the wunderground.com web site. You will use a URL like this one, where your station ID replaces the text “STATIONID”: http://www.wunderground.com/personal-weather-station/dashboard?ID=STA TIONID It will show a page such as this, where you can look at today’s data and historical data as well: There are also some very useful mobile apps.
- Page 47 WU Storm: iPad and iPhone application for viewing radar images, animated wind, cloud coverage and detailed forecast, and PWS station data https://itunes.apple.com/us/app/wu-storm/id955957721 Weather Underground: Forecast: iOS and Android application for forecasts...
- Page 48 https://itunes.apple.com/us/app/weather-underground-forecast/id486154808 https://play.google.com/store/apps/details?id=com.wunderground.android.wea ther&hl=en PWS Weather Station Monitor: View weather conditions in your neighborhood, or even right in your own backyard. Connects to wunderground.com https://itunes.apple.com/us/app/pws-weather-station-monitor/id713705929...
-
Page 49: Maintenance
11 Maintenance The following steps should be taken for proper maintenance of your station 1. Clean the rain gauge once every 3 months. Rotate the funnel counter-clockwise and lift to expose the rain gauge mechanism, and clean with a damp cloth. Remove any dirt, debris and insects. If bug infestation is an issue, spray the array lightly with insecticide. - Page 50 When replacing the batteries, apply a corrosion preventing compound on the battery terminals, available at Amazon and most hardware stores. In snowy environments, spray the top of the weather station with anti-icing silicon spray to prevent snow build up. 12. Troubleshooting Guide Problem Solution Outdoor sensor array...
- Page 51 Problem Solution Temperature sensor Make certain that the sensor array is not too close to heat reads too high in the generating sources or strictures, such as buildings, day time. pavement, walls or air conditioning units. Use the calibration feature to offset installation issues related to radiant heat sources.
- Page 52 Problem Solution 8. Check your router firewall settings. The console sends data via Port 80. No Wi-Fi connection 1. Check for Wi-Fi symbol on the display. If wireless connectivity is successful the Wi-Fi icon will be displayed in the time field. 3.
Need help?
Do you have a question about the WN1900 and is the answer not in the manual?
Questions and answers