Table of Contents

Subscribe to Our Youtube Channel
Related Manuals for ECOWITT WN90LP


Summary of Contents for ECOWITT WN90LP
- Page 1 WN90LP Weather Station with RS485 Interface and Modbus Protocol Ultrasonic Anemometer with Piezoelectric Rain Gauge, Light & UV, Thermo-hygro-barometer Sensors with RS485 Output Manual Model:WN90PL https://s.ecowitt.com/TM6RWH...
-
Page 2: Table Of Contents
ontens Table of C 1. Feature................1 2. Overview..............2 3. Setup Guide..............5 3.1 Install batteries in sensor package......5 3.2 Mount ultrasonic anemometer with piezoelectric assembly............6 3.2.1 Before you mount........6 3.2.2 Mounting..........7 3.2.3 Reset Button and Transmitter LED..9 4. -
Page 3: Feature
1. Feature Piezoelectric rain gauge; Ultrasonic anemometer(start wind speed 0.3m/s); Barometric; Temperature; Humidity; Solar light intensity and UV index; Waterproof IPX5; Note: There’s a built-in thermostat inside the anemometer sensor to control the power supply for the heat plate, which will automatically turn on below 0℃... -
Page 4: Overview
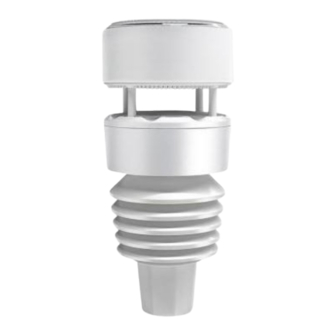
2. Overview Figure 1: Sensor package assembly components... - Page 5 1. Ultrasonic wind sensor 7. NORTH alignment indicator 2. Temperature & humidity 8. Battery sensor compartment 3. Fixed Bolt (Mounting 9. RS485 cable on a pole with 1 inch connector diameter) 4. Micro USB port (only 10. Reset button for firmware update, Factory use only) 5.
- Page 6 Cable pin definition Extension cable pin definition...
-
Page 7: Setup Guide
3. Setup Guide 3.1 Install batteries in sensor package Open the battery compartment with a screwdriver and insert 2 AA batteries(not included) in the battery compartment, and press “Reset” button, the LED indicator on the back of the sensor package (item 6) will turn on for 3 seconds and then flash once every 8.8 seconds indicating sensor data transmission. -
Page 8: Mount Ultrasonic Anemometer With Piezoelectric Assembly
Note: Please make sure the battery is inserted correctly for its polarity as the system needs its initial power from this backup battery to start up the system before solar panel charges up the accumulator supply system power afterwards. when in high altitude area,during wintertime, sunshine time... -
Page 9: Mounting
3.2.2 Mounting You can attach a pole(not included) to a permanent structure and then attach the sensor package to it. The install hole will accommodate a pole diameter of 1.0 inch(pole not included). Figure 3: Sensor package mounting diagram6-1... - Page 10 Make sure the mounting pole is vertical, or very close to it. Use a level as needed. Figure 4 Facing North diagram Now you will need to align the whole package in the proper direction by rotating it on top of the mounting pipe as needed.
-
Page 11: Reset Button And Transmitter Led
package (item 8). You must rotate the whole sensor package until this arrow points due north. To achieve proper alignment, it is helpful to use a compass (many cell phones have a compass application). Note: In Southern hemisphere, it is not necessary to change the orientation to SOUTH as its solar panel is a rounded type and it is orientation free for its charging capability. -
Page 12: Specification
The LED should then resume as normal, flashing approximately once every 8.8 seconds. 4. Specification Model WN90LP Ultrasonic Anemometer with Piezoelectric Rain Gauge, Light & Name UV, Thermo-hygrometer Sensors RS485 Dimensions 93*93*208mm Weight 498(g) Material of Plastic ASA+PC、PC... - Page 13 Barometric Pressure 300 to 1100 hPa (8.85 to 32.5 inHg) Metering range Barometric Pressure ±5hPa Metering accuracy Barometric Pressure 0.1 hPa (0.01 inHg) Metering resolution Rainfall Metering 0mm to 9999mm range Rainfall Metering <5mm/h, ±20%; 5mm/h to 50mm/h, accuracy ±10%; >50mm/h, ±20% Rainfall Metering 0.1mm resolution...
- Page 14 Wind direction 1° Metering resolution Light Metering 0Klux to 200Klux range Light Metering ±25% accuracy Light Metering 0.1Klux resolution UV Metering range 1 to 15 UV Metering ±2 accuracy UV Metering resolution Data reporting 8.8 seconds Interval RF Connection 920/915/868/433MHz (depending Frequency on local regulations) RF Wireless Range...
-
Page 15: After-Sales Service
5. After-sales Service Order Issues: If you encounter any missing or incorrect shipments of Ecowitt products purchased, please reach out to the respective platform's customer service from the store you bought product for assistance. Usage Inquiries: For any issues related to product usage, feel free to contact our customer support team at support@ecowitt.com. -
Page 16: Stay In Touch
6.Stay in Touch Ask questions, watch setup videos, and provide feedback on our social media outlets. Follow Ecowitt on Discord, YouTube, Facebook and Twitter. Copyright © 2024 ecowitt All Rights Reserved. DC072624...
Need help?
Do you have a question about the WN90LP and is the answer not in the manual?
Questions and answers