
Related Manuals for EverFocus EQN100


Summary of Contents for EverFocus EQN100
- Page 1 EQN100 Mini Cube IP Camera Auto White Balance, 3DNR User’s Manual Copyright © EverFocus Electronics Corp. Release Date: November, 2016...
- Page 2 Copyright All rights reserved. No part of the contents of this manual may be reproduced or transmitted in any form or by any means without written permission of the EverFocus Electronics Corporation. EverFocus 12F-1, No.79, Sec. 1, Shin-Tai Wu Road,...
-
Page 3: About This Document
- Consult the dealer or an experienced radio/TV technician for help. Warning: Changes or modifications made to this equipment, not expressly approved by EverFocus or parties authorized by EverFocus could void the user's authority to operate the equipment. This device complies with part 15 of the FCC Rules. Operation is subject to the following two... - Page 4 Precautions 1. Do not install the camera near electric or magnetic fields. Install the camera away from TV/radio transmitters, magnets, electric motors, transformers and audio speakers since the electromagnetic fields generated from these devices may distort the video image or otherwise interfere with camera operation. 2.
-
Page 5: Table Of Contents
Table of Contents Introduction ......................1 Features ........................1 Physical Description ....................2 Dimensions ........................2 Installation ......................3 Packing List ........................3 Optional Accessory ...................... 3 Basic Installation......................3 Accessing the Camera ................... 4 Checking the Dynamic IP Address ................4 Settings for Microsoft Internet Explorer .............. -
Page 6: Introduction
EQN100 1. Introduction The EQN100 mini cube IP camera comes with 1.3MP image quality, providing up to 30fps at 1280 x 1024 viewing resolution. The camera supports dual streams from H.264 and MJPEG compression formats. High performance 3DNR noise reduction and auto wide balance functions are also supported. -
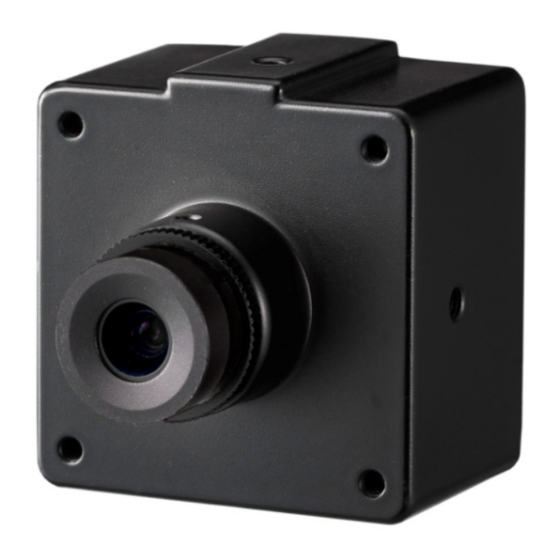
Page 7: Physical Description
EQN100 3. Physical Description Front View Rear View Cable No. Item Name Descriptions Lens Fix focal lens 6mm (optional:2.8mm, 3.6mm, 8mm) Use a paper click to press and hold the Reset Button for 2 Reset Button seconds and then release the button for 2 seconds. Repeat doing this 3 times to reset all configurations to factory default setting. -
Page 8: Installation
Note: Equipment configurations and supplied accessories vary by country. Please consult your local EverFocus office or agents for more information. Please also keep the shipping carton for possible future use. 2. Contact the shipper if any items appear to have been damaged in the shipping process. -
Page 9: Accessing The Camera
Checking the Dynamic IP Address You can look up the IP address and access the Web interface of the camera using the IP Utility software, which can be downloaded from EverFocus’ Website (Download Center) ). Please connect the IP camera http://www.everfocus.com.tw/HQ/Support/DownloadCenter_p1.aspx... - Page 10 EQN100 3. To access the Live View window, double click the IP address of the device, the login window appears. 4. Download and install the ActiveX file by clicking File on the login window. Click Run and follow the instructions to install the program. Click Finish to complete the process.
-
Page 11: Settings For Microsoft Internet Explorer
EQN100 Settings for Microsoft Internet Explorer To enable Remote Live View, Firmware Upgrade and ActiveX Prompt on Internet Explorer, some settings have to be complete. Please follow the steps below: 1. On the computer, click Start > Control Panel > System and Security > Action Center (click Change User Account Control Settings), the User Account Control Settings window appears. - Page 12 EQN100 Download unsigned ActiveX controls field, select Prompt. In the Include local directory path when uploading files to a server field, select Enable. Click OK. In the Internet Options window, click the Advanced tab and then disable Enable memory protection to...
-
Page 13: Connecting The Camera To The Network
EQN100 Connecting the Camera to the Network There are three methods to connect the IP camera to the network: Router or LAN Connection, Direct High-Speed Connection and One-to-One Connection. Router or LAN connection This is the most common connection in which the IP camera is connected to a router and allows multiple users on and off site to see the IP camera on a LAN/WAN (Internet). - Page 14 EQN100 One-to-One Connection (Directly from PC to IP Camera) You can connect directly without using a switch, router or modem. However, only the PC connected to the camera will be able to view the IP camera. You will also have to manually assign a compatible IP address to both the computer and the IP camera.
-
Page 15: Live View Window
EQN100 Live View Window After logging in, the Live View window appears. On the Live view window, users can do operations like taking Snapshot, Recording, Alarm Search, Playback and Full-screen Viewing. [Liveview] Click to enter the Live View window. [Replay] Click to enter the Playback page, please refer to 6. Playback. -
Page 16: Playback
EQN100 6. Playback After recording the camera live view to the computer, you can use this internal player to play back the recordings. To record camera live view, click the Record button on the Live View Window (see 5.4 Live View Window). -
Page 17: System Settings
EQN100 7. System Settings On the Live View window, click Config to enter the System Settings page. Local Config [Preview mode]: Users can choose Real time priority or Fluency priority mode according to their needs. [Reset Mosaic]: Select this option to make image quality better, but CPU usage rate will be higher at the same time. -
Page 18: Video Settings
[Connecting No.]: Check the box to enable displaying the number of connections to this camera. The number will be displayed at the end of title. For example, EverFocus EQN100(3). The “(3)” indicates there are 3 connections to this camera. After you set these parameters, please click... -
Page 19: Video Coding
EQN100 7.2.2 Video Coding You can configure Main / Sub stream settings on this page. [Coding Level]: Baseline and Main profile available, only for H.264 compression format. Baseline suits for low delay, and the situation have requirement on real time. Main profile suits for better quality. - Page 20 EQN100 [Frame rate]: Set encoding frame rate per second. Under poor network condition, frame rate can be reduced to control encoding bitrate to make motion images flow more smoothly. [GOP]: Adjustable between 1~200(Preferred Stream), 1~200(Alternate Stream). Smaller I frame interval means higher bitrate and better image quality. It is recommended to set the I frame interval as above 25.
-
Page 21: Video Mask
EQN100 7.2.3 Video Mask The Video Mask can block out sensitive areas from view, covering the areas with black boxes in both live view and recorded clips. This feature is useful when users’ don’t want the sensitive information visible. Up to four Video Masks can be configured. -
Page 22: Video Parameter
EQN100 7.2.4 Video Parameter You can adjust video parameter on this page. Click Image, Basic and Advanced to configure the settings. [Image]: You can adjust the following image color settings. Slide the bar to adjust the Brightness, Contrast, Hue, Saturation, Acutance, Gamma of video. - Page 23 EQN100 WDR: Set WDR, enhance the image quality in such area: strong light source (sunlight, lamps or reflectors, etc.), shadow of high-brightness, backlight. 3D-DNR: Set 3D NR to get a clearer picture in low light environment, effectively eliminate video noise and color noise in low light conditions.
-
Page 24: Network Settings
EQN100 Network Settings 7.3.1 Basic Setting [Data Port]: Default value is 5000 (users are recommended not to change it). [Web Port]: Default value is 80 (users are recommended not to change it). [ONVIF Port]: Default value is 2000 (users are recommended not to change it). -
Page 25: Lan Setting
EQN100 7.3.2 LAN Setting [DHCP Enable]: If DHCP function of the router is enabled, IP camera will automatically fetch IP address from the router. [IP]: Set the camera’s IP address. [Subnet Mask]: Default value is 255.255.255.0 (users are recommended not to change it). -
Page 26: Pppoe Setting
EQN100 7.3.3 PPPoE Setting [Enable]: Enable or disable PPPOE dial-up function. [IP]: After successful setting of device dial-up, it will display the public IP Address. [Username]: ADSL dial-up account, obtain from the IP service provider. [Password]: ADSL dial-up password, obtain from the IP service provider. -
Page 27: Upnp Setting
EQN100 7.3.4 UPNP Setting Auto-mapping of port, when IP camera is connected to a router with UPNP function enabled, the router will automatically map the port in UPNP settings to public network, manual port mapping by users is not necessary. -
Page 28: Email Setting
EQN100 7.3.5 Email Setting To set the mailbox addresses and parameters of alarm mails and public network IP mails. [SMTP server]: Enter the IP address or the host name of the SMTP server used to send e-mails. [From]: Input the sender’s e-mail address, so that the receiver can recognize the sender when an event message is received. -
Page 29: Ftp Setting
EQN100 7.3.6 FTP Setting FTP server sends the record files and snapped images generated after alarm is triggered in FTP mode to specified FTP server, supports 2 FTP servers, when the preferred one goes wrong, system will switch to the alternate one. -
Page 30: Ddns Setting
After clicking , the following message pops-up. Click Login to re-login the IP camera. Note that EverFocus provides free DDNS host name. If you want to check whether the host name you desired is available, go to www.everfocusddns.com for a quick check. -
Page 31: Vpn Setting
EQN100 7.3.8 VPN Setting [Enable]: Enable or disable VPN function. [Server URL]: IP address or domain of VPN server. [User Name]: User registered in VPN server. [Password]: User password registered in VPN server. [IP]: Display IP after VPN dial-up success. -
Page 32: Rtsp Setting
EQN100 7.3.9 RTSP Setting [Enable RTSP]: Check RTSP switch to enable RTSP function, RTSP function enabled as default. [Enable Authentication]: Check encryption switch, disabled as default, when enable encryption, you need the password when using VLC player connect camera. Open: rtsp://ip/av0_0&user=admin&password=admin;... -
Page 33: Ip Email
EQN100 7.3.10 IP Email [Enable Email]: Check this switch to enable public IP mail notification function. [Update Interval]: Select the interval of public IP mail notifications. After enable this function, when the device detects public IP changed, it will send notification mail to the mail address set in [mail setting]. -
Page 34: Connect Setting
EQN100 7.3.11 Connect Setting [Enable]: Enable or disable active connection of the device to surveillance center. [Server URL]: The address of surveillance center (e.g. 192.168.55.99). [Server Port]: The port of surveillance center (e.g. 6000). After setting all the network parameters, click... -
Page 35: Alarm Settings
EQN100 Alarm Settings 7.4.1 Motion Detection You can set up motion detection function on this page. When a moti on event is detected, the camera will send E-mail, take a snapshot or record live views. You can then set up to send Snapshots or Recordings to the pre-configured E-mail or FTP server. - Page 36 EQN100 After setting all the parameters, click to make the parameters valid. Note: Record file packet time equals duration of alarm add the record time set in [Linkage recording]. To set up a Motion Area: 1. Click the Motion area set button.
-
Page 37: System Setting
EQN100 System Setting 7.5.1 System Info [Device Name]: Enter a device name. [VO Standard]: Select NTSC or PAL from the drop-down list. [Language]: Select a language from the drop-down list. After changing the language, please reopen the IE browser to login the camera again. -
Page 38: System Time
EQN100 7.5.2 System Time On this page, you can configure camera time from one of the three methods: NTP Server, Synchronize with Local Computer or Manually configure. Note: Before start operating the IP camera, please make sure the camera date and time are correct. -
Page 39: User Manage
EQN100 7.5.3 User Manage You can set three users for every camera, one is Administrator, the others are general users. [Select User]: Select a user from the drop-down list. Administrator: Can operate and set all functions and parameters of IP camera . -
Page 40: Upgrade
EQN100 7.5.4 Upgrade Click the Browse button to find a previously prepared firmware upgrade file. Click the Upgrade button to install the new firmware. The upgrading status will be displayed. When the upgrade process is complete, the IP camera will restart autom atically. -
Page 41: Restore
EQN100 7.5.5 Restore Click the Restore factory settings button to restore the camera to the factory default settings. All device parameters (including network parameters, excluding physical address) will be recovered as factory setting values. 7.5.6 Restart You can set up to manually or automatically reboot the camera. -
Page 42: System Log
EQN100 7.5.7 System log You can search operation log and alarm log on this page. The maximum capacity is 512 entries of message, when the number of entries exceeds 512, the camera will delete records of the earliest date automatically. -
Page 43: Alarm Search
EQN100 8. Alarm Search When there is an alarm, the alarm status will be displayed on the Alarm tab Click [Alarm] to enter the alarm log search page for searching the alarm log data. The maximum capacity is 512 entries of message, when the number of entries exceeds 512, system will delete records of the earliest date automatically. -
Page 44: Specifications
EQN100 9. Specifications Camera Megapixel 1.3MP Pickup Device 1/3” progressive CMOS sensor Lens Fix focal lens 6mm (optional: 2.8mm, 3.6mm, 6mm, 8mm) Min. Illumination Color: 0.05 Lux @F1.2 / Black: 0.01 Lux @F1.2 Day/Night Easy Day / Night Shutter Time 1/25 ~ 1/8000sec. -
Page 45: Appendix
EQN100 10. Appendix Appendix 1 Network Interface of IP Camera The default network ports of IP camera are: Web port 5000 Communication port, audio/video data transmission port, talkback data transmission port 5000 Audio/video data transmission port Multi-cast port Multicast original port + channel number... -
Page 46: Everfocus Electronics Corp
Tokyo, 130-0022, Japan FAX: +1 626 844 8838 TEL: +81-3-5625-8188 www.everfocus.com FAX: +81 3 5625 8189 sales@everfocus.com www.everfocus.co.jp info@everfocus.co.jp Ihr EverFocus Produkt wurde entwickelt Your EverFocus product is designed and hergestellt qualitativ manufactured with high quality hochwertigen Materialien materials and components which can be Komponenten, die recycelt und wieder recycled and reused.
Need help?
Do you have a question about the EQN100 and is the answer not in the manual?
Questions and answers