Table of Contents
Advertisement
Quick Links
Advertisement
Table of Contents

Related Manuals for VOCiC AY02


Summary of Contents for VOCiC AY02
- Page 1 TRANSFER LIFT User Manual AY��...
-
Page 2: Table Of Contents
CONTENTS Table of Contents I.Safety & Warning �� Statement of note, caution, and warning II.Specifications �� III.Assembly Instruction �� Unpacking Assembly Disassembly Storage IV.Product Description �� Features Sling �� V.Use Instruction Battery Charger Setting Up the Charger First Use Recharging Operating the Lift Adjusting the Base Width Parking Brakes... -
Page 3: I.safety & Warning
Your Family Rehabilitation Partner I.Safety & Warning Thank you for choosing our product. Before first use, please read this manual thoroughly as it will guide you on how to operate the patient lift and important safety considerations. Inspect all parts for any transport damage before use. Do not use the device if any damage is found. - Page 4 Danger: Risk of electric shock - Follow these precautions when charging: Check for damage to the power cord when charging!Check for damage to the power plug when charging! Check for damage to the control box when charging! Do not charge in a damp environment! Do not charge in high temperatures (above ��°C/���°F)! Warning: When assembling the patient lift, please follow the Assembly Instructions...
-
Page 5: Statement Of Note, Caution, And Warning
Your Family Rehabilitation Partner Before transferring the patient from a fixed object (wheelchair, toilet, or bed), slightly lift the patient off the object and check that all sling hard- ware is securely attached, including the Sling, Sling Hooks, and the con- nection between the sling hooks and boom. -
Page 6: Iii.assembly Instruction
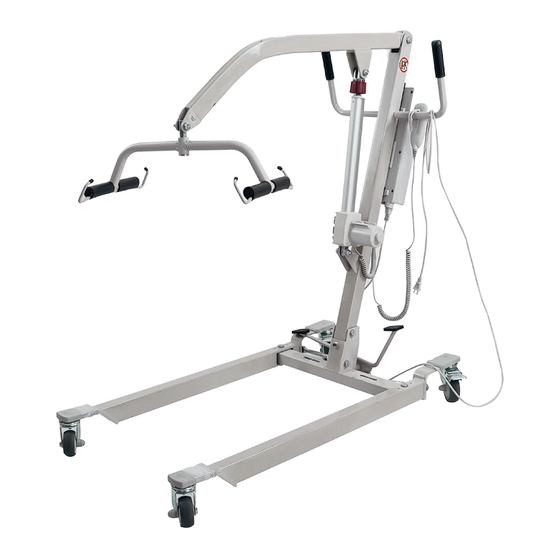
Specifications Base Width Base Width ��.� ��.� Open(inches) Closed(inches) Base Length Base Height(inches) �.� ��.� (inches) Boom Height Weight ��.� - ��.�(��.�) ��� (inches) Capacity(lbs.) Rear Caster Front Caster �.� �.� Size(inches) Size(inches) Push Handle ��.� Item Weight(lbs.) ��.� Height(inches) III.Assembly Instruction Unpacking Open the packaging and carefully remove the patient lift from the box. - Page 7 Your Family Rehabilitation Partner The patient lift package should include the following parts (as illustrated): d.Motor a. Base c. Boom b. Mast e. Sling Hooks f. Control Box g. Hand Controller h. Sling j. Charger k. Tool Kit l. Wrenches ��...
- Page 8 Base: The foundational part of the patient lift, featuring ���-degree rotating front casters, rear casters with brakes for stability, adjustable base legs, and a pedal to control the base legs' angle (Base leg adjustment pedal). Main Support Mast: Connects the base to the boom and supports the entire patient lift, equipped with a push handle.
-
Page 9: Assembly
Your Family Rehabilitation Partner Assembly The installation of this product should be performed by at least two adults. It is recommended that assembly is done cooperatively to ensure safety and the correct setup of the equipment. Caution: Before assembly, the caster brakes must be disengaged! Start by locating the base. - Page 10 �.Using Part Package A (three sets of M��*�� bolts and nuts) and tools, connect and bolts the base to the mast. Ensure the mast's push handle is oriented upwards. Insert the screws and washers, tighten the nuts, and cover with caps. (As shown in the diagram Part Package A �.With Part Package B (one set of M��*��...
- Page 11 Your Family Rehabilitation Partner �.Use Part Package C (two sets of M��*�� bolts and nuts) and tools to attach the lifting motor to both the mast and the boom. Insert the bolts and washers, tighten the nuts, and cover with caps. (As shown in the dia- gram below) Part Package C �.With Part Package D (one set of M��*��...
-
Page 12: Disassembly
�.Install the control box onto the mounting plate on the mast. �.Use the Allen wrench install limit screw. Limit Screw Disassembly To disassemble the patient lift, repeat the assembly steps in reverse order. Caution: You must press the emergency stop button (the red button on the control box)! You must press down on the caster brake plate to disengage the caster brakes! -
Page 13: Iv.product Description
Your Family Rehabilitation Partner IV.Product Description ��... -
Page 14: Features
Features a. The product features a steel construction that is robust and safe, with a powder-coated surface for easy cleaning. b. The base legs are adjustable via a pedal, opening from ��.�� to ��.�� inches, making it suitable for various types of wheelchairs and hospital beds. -
Page 15: Sling
Your Family Rehabilitation Partner Sling The patient lift must be operated with the accompanying sling. Use a sling recommended by a personal doctor, nurse, or medical profes- sional to ensure the comfort and safety of the person being lifted. The patient sling, used in conjunction with the patient lift, supports the patient during lifting and transferring processes. -
Page 16: V.use Instruction
V.Use Instruction The patient lift should only be operated by qualified personnel who have received specific application guidance or training. The patient lift is for indoor use only. Ensure it is used only on flat surfaces. It must only be operated indoors. Use only the provided battery charger; other charging devices must not be used. -
Page 17: Setting Up The Charger
Your Family Rehabilitation Partner This patient transfer device uses rechargeable lead-acid batteries. After a full charge, the patient lift can perform ��-�� lifting cycles with load and up to �� cycles without load. Note: Use only the battery charger supplied and no other charging equipment. It is recommended to regularly charge the internal control box battery to ensure the patient lift remains operational and to extend the battery's lifespan. -
Page 18: Recharging
Recharging WARNING: Risk of injury ‒ Do not operate the patient lift while it is connected to the charger. When the batteries are recharging, the upper LED will display dynamically. After recharging is complete, always first unplug the charger from the wall outlet, then disconnect it from the control box. -
Page 19: Operating The Lift
Your Family Rehabilitation Partner Operating the Lift Please adhere to the technical specifications for operating patient lifts. The patient lifts must be operated exclusively by authorized personnel who have received training in its use and operation. WARNING: Risk of burns ‒ Exercise caution when operating the patient lift in hot or cold environments (such as direct sunlight, extreme cold, saunas, etc.) for prolonged periods. -
Page 20: Parking Brakes
Parking Brakes Secure the two rear casters of the base by gently pressing down the caster brake plates to their end stops using the tip of your foot. To release the brakes, gently push the brake plates back up with the front of your foot until the casters are free to move. -
Page 21: Moving The Patient Lift
Your Family Rehabilitation Partner ➀= To raise the boom ➁= To lower the boom Moving the Patient Lift �.Stand behind the patient hoist and firmly grasp the handles on the left and right sides next to the control box with both hands. �.Ensure that both rear caster brakes are disengaged. -
Page 22: Safety Guidelines
Sling WARNING: Risk of Injury ‒ Only use appropriate slings for the patients. WARNING: Risk of injury ‒ Do not use damaged slings. The patient lift must be operated with the supplied slings. Use a sling that is recommended by the individual's doctor, nurse or medi- cal attendant for the comfort and safety of the individual being lifted. -
Page 23: Vi.emergency
Your Family Rehabilitation Partner Always be aware of the lifting arm to avoid injury. The patient lift must only be used on level surfaces, with all � casters con- tacting the ground evenly. It must not be used in humid environments. Only slings that have been designed and approved for the patients must be used. -
Page 24: Emergency Stop
Emergency stop In emergencies, and during assembly and disassembly, the emergency stop is activated by pressing the red button on the right of the control box. Push on the button and turn in the direction of the arrows. If the button is fully pressed to the back turn back in the opposite direction of the arrows. -
Page 25: Vii.maintenance & Care
Your Family Rehabilitation Partner Usage: Pull the knob downward, then turn the knob, and the boom will lower accordingly. Note: This emergency lowering is factory-set for a patient weight of ���LBS(��KG). Standard calibration: ����N, �� mm/s to lower the patient. 360°... - Page 26 Ensure that the batteries are sufficiently loaded for the intended use and recharge them as required. Check the patient lift (cleanliness, cracks, damage on structural parts, ...) and make it clean. If necessary change the coating. Regular Maintenance Follow these guidelines for transporting and storing the patient lift: Store in a dry place (between +�°C and +��°C).
-
Page 27: Inspection
Your Family Rehabilitation Partner Do not use strong cleaners like solvents, nor hard brushes. Never clean with steam and/or high-pressure cleaners. Inspection We recommend an annual inspection and at least one inspection before resuming use. �.Check the frame and components. �.Check the tightness of all connections. -
Page 28: Viii.troubleshooting
VIII.Troubleshooting Tips on solving Problems Checking steps Solving methods methods Check whether the Rotate emergency switch Free to operate emergency stop switch is button to the right. Equipment does Check whether the Adjust the device to the Free to operate not work battery charging state, press... - Page 29 Your Family Rehabilitation Partner lf you have any questions,please contact us: support@vocic.com 833-879-9376...
Need help?
Do you have a question about the AY02 and is the answer not in the manual?
Questions and answers