Table of Contents
Advertisement
Quick Links
Advertisement
Table of Contents

Related Manuals for Laxco LMC-4000 Series

Summary of Contents for Laxco LMC-4000 Series
- Page 1 LMC-4000 MICROSCOPE SERIES USER MANUAL...
-
Page 2: Table Of Contents
Contents LMC-4000 Series Before Use 1. Components ..........................1 2-1 Components of Complete System ..................1 2-2 Body Components ......................2 2. Assembling ..........................3 2-1 Assembling Scheme ......................3 2-2 Assembling Steps ......................4 3. Operation ........................... 7 3-1 Set Illuminations ......................7 3-2 Place the Specimen Slide .................... - Page 3 Before Use LMC-4000 Series 1. Operation Notice 1. The microscope is a precision instrument, please operate carefully: avoid vibrating or jolting the microscope during operation. 2. Do not operate the microscope under conditions of direct sunlight, high temperature, high humidity, dust, or close to sources of vibration.
- Page 4 LMC-4000 Series 3. Safety Sign Sign Signification The surface gets hot and don’t touch it with bare hand. Read the manual before use. Unsuitable operation could lead to injury or instrument failure. Main switch is ON. Main switch is OFF.
-
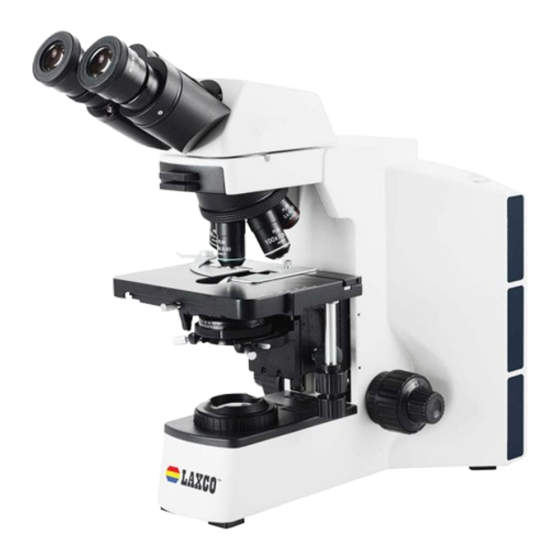
Page 5: Components
1. Components LMC-4000 Series LMC-4000 Series Biological Microscope Components Light Path Condenser Height Selecion Lever Eyepiece Trinocular Head Adjustment Knob Hex Wrench Objective Tension Stage Adjustment Knob Condenser Centering Adjustment Screw Field Diaphragm Adjustment Ring Y-axis Knob X-axis Knob Coarse Focus... -
Page 6: Body Components
LMC-4000 Series Stage Height Diopter LMC-4000 Limit Lever Adjustment Ring Power Switch Nosepiece Fuse Condenser Focus Arm Lamp Coarse Focus Illumination Fine Focus Power Socket Housing Knob Dimmer Knob... -
Page 7: Assembling
LMC-4000 Series 2. Assembly 2-1 Assembly Schematic Assemble the microscope in the order denoted below. ★ Ensure all parts are dust- and dirt-free before assembly. Carefully assemble the microscope to avoid scratching the components and touching the glass surfaces. -
Page 8: Assembling Steps
LMC-4000 Series 2-2 Assembling Steps 2-2-1 Assemble the Halogen Bulb (for halogen models) Hold the bulb ① with clean cloth or tissue and insert the pins ② into the receptacle ③ fully. Make sure the bulb is vertical (See Fig. 3). - Page 9 LMC-4000 Series (4) Swing out the front lens of condenser with the scale forward. Align the pin on the back of the condenser with condenser mount and insert the condenser. (5) Tighten the condenser lock screw③, and raise the condenser to the highest position with the condenser height adjustment knob②.
- Page 10 LMC-4000 Series 2-2-8 Connect the Power Cord (1) Make sure the power switch is in the “O” (OFF). (See Fig. 10) (2) Fully insert the power cord① into the power socket ② of the microscope. (3) Fully insert the wall connector into a wall socket.
-
Page 11: Operation
LMC-4000 Series 3. Operation 3-1 Set Illumination (1) Turn on the microscope. (see Fig. 11) (2) Adjust the light adjustment knob ① to a desirable level (see Fig. 9). Rotate the light adjustment knob① clockwise to raise the brightness. Rotate the light adjustment knob①... -
Page 12: Adjust The Focusing Tension
LMC-4000 Series 3-4 Adjust the Focusing Tension If the coarse focusing knob’s tension is too high; or if the stage moves out of focus, adjust the focus tension① according to the indicator on the knob. (See Fig. 14) 3-5 Adjust the Diopter Focus on a sample looking through only the right Fig. -
Page 13: Center The Condenser
LMC-4000 Series 3-7 Center the Condenser (1) Rotate the condenser knob ① to raise it to the highest position (see Fig. 17). (2) Rotate the condenser swing-in lens② into light path. ★Move the front lens of condenser into light path when the objective is beyond 20X. -
Page 14: Adjust The Field Diaphragm
LMC-4000 Series 3-9 Adjust the Aperture Diaphragm The aperture diaphragm controls the numerical aperture (NA) of the illumination. A matching NA between the illumination and the objective will provide better resolution, contrast, and depth of field. If your sample has low contrast, it is advised to adjust the condenser aperture diaphragm to be 70%-80% of the N.A. -
Page 15: Use The Eye-Cap
LMC-4000 Series 3-11 Eye Cup (1) When wearing glasses, fold the eye cups inward to prevent damage to eyeglasses. (2) When not wearing glasses, fold out the eye cups to prevent stray light. (See Fig. 22) Fig. 22 3-12 Color Filter... -
Page 16: Replace The Fuse
LMC-4000 Series (4) After using, wipe the front lens with a tissue moistened with a small amount of 3:7 mixture of alcohol and ether or with dimethylbenzene. Wipe off the oil on the specimen. ★ Avoid using another objective before removing the oil from the specimen. -
Page 17: Assembling And Operation Of Disc Phase Contrast Condenser
LMC-4000 Series 3-16 Assembly and Operation of Disc Phase Contrast Condenser Assembly of Disc Phase Contrast Condenser refers to 2- 2-4 Assemble the Condenser. For phase contrast observation, rotate the correct phase contrast ring into place① for the objective in the light path. -
Page 18: Assemble And Use The Tv Device
LMC-4000 Series 3-17 Assembling Camera Adapter (1) Loosen the lock screw① on the trinocular head, and remove the dust cap②(See Fig.29). (2) Remove the dust cap from the c-mount adapter③. Insert the c-mount adapter into the trinocular head as shown in the figure and tighten the lock screw①. -
Page 19: Technical Specifications
LMC-4000 Series 4. Technical Specifications 4-1 Key Technical Specifications: LMC-4000 Series Biological Microscope Optical Color corrected infinity optical system System Gemel Binocular head, 30° inclined, 360° rotatable. Gemel Trinocular head, 30° inclined, 360° rotatable, Splitting ratio: Head Binocular Head 100%, Binocular Head/ Trinocular Head 50%/50%. - Page 20 LMC-4000 Series 4-2 Objective Specifications Numerical Operating Parfocal Magnification Conjugate Thickness Aperture Range Distance Mark Type Magnification Distance of Cover (mm) Glass (color ring) (N.A) (mm) (mm) 0.10 11.9 ∞ 0.17 Infinity 0.25 12.1 ∞ 0.17 Yellow plan 0.40 1.56 ∞...
-
Page 21: Troubleshooting
LMC-4000 Series 5. Troubleshooting Problem Cause Solution 1. Optical system Field diaphragm is not large enough. Enlarge the field diaphragm. Condenser is too low. Adjust the condenser. (1) The bulb is bright but it is dark in the Condenser is not centered. - Page 22 Problem Cause Solution superpose with the The eyepiece for the right eye is different Use the same eyepieces. left. from the left one. 2. Mechanical system (1)Cannot focus when The cover glass faces down. Put the cover glass to face up. using high Use a standard cover glass with magnification...
Need help?
Do you have a question about the LMC-4000 Series and is the answer not in the manual?
Questions and answers