
Related Manuals for GYS GYSPOT PTI NEO


Summary of Contents for GYS GYSPOT PTI NEO
- Page 1 GYSPOT PTI NEO 02 - 26 / 77 - 93 220V 27 - 51 / 77 - 93 52 - 76 / 77 - 93 73502 26/08/2024 Find more languages of user manuals www.gys.fr...
-
Page 2: Table Of Contents
SOMMAIRE 1. MONTAGE ................................3 2. AVERTISSEMENTS - RÈGLES DE SÉCURITÉ .....................7 3. INSTALLATION – FONCTIONNEMENT PRODUIT .....................11 3.1 DESCRIPTION DU MATÉRIEL ........................... 11 3.2 DESCRIPTION DE LA PINCE ..........................12 3.3 ACCESSOIRES ET OPTIONS ..........................12 3.4 ALIMENTATION ÉLECTRIQUE ........................... 14 3.5 ALIMENTATION EN AIR COMPRIMÉ... -
Page 3: Manuel D'utilisation
Manuel d’utilisation GYSPOT PTI NEO - 220 V Notice originale 1. MONTAGE RÉF Vis M6 autoformeuse / Self-forming M6 screw / Selbstformende M6-Schraube / Tornillo autoformante M6/ Zelfvor- 43356 mende M6 schroef / Vite M6 autoformante / Самозажимной винт M6 RÉF Vis M10x30 / M10x30 screw / Schraube M10x30 / Tornillo M10x30 / M10x30 schroef / Vite M10x30 / Винт M10x30 42140 Ecrou M10 / M10 nut / Mutter M10 / Tuerca M10 / M10 moer / Dado M10 / гайка M10 41160 Goupilles / Dowel pins / Splinte / Alfileres / Pinnen / Spille / Дюбели 42032 Rondelles M10 / Washers M10 / Unterlegscheiben M10 / Arandelas M10 / Sluitringen M10 / Rondelle M10 / Шайбы 43253... - Page 4 Manuel d’utilisation GYSPOT PTI NEO - 220 V Notice originale RÉF Vis M6 autoformeuse / Self-forming M6 screw / Selbstformende M6-Schraube / Tornillo autoformante M6/ Zelfvor- 43356 mende M6 schroef / Vite M6 autoformante / Самозажимной винт M6 RÉF Vis M6 autoformeuse / Self-forming M6 screw / Selbstformende M6-Schraube / Tornillo autoformante M6/ Zelfvor- 43356 mende M6 schroef / Vite M6 autoformante / Самозажимной винт M6...
- Page 5 Manuel d’utilisation GYSPOT PTI NEO - 220 V Notice originale RÉF Axe de roue Lg 628 / Wheel axle Lg 628 / Radachse Lg 628 / Eje de rueda Lg 628 / Wielas Lg 628 / Asse della 98908ST ruota Lg 628 / Колесная ось Lg 628 Rondelle M10 Øext 40mm ep 4mm / Washers M10 Øext 40mm ep 4mm / Unterlegscheiben M10 Øext 40mm ep...
- Page 6 Manuel d’utilisation GYSPOT PTI NEO - 220 V Notice originale Vis M6 / M6 screw / Schraube M6 / Tornillo M6/ M6 schroef / Pesce M6 / винт M6 41276 Vis M6 autoformeuse / Self-forming M6 screw / Selbstformende M6-Schraube / Tornillo autoformante M6/ Zelfvor- 43356 mende M6 schroef / Vite M6 autoformante / Самозажимной винт M6 Molette M6 /Adjuster wheel M6 / Ein M6-Rad / Rueda M6 / Wiel M6 / Ruota M6 / Регулировочное колесо M6 41040...
-
Page 7: Avertissements - Règles De Sécurité
Manuel d’utilisation GYSPOT PTI NEO - 220 V Notice originale 2. AVERTISSEMENTS - RÈGLES DE SÉCURITÉ CONSIGNE GÉNÉRALE Ces instructions doivent être lues et bien comprises avant toute opération. Toute modification ou maintenance non indiquée dans le manuel ne doit pas être entreprise. Veiller à bien conserver ce manuel d’instruction pour des consultations ultérieures. -
Page 8: Sécurité Électrique
Manuel d’utilisation GYSPOT PTI NEO - 220 V Notice originale Attention le soudage dans des milieux de petites dimensions nécessite une surveillance à distance de sécurité. Par ailleurs le soudage de certains matériaux contenant du plomb, cadmium, zinc ou mercure voire du béryllium peuvent être particulièrement nocifs, dégraisser également les pièces avant de les souder. -
Page 9: Installation Du Matériel
Manuel d’utilisation GYSPOT PTI NEO - 220 V Notice originale Évaluation de la zone de soudage Avant d’installer un matériel de soudage par résistance, l’utilisateur doit évaluer les problèmes électromagnétiques potentiels dans la zone environnante. Ce qui suit doit être pris en compte: a) la présence au-dessus, au-dessous et à côté du matériel de soudage par résistance d’autres câbles d’alimentation, de commande, de signalisation... - Page 10 Manuel d’utilisation GYSPOT PTI NEO - 220 V Notice originale ENTRETIEN / CONSEILS • Les utilisateurs de cette machine doivent avoir reçu une formation adaptée à l’utilisation de la machine afin de tirer le maximum de ses performances et de réaliser des travaux conformes (ex : formation de carrossier). • Vérifier que le constructeur autorise le procédé de soudage employé avant toute réparation sur un véhicule. La maintenance et la réparation du générateur ne peut être effectuée que par le fabricant. Toute intervention dans ce générateur effectuée par une tierce personne annulera les conditions de garantie. Le fabricant décline toute responsabilité concernant tout incident ou accident survenant postérieurement à cette intervention. Couper l’alimentation en débranchant la prise, et attendre deux minutes avant de travailler sur le matériel. A l’intérieur, les tensions et intensités sont élevées et dangereuses.
-
Page 11: Installation - Fonctionnement Produit
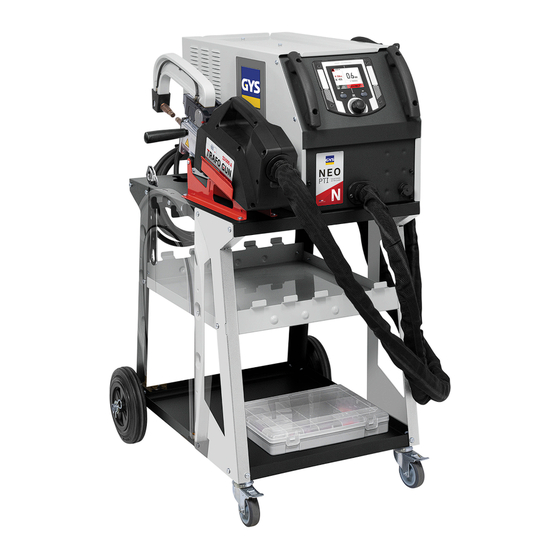
Manuel d’utilisation GYSPOT PTI NEO - 220 V Notice originale 3. INSTALLATION – FONCTIONNEMENT PRODUIT Seul le personnel expérimenté et habilité par le fabricant peut effectuer l’installation. Pendant l’installation, s’assurer que le générateur est déconnecté du réseau. Les connexions en série ou en parallèle de générateurs sont interdites. 3.1 DESCRIPTION DU MATÉRIEL Fig.1 Cet appareil a été conçu pour effectuer les opérations suivantes en carrosserie : - soudure par points de tôles avec une pince pneumatique, - soudure de tôles au pistolet, - soudure de clous, rivets, rondelles, goujons, moulures, - élimination de bosses et d’impacts (impacts de grêle avec option pince tire-creux). -
Page 12: Description De La Pince
Manuel d’utilisation GYSPOT PTI NEO - 220 V Notice originale 3.2 DESCRIPTION DE LA PINCE Fig.2 Levier de verrouillage/déverrouillage du bras Bouton de soudage par point Corps pneumatique Voyant état pointeuse Electrode Connecteur pour pistolet mono-point Bras mobile Poignée latérale 3.3 ACCESSOIRES ET OPTIONS... - Page 13 Manuel d’utilisation GYSPOT PTI NEO - 220 V Notice originale G1 (550 daN) - ref. 022768 INCLUS G2 (300 daN) - ref. 022775 G3 (550 daN) - ref. 022782 G2 + G3 + G4 - ref. 022898 G6 (550 daN) - ref. 022812 G7 (150 daN) - ref.
-
Page 14: Alimentation Électrique
3.6 LIQUIDE DE REFROIDISSEMENT Le liquide de refroidissement recommandé par GYS, doit impérativement être utilisé : 5 l : ref. 062511 • L’utilisation de liquides de refroidissement autres, et en particulier du liquide standard automobile, peut conduire, par un phénomène d’électrolyse, à l’accumulation de dépôts solides dans le circuit de refroidissement, dégradant ainsi le refroidissement, et pouvant aller jusqu’à... -
Page 15: Mise En Service De La Machine
Manuel d’utilisation GYSPOT PTI NEO - 220 V Notice originale 4. MISE EN SERVICE DE LA MACHINE • La mise en marche se fait par basculement de l’interrupteur sur la position ON (Fig 1 – n° 8). La machine démarre un cycle de test et d’initialisation qui dure environ 10 secondes (affichage d’un sablier à l’écran). -
Page 16: Interface Homme Machine Du Générateur
Manuel d’utilisation GYSPOT PTI NEO - 220 V Notice originale 4.2.2 Interface Homme Machine du générateur A la mise sous tension, la machine s’initialise et entreprend une auto-vérification de ses périphériques (tension d’alimentation, capteurs divers, IGBT, diodes, électrovannes, pompes, etc). 4.2.2.1 Affichage principal 1 : Fonctionnement avec pince ou pistolet mono-point. 2 : Heure courante. -
Page 17: Affichage Principal
Manuel d’utilisation GYSPOT PTI NEO - 220 V Notice originale 4.2.2.3 Affichage principal Mode Colle En mode Manuel et Synergique, l’utilisateur peut préciser la présence de colle entre les tôles. Si le mode colle est activé, un prépoint est réalisé avant le point de soudure. La durée de ce prépoint est paramétrée en millisecondes, de 0 (OFF) à 400 ms, par palier de 50 ms. Lorsque le mode colle est sélectionné, la mention « Colle » s’affiche en bas de l’écran principal. -
Page 18: Mode Synergique
Manuel d’utilisation GYSPOT PTI NEO - 220 V Notice originale 4.3.2 Mode Synergique Ce mode détermine les paramètres de soudage à partir de l’épaisseur des tôles et du type d’acier. L’épaisseur de chacune des tôles peut être renseignée entre 0.5mm et 3mm. Les types d’acier sont : l’acier et l’acier revêtu, l’acier HLE/THLE, l’acier UHLE et l’acier au bore (BORON). Il est possible de renseigner un assemblage allant jusqu’à 3 tôles pour une épaisseur d’assemblage max de 7.5mm. Utiliser la molette pour sélectionner l’épaisseur et le type d’acier de chacune des tôles. Pour activer la troisième tôle, la sélectionner et renseigner son épaisseur. Pour la désactiver, renseigner une épaisseur nulle « --- » Afin de faciliter la lecture de l’écran, le type de matière est identifié par un code couleur. - Bleu : ACIER... -
Page 19: Menu Avancé
Manuel d’utilisation GYSPOT PTI NEO - 220 V Notice originale Option 1 : Accédez au Menu de changement de bras depuis le Menu général, renseignez le bras monté sur la machine. Option 2 : Couper l’alimentation électrique de la machine, procédez au changement de bras, redémarrer la machine et... - Page 20 Manuel d’utilisation GYSPOT PTI NEO - 220 V Notice originale PARAMÈTRES Cet onglet permet de sélectionner le mode Easy ou Expert de la machine. De choisir la langue (EN, FR, etc.), le système d’unité (bar, PSI) et la luminosité de l’écran.
-
Page 21: Changement De Caps
Manuel d’utilisation GYSPOT PTI NEO - 220 V Notice originale 4.6 CHANGEMENT DE CAPS La machine comptabilise le nombre de points réalisés avec chaque bras de manière indépendante. Le pictogramme d’avertissement et un message apparaissent à l’écran lorsque la limite des points effectués par les caps est atteinte. -
Page 22: Importer Les Rapports D'intervention Stockés Sur Votre Clé Usb
Manuel d’utilisation GYSPOT PTI NEO - 220 V Notice originale 5.4. IMPORTER LES RAPPORTS D’INTERVENTION STOCKÉS SUR VOTRE CLÉ USB Pour importer dans votre PC les rapports d’intervention réalisés avec une GYSPOT (préalablement enregistrés dans votre clé USB depuis la machine, voir paragraphe «Traçabilité»), insérer la clé USB dans le port USB de votre PC. Ensuite, sélectionner le lecteur dans lequel votre clé USB est insérée... -
Page 23: Imprimer Un Rapport
Manuel d’utilisation GYSPOT PTI NEO - 220 V Notice originale 5.9. IMPRIMER UN RAPPORT Pour imprimer un rapport, sélectionner un rapport puis cliquer sur le bouton . Un aperçu de l’édition s’affiche. Cliquer sur le bouton pour lancer l’impression. 6. UTILISATION DU BRAS G11 (OPTION) Eteignez la machine ou suivez la procédure de changement de bras d’écrite au § 4.4 Montage et... -
Page 24: Utilisation Du Pistolet Mono-Point (Option)
Manuel d’utilisation GYSPOT PTI NEO - 220 V Notice originale 7. UTILISATION DU PISTOLET MONO-POINT (OPTION) Machine en marche, connecter le câble de commande du pistolet à la fiche Jack située sur la poignée de la pince. Un message s’affiche à l’écran et demande un appui sur la gâchette du pistolet. Une fois le pistolet mis en place sur la pince (voir paragraphes ci-après), sélectionner l’outil (étoile, anneau, fil ondulé, etc.) et valider. -
Page 25: Cas Du Pistolet D'ancienne Génération
Manuel d’utilisation GYSPOT PTI NEO - 220 V Notice originale 7.2 CAS DU PISTOLET D’ANCIENNE GÉNÉRATION Fixer le câble de masse sur l’électrode mobile. Faire coulisser et serrer la molette. Retirer le bras de la pince, et fixer en lieu et place de celui-ci le câble du pistolet. Vérifier que la vis qui connecte le patin à la cosse du câble est bien serrée. 8. PRÉCAUTION D’EMPLOI ET ENTRETIEN Formation de l’utilisateur Les utilisateurs de cette machine doivent recevoir une formation adaptée à l’utilisation de la machine afin de tirer le maximum des performances de... -
Page 26: Anomalies, Cause, Remèdes
Manuel d’utilisation GYSPOT PTI NEO - 220 V Notice originale 9. ANOMALIES, CAUSE, REMÈDES ANOMALIES CAUSES REMEDES Les caps utilisés sont usagés. Changer les caps. Mauvais décapage des tôles. Vérifier la préparation des surfaces. Le point réalisé ne tient pas / tient mal Le bras renseigné ne correspond pas à celui Vérifier le bras renseigné dans le logiciel. - Page 27 SUMMARY 1. ASSEMBLY ...............................28 2. WARNINGS - SAFETY INSTRUCTIONS ......................32 3. INSTALLATION - USING THE PRODUCT ......................36 3.1 PRODUCT DESCRIPTION ..........................36 3.2 DESCRIPTION OF THE CLAMP .......................... 37 3.3 ACCESSORIES AND OPTIONS .......................... 37 3.4 POWER SUPPLY .............................. 39 3.5 COMPRESSED AIR SUPPLY ..........................
-
Page 28: Assembly
User manual Translation of the original GYSPOT PTI NEO - 220 V instructions 1. ASSEMBLY Vis M6 autoformeuse / Self-tapping M6 screw / Selbstformende M6-Schraube / Tornillo autoformante M6/ Zelfvor- 43356 mende M6 schroef / Vite M6 autoformante / Самозажимной винт M6 Vis M10x30 / M10x30 screw / Schraube M10x30 / Tornillo M10x30 / M10x30 schroef / Vite M10x30 / Винт M10x30 42140 Ecrou M10 / M10 nut / Mutter M10 / Tuerca M10 / M10 moer / Dado M10 / гайка M10 41160 Goupilles / Split pins / Splinte / Alfileres / Pinnen / Spille / Дюбели 42032 Rondelles M10 / Washers M10 / Unterlegscheiben M10 / Arandelas M10 / Sluitringen M10 / Rondelle M10 / Шайбы 43253... - Page 29 User manual Translation of the original GYSPOT PTI NEO - 220 V instructions Vis M6 autoformeuse / Self-tapping M6 screw / Selbstformende M6-Schraube / Tornillo autoformante M6/ Zelfvor- 43356 mende M6 schroef / Vite M6 autoformante / Самозажимной винт M6 Vis M6 autoformeuse / Self-tapping M6 screw / Selbstformende M6-Schraube / Tornillo autoformante M6/ Zelfvor- 43356 mende M6 schroef / Vite M6 autoformante / Самозажимной винт M6...
- Page 30 User manual Translation of the original GYSPOT PTI NEO - 220 V instructions Axe de roue Lg 628 / Wheel axle Lg 628 / Radachse Lg 628 / Eje de rueda Lg 628 / Wielas Lg 628 / Asse della 98908ST ruota Lg 628 / Колесная ось Lg 628...
- Page 31 User manual Translation of the original GYSPOT PTI NEO - 220 V instructions Vis M6 / M6 screw / Schraube M6 / Tornillo M6/ M6 schroef / Pesce M6 / винт M6 41276 Vis M6 autoformeuse / Self-tapping M6 screw / Selbstformende M6-Schraube / Tornillo autoformante M6/ Zelfvor- 43356 mende M6 schroef / Vite M6 autoformante / Самозажимной винт M6 Molette M6 / Adjusting knob M6 / Ein M6-Rad / Rueda M6 / Wiel M6 / Ruota M6 / Регулировочное колесо M6 41040...
-
Page 32: Warnings - Safety Instructions
User manual Translation of the original GYSPOT PTI NEO - 220 V instructions 2. WARNINGS - SAFETY INSTRUCTIONS GENERAL INSTRUCTIONS These instructions must be read and fully understood before use. Do not carry out any alterations or maintenance work that is not directly specified in this manual. Please store this manual safely. -
Page 33: Electrical Safety
User manual Translation of the original GYSPOT PTI NEO - 220 V instructions The fumes, gases and dusts emitted by welding are harmful to health. Sufficient ventilation must be provided and an additional air supply may be required. An air-fed mask could be a solution in situations where there is inadequate ventilation. Check the extraction system performance against the relevant safety standards. -
Page 34: Setting Up The Equipment
User manual Translation of the original GYSPOT PTI NEO - 220 V instructions Assessing the welding area Before installing resistance welding equipment, the user must assess any potential electromagnetic problems in the surrounding area. The following should be taken into account: a) the presence of other power, control, signal and telephone cables above, below and adjacent to the resistance welding equipment;... -
Page 35: Maintenance Recommendations
User manual Translation of the original GYSPOT PTI NEO - 220 V instructions MAINTENANCE / RECOMMENDATIONS • Anyone using this machine needs to have received appropriate training in the use of the device, in order to get the most out of its performance, and to carry out the work in accordance with the instructions (e.g: panel beater training). -
Page 36: Installation - Using The Product
User manual Translation of the original GYSPOT PTI NEO - 220 V instructions 3. INSTALLATION - USING THE PRODUCT Only experienced personnel, authorised by the manufacturer, may carry out the set-up of the machine. During set-up, ensure that the power source is unplugged from the mains. -
Page 37: Description Of The Clamp
User manual Translation of the original GYSPOT PTI NEO - 220 V instructions 3.2 DESCRIPTION OF THE CLAMP Fig.2 Arm locking/unlocking lever Spot welding button Pneumatic housing Spot welder status indicator Electrode Single-point gun connector Interchangeable arm Side handle 3.3 ACCESSORIES AND OPTIONS... - Page 38 User manual Translation of the original GYSPOT PTI NEO - 220 V instructions G1 (550 daN) - ref. 022768 INCLUDED G2 (300 daN) - ref. 022775 G3 (550 daN) - ref. 022782 G2 + G3 + G4 - ref. 022898 G6 (550 daN) - ref.
-
Page 39: Power Supply
3.6 COOLANT LIQUID The coolant recommended by GYS must be used: 5 l : Ref. 062511 • The use of other coolants, particularly standard automotive coolant, can lead to the accumulation of solid deposits in the cooling circuit through electrolysis, resulting in poor cooling performance and potentially a complete blockage of the cooling system. -
Page 40: Commissioning The Machine
User manual Translation of the original GYSPOT PTI NEO - 220 V instructions 4. COMMISSIONING THE MACHINE • It is switched on by turning the switch to the ON position (Fig 1 - n° 8). The machine will start a testing and initialisation cycle lasting approximately 10 seconds (hourglass display on screen). -
Page 41: Human Machine Interface Of The Machine
User manual Translation of the original GYSPOT PTI NEO - 220 V instructions 4.2.2 Human Machine Interface of the machine On start-up, the unit automatically initialises and performs a self-check of its various systems (supply voltage, sensors, IGBTs, diodes, solenoid valves, pumps, etc.). -
Page 42: Main Display
User manual Translation of the original GYSPOT PTI NEO - 220 V instructions 4.2.2.3 Main display Glue Mode In Manual and Synergic mode, the user can specify whether glue is present between the plates. When this mode is in use, a pre-spot is performed before the weld. The duration of this pre-spot is set in milliseconds, from 0 (OFF) to 400 ms, in 50 ms steps. -
Page 43: Synergic Mode
User manual Translation of the original GYSPOT PTI NEO - 220 V instructions 4.3.2 Synergic mode This mode determines the welding parameters based on the thickness of the sheets and the type of steel. The thickness of each sheet can be set between 0.5mm and 3mm. The types of steel are: steel and coated steel, HLE/THLE steel, UHLE steel, and boron steel (BORON). -
Page 44: Advanced Menu
User manual Translation of the original GYSPOT PTI NEO - 220 V instructions Option 1: Access the Arm change menu from the General menu, and specify the arm fitted to the machine. Option 2: Switch the power supply to the machine off, change the arm, restart the machine and input the new arm. - Page 45 User manual Translation of the original GYSPOT PTI NEO - 220 V instructions PARAMETERS This tab is used to select the Easy or Expert mode of the machine. Select the language (EN, FR, etc.), unit system (bar, PSI) and screen brightness.
-
Page 46: Changing The Caps
User manual Translation of the original GYSPOT PTI NEO - 220 V instructions 4.6 CHANGING THE CAPS The machine counts the spots performed with each arm separately. warning icon and a message appear on the screen when the spot limit has been reached. -
Page 47: Import Reports Stored On Your Usb Stick
User manual Translation of the original GYSPOT PTI NEO - 220 V instructions 5.4. IMPORT REPORTS STORED ON YOUR USB STICK To import the job reports produced using a GYSPOT (previously saved on your USB stick from the machine, see «Traceability» section) into your PC, insert the USB stick into your PC’s USB port. -
Page 48: Print A Report
User manual Translation of the original GYSPOT PTI NEO - 220 V instructions 5.9. PRINT A REPORT To print a report, select a report and click on the button . A preview of the report will be displayed. Click on the button to start printing . -
Page 49: Using The Single-Point Gun (Optional)
User manual Translation of the original GYSPOT PTI NEO - 220 V instructions 7. USING THE SINGLE-POINT GUN (OPTIONAL) With the machine running, connect the gun control cable to the Jack plug located on the handle of the gun. ... -
Page 50: Older Generation Guns
User manual Translation of the original GYSPOT PTI NEO - 220 V instructions 7.2 OLDER GENERATION GUNS Attach the earth cable to the mobile electrode. Slide and tighten the knob. Remove the clamp arm and fit the gun cable in its place. Check that the screw connecting the shoe to the cable lug is tight. -
Page 51: Faults, Causes, Remedies
User manual Translation of the original GYSPOT PTI NEO - 220 V instructions 9. FAULTS, CAUSES, REMEDIES FAULTS CAUSES SOLUTIONS The caps are worn out. Change the caps. The sheets are not clean enough. Check surface preparation. The spot doesn’t hold / holds poorly The arm selected does not match the one Check the arm selected in the software. - Page 52 ÍNDICE 1. MONTAJE .................................53 2. ADVERTENCIAS - NORMAS DE SEGURIDAD ....................57 3. INSTALACIÓN - FUNCIONAMIENTO DEL PRODUCTO ..................61 3.1 DESCRIPCIÓN DEL PRODUCTO ........................61 3.2 DESCRIPCIÓN DE LA PINZA ..........................62 3.3 ACCESORIOS Y OPCIONES ..........................62 3.4 FUENTE DE ALIMENTACIÓN..........................64 3.5 SUMINISTRO DE AIRE COMPRIMIDO .......................
-
Page 53: Manual De Uso
Manual de uso Traducción de las instrucciones GYSPOT PTI NEO - 220 V originales 1. MONTAJE CANTI- Vis M6 autoformeuse / Self-forming M6 screw / Selbstformende M6-Schraube / Tornillo autoformante M6/ Zelfvor- 43356 mende M6 schroef / Vite M6 autoformante / Самозажимной винт M6 CANTI- Vis M10x30 / M10x30 screw / Schraube M10x30 / Tornillo M10x30 / M10x30 schroef / Vite M10x30 / Винт M10x30 42140 Ecrou M10 / M10 nut / Mutter M10 / Tuerca M10 / M10 moer / Dado M10 / гайка M10 41160 Goupilles / Dowel pins / Splinte / Clavijas / Pinnen / Spille / Дюбели... - Page 54 Manual de uso Traducción de las instrucciones GYSPOT PTI NEO - 220 V originales CANTI- Vis M6 autoformeuse / Self-forming M6 screw / Selbstformende M6-Schraube / Tornillo autoformante M6/ Zelfvor- 43356 mende M6 schroef / Vite M6 autoformante / Самозажимной винт M6 CANTI- Vis M6 autoformeuse / Self-forming M6 screw / Selbstformende M6-Schraube / Tornillo autoformante M6/ Zelfvor- 43356 mende M6 schroef / Vite M6 autoformante / Самозажимной винт M6...
- Page 55 Manual de uso Traducción de las instrucciones GYSPOT PTI NEO - 220 V originales CANTI- Axe de roue Lg 628 / Wheel axle Lg 628 / Radachse Lg 628 / Eje de rueda Lg 628 / Wielas Lg 628 / Asse della 98908 ST ruota Lg 628 / Колесная ось Lg 628...
- Page 56 Manual de uso Traducción de las instrucciones GYSPOT PTI NEO - 220 V originales CANTI- Vis M6 / M6 screw / Schraube M6 / Tornillo M6/ M6 schroef / Pesce M6 / винт M6 41276 Vis M6 autoformeuse / Self-forming M6 screw / Selbstformende M6-Schraube / Tornillo autoformante M6/ Zelfvor- 43356 mende M6 schroef / Vite M6 autoformante / Самозажимной винт M6 Molette M6 /Adjuster wheel M6 / Ein M6-Rad / Rueda M6 / Wiel M6 / Ruota M6 / Регулировочное колесо M6 41040...
-
Page 57: Advertencias - Normas De Seguridad
Manual de uso Traducción de las instrucciones GYSPOT PTI NEO - 220 V originales 2. ADVERTENCIAS - NORMAS DE SEGURIDAD CONSIGNA GENERAL Estas instrucciones se deben leer y comprender antes de toda operación. Toda modificación o mantenimiento no indicado en el manual no se debe llevar a cabo. Conserve este manual de instrucciones para una consulta posterior. -
Page 58: Seguridad Eléctrica
Manual de uso Traducción de las instrucciones GYSPOT PTI NEO - 220 V originales HUMOS DE SOLDADURA Y GAS El humo, el gas y el polvo que se emite durante la soldadura son peligrosos para la salud. Hay que prever una ventilación suficiente y en ocasiones puede ser necesario un aporte de aire. Una máscara de aire puede ser una solución en caso de aireación... - Page 59 Manual de uso Traducción de las instrucciones GYSPOT PTI NEO - 220 V originales Recomendaciones para evaluar la zona y la instalación de soldadura Aspectos generales El usuario es responsable de la instalación y del uso del producto de soldadura por resistencia de acuerdo con las instrucciones del fabricante. Si se detectan alteraciones electromagnéticas, el usuario del material de soldadura por resistencia debe resolver la situación siguiendo las recomendaciones...
-
Page 60: Mantenimiento / Consejos
Manual de uso Traducción de las instrucciones GYSPOT PTI NEO - 220 V originales El fabricante no asume ninguna responsabilidad respecto a daños provocados a personas y objetos debido a un uso incorrecto y peligroso de este aparato. MANTENIMIENTO / CONSEJOS •... -
Page 61: Instalación - Funcionamiento Del Producto
Manual de uso Traducción de las instrucciones GYSPOT PTI NEO - 220 V originales 3. INSTALACIÓN - FUNCIONAMIENTO DEL PRODUCTO Solo el personal experimentado y habilitado por el fabricante puede efectuar la instalación. Durante la instalación, asegúrese que el generador está... -
Page 62: Descripción De La Pinza
Manual de uso Traducción de las instrucciones GYSPOT PTI NEO - 220 V originales 3.2 DESCRIPCIÓN DE LA PINZA Imagen 2 Palanca de bloqueo/desbloqueo del brazo Botón de soldadura por puntos Cuerpo de neumático Indicador del estado de la soldadora por puntos... - Page 63 Manual de uso Traducción de las instrucciones GYSPOT PTI NEO - 220 V originales G1 (550 daN) - ref 022768 INCLUIDO G2 8300 daN) - ref 022775 G3 (550 daN) - ref 022782 G2 + G3 + G4 - ref. 022898 G6 (550 daN) - ref.
-
Page 64: Fuente De Alimentación
3.6 REFRIGERANTE Debe utilizarse el refrigerante recomendado por GYS: 5 l: ref. 062511 • El uso de otros líquido de refrigeración, y en particular de líquido estándar para automóviles, puede provocar, mediante un fenómeno de electrolisis, la acumulación de depósitos sólidos en el circuito de refrigeración, que disminuyen la calidad de la refrigeración y pueden llegar... -
Page 65: Puesta En Marcha De La Máquina
Manual de uso Traducción de las instrucciones GYSPOT PTI NEO - 220 V originales 4. PUESTA EN MARCHA DE LA MÁQUINA • La máquina se enciende colocando el interruptor en la posición ON (Fig 1 - nº 8). La máquina inicia un ciclo de prueba e inicialización que dura aproximadamente 10 segundos (aparece un reloj de arena). -
Page 66: Interfaz Hombre-Máquina Del Generador
Manual de uso Traducción de las instrucciones GYSPOT PTI NEO - 220 V originales 4.2.2 Interfaz hombre-máquina del generador Al encenderse, la máquina se inicializa y realiza un autochequeo de sus periféricos (tensión de alimentación, diversos sensores, IGBTs, diodos, electroválvulas, bombas, etc). -
Page 67: Pantalla Principal
Manual de uso Traducción de las instrucciones GYSPOT PTI NEO - 220 V originales 4.2.2.3 Pantalla principal Modo Pegamento En los modos Manual y Sinérgico, el usuario puede especificar la presencia de pegamento entre las chapas. Si el modo pegamento está activado, un prepunto se realiza antes del punto de soldadura. La duración de este punto previo se ajusta en milisegundos, de 0 (OFF) a 400 ms, en pasos de 50 ms. -
Page 68: Modo Sinérgico
Manual de uso Traducción de las instrucciones GYSPOT PTI NEO - 220 V originales 4.3.2 Modo sinérgico Este modo determina los parámetros de soldadura a partir del grosor de las chapas y del tipo de acero. El grosor de cada chapa puede ajustarse entre 0,5 mm y 3 mm. Los tipos de acero son: acero y acero revestido, acero HLE/THLE, acero UHLE y acero al boro (BORON). -
Page 69: Menu Avanzado
Manual de uso Traducción de las instrucciones GYSPOT PTI NEO - 220 V originales Opción 1: Acceda al Menú de Cambio de Brazo desde el Menú General, introduzca el brazo instalado en la máquina. Opción 2: Desconecte la alimentación de la máquina, proceder al cambio de brazo, reiniciar la máquina y rellenar... - Page 70 Manual de uso Traducción de las instrucciones GYSPOT PTI NEO - 220 V originales Parámetros Esta pestaña permite seleccionar el modo Easy o Expert de la máquina. Permite seleccionar el idioma (EN, FR, etc.), el sistema de unidades (bar, PSI) y el brillo de la pantalla.
-
Page 71: Cambio De Los Caps
Manual de uso Traducción de las instrucciones GYSPOT PTI NEO - 220 V originales 4.6 CAMBIO DE LOS CAPS La máquina contabiliza el número de puntos realizados con cada brazo de forma independiente. El pictograma de advertencia y un mensaje aparecen en la pantalla cuando se alcanza el límite de puntadas realizadas con las tapas El mensaje permanece en pantalla después de cada punto hasta que se haya realizado la operación... -
Page 72: Importar Informes De Intervención Almacenados En Su Usb
Manual de uso Traducción de las instrucciones GYSPOT PTI NEO - 220 V originales 5.4. IMPORTAR INFORMES DE INTERVENCIÓN ALMACENADOS EN SU USB Para importar sus informes de servicio GYSPOT (previamente guardados en su llave USB desde la máquina, ver la sección «Trazabilidad») a su PC, inserte la llave USB en el puerto USB de su PC. -
Page 73: Imprimir Un Imforme
Manual de uso Traducción de las instrucciones GYSPOT PTI NEO - 220 V originales 5.9. IMPRIMIR UN IMFORME Para imprimir un informe, seleccione un informe y haga clic en el botón . Una visualización de la edición se indica en pantalla. -
Page 74: Uso De La Pistola Monopunto (Opcional)
Manual de uso Traducción de las instrucciones GYSPOT PTI NEO - 220 V originales 7. USO DE LA PISTOLA MONOPUNTO (OPCIONAL) Con la máquina en marcha, conecte el cable de control de la pistola al enchufe Jack de la empuñadura de la pistola. -
Page 75: Pintola De Antigua Generación
Manual de uso Traducción de las instrucciones GYSPOT PTI NEO - 220 V originales 7.2 PINTOLA DE ANTIGUA GENERACIÓN Conecte el cable de masa al electrodo móvil. Deslice y apriete la rueda. Retire el brazo de la abrazadera y coloque el cable de la pistola en su lugar. -
Page 76: Averías, Causas, Soluciones
Manual de uso Traducción de las instrucciones GYSPOT PTI NEO - 220 V originales 9. AVERÍAS, CAUSAS, SOLUCIONES ANOMALÍAS CAUSAS Soluciones Los caps utilizados están desgastados. Cambiar los caps. El punto realizado no aguanta / se mantiene Mal decapado de las chapas. -
Page 77: Manuel D'utilisation
Manuel d’utilisation GYSPOT PTI NEO - 220 V Notice originale 11. PIÈCES DE RECHANGE DU GÉNÉRATEUR / GENERATOR SPARE PARTS / ERSATZTEILE DES GENERATORS / RECAMBIOS PARA GENERADORES / ЗАПАСНЫЕ ЧАСТИ ГЕНЕРАТОРА / RESERVE ONDERDELEN / PEZZI DI RICAMBIO 11.1 Générateur... - Page 78 Manuel d’utilisation GYSPOT PTI NEO - 220 V Notice originale RÉF Filtre régulateur / Filter regulator / Filter regulierbarer Druckluftanschluss / Filtro regulador / Regulerend filter / Filtro 53582 regolatore Interrupteur différentiel / Differential switch / Differenzialschalter / Interruptor diferencial / Differentieel schakelaar / 52351 Interruttore differenziale Radiateur / Radiator / Kühler / Radiador / Radiator / Radiatore 72125 Ventilateur / Fan / Lüfter / Ventilador /Ventilator / Ventilatore 51238...
-
Page 79: Schéma Électrique
Schéma électrique GYSPOT PTI NEO - 220 V Notice originale CIRCUIT DIAGRAM / SCHALTPLAN / DIAGRAMA ELECTRICO / ЭЛЕКТРИЧЕСКАЯ СХЕМА / ELEKTRISCHE SCHEMA / SCEMA ELETTRICO Schéma électrique du générateur... - Page 80 Manuel d’utilisation GYSPOT PTI NEO - 220 V Notice originale Schéma circuit de refroidissement...
- Page 81 Manuel d’utilisation GYSPOT PTI NEO - 220 V Notice originale 12. PIÈCES DE RECHANGE / SPARE PARTS / ERSATZTEILE / PIEZAS DE RECAMBIO / ЗАПЧАСТИ / RESERVE ONDERDELEN / PEZZI DI RICAMBIO 12.1 Pince...
- Page 82 Manuel d’utilisation GYSPOT PTI NEO - 220 V Notice originale RÉF Shunt pince / Shunt clamp / Shunt-Klemme / Pinza Shunt / Shunt klem / Pinza Shunt 77060 Tuyau rouge D=8mm 4900mm / Red hose D=8mm 4900mm / Roter Schlauch D=8mm/4900mm / Cable rojo...
- Page 83 Schéma électrique GYSPOT PTI NEO - 220 V Notice originale CIRCUIT DIAGRAM / SCHALTPLAN / DIAGRAMA ELECTRICO / ЭЛЕКТРИЧЕСКАЯ СХЕМА / ELEKTRISCHE SCHEMA / SCEMA ELETTRICO Schéma électrique de la pince 4 BLACK 4 RED 4 WHITE...
-
Page 84: Schéma Pneumatique
Schéma Pneumatique GYSPOT PTI NEO - 220 V Notice originale NETWORK PRESSURE SENSOR PLIERS CYLINDER PLIERS PRESSURE SENSOR PLIERS TRANSFORMER... - Page 85 Manuel d’utilisation GYSPOT PTI NEO - 220 V Notice originale BRAS G /G ARM Accéder à la liste des pièces détachées des bras : Depuis la page produit SAV : 063419 - Bras G En cliquant sur le lien :...
- Page 86 Manuel d’utilisation GYSPOT PTI NEO - 220 V Notice originale G1/G3/G4/G5/G6/G8/G10/G12 91264 91265 91266 93803 Tuyau anti-étincelles / Anti-spark hose / Funkengeschützte Leitung / Conducto anti-chispas 91269 93804 F0231 F0668 Caps type A13 / Kappen Typ A13 / Gorras tipo A13 77027 Socle bras équipé...
- Page 87 Manuel d’utilisation GYSPOT PTI NEO - 220 V Notice originale Tuyau anti-étincelles 125 mm / Anti-spark hose 125 mm / Funkengeschützte Leitung 125 mm / Conducto anti-chispas 125 mm F0504 Tuyau anti-étincelles 115 mm / Anti-spark hose 115 mm / Funkengeschützte Leitung 115 mm / Conducto anti-chispas 115 mm F0505 Tuyau anti-étincelles 150 mm / Anti-spark hose 150 mm / Funkengeschützte Leitung 150 mm / Conducto anti-chispas 150 mm...
- Page 88 Manuel d’utilisation GYSPOT PTI NEO - 220 V Notice originale PISTOLET QUICK-FIX N° Désignation Réf. Câble pistolet Quick fix complet / Quick fix gun cable complete / Pistolenkabel Quick fix komplett / Cable completo de la A0334 pistola Quick Fix / Kabel pistool Quick fix compleet / Cavo per pistola a fissaggio rapido completo Cale plastique pour carte électronique / Plastic wedge for electronic board / Plastikkeil für die Platine / Bloque de plástico J0177 para tarjeta electrónica / Kunststoffen wig voor elektronische kaart / Cuneo in plastica per scheda elettronica E0237C Carte électronique / Electronic board / Elektronikplatine / Tarjeta electrónica / Print plaat / Scheda elettrica...
- Page 89 Schéma électrique GYSPOT PTI NEO - 400 V CIRCUIT DIAGRAM / SCHALTPLAN / DIAGRAMA ELECTRICO / ЭЛЕКТРИЧЕСКАЯ СХЕМА / ELEKTRISCHE SCHEMA / SCEMA ELETTRICO Schéma électrique du générateur...
- Page 90 Schéma électrique GYSPOT PTI NEO - 400 V Schéma électrique de la pince Schéma circuit de refroidissement...
- Page 91 Schéma Pneumatique GYSPOT PTI NEO - 400 V NETWORK PRESSURE SENSOR PLIERS CYLINDER PLIERS PRESSURE SENSOR PLIERS TRANSFORMER...
- Page 92 Pictogrammes GYSPOT PTI NEO - 220V ICONOS / SYMBOLS / ZEICHENERKLÄRUNG / ICONOS - Attention ! Lire le manuel d’instruction avant utilisation. - Warning ! Read the instructions manual before use. - Внимание! Прочтите инструкцию перед использованием - ¡Cuidado! Lea el manual de instrucciones antes de su uso.
- Page 93 Pictogrammes GYSPOT PTI NEO - 220V - Matériel conforme aux directives européennes. La déclaration UE de conformité est disponible sur notre site (voir à la page de couverture). - Device complies with Europeans directives. The EU Declaration of Conformity is available on our website (see cover page).
- Page 94 GYS France GYS Italia Siège social / Headquarter Filiale / Filiale 1, rue de la Croix des Landes - CS 54159 Via Porta Est, 7 53941 Saint-berthevin Cedex 30020 Marcon - VE France Italia www.gys.fr www.gys-welding.com +33 2 43 01 23 60 +39 041 53 21 565 service.client@gys.fr...
Need help?
Do you have a question about the GYSPOT PTI NEO and is the answer not in the manual?
Questions and answers