Table of Contents
Advertisement
Quick Links
Advertisement
Table of Contents

Related Manuals for Taga Harmony TAV-500B v.2


Summary of Contents for Taga Harmony TAV-500B v.2
- Page 1 TAV-500B v.2 Hi-Fi ACTIVE SPEAKER SYSTEM Instruction Manual Edition 04-2024...
- Page 3 Introduction Thank you for purchasing this TAGA Harmony active speaker system. TAGA Harmony TAV-500B v.2 active speaker system provides high-quality sound performance for your home. Key features: • Design based on a highly-acclaimed, new generation Audio-Video speaker series, including: - 2nd generation TLIE-I enclosure (Taga Low Interference Enclosures) - more rigid structure to limit unwanted resonances: thicker 18 mm MDF front baffle.
- Page 4 Introduction IEC C8 power inlet and a removable Europlug-IEC C7 power cord an option to upgrade your system with a premium audiophile power cable. Speakers The System consists of 2 speakers: an Active Speaker (for the right channel) and a Passive Speaker (for the left channel).
-
Page 5: Table Of Contents
Contents Safety Instructions Remote controller Front and Rear Panel Hooking Up Speaker Cables Hooking Up the System Operation Play from a USB Flash Drive Play via Bluetooth ® Additional Information Kit Content Specifications... -
Page 6: Safety Instructions
Safety Instructions IMPORTANT READ THIS SECTION CAREFULLY BEFORE PROCEEDING! WARNING: TO REDUCE THE RISK OF FIRE OR ELECTRIC SHOCK, DO NOT EXPOSE THIS PRODUCT TO RAIN OR MOISTURE. DO NOT REMOVE COVER (OR BACK). NO USER-SERVICEABLE PARTS INSIDE. REFER SERVICING TO QUALIFIED SERVICE PERSONNEL. The triangle containing a lightning symbol is intended to alert the user to the presence of uninsulated dangerous voltages within the product’s enclosure that may be of sufficient magnitude to constitute a risk of electric shock to persons. - Page 7 Safety Instructions 1. Read Instructions - All the safety and operating instructions 13. Overloading - Do not overload wall outlets, extension cords or should be read before the product is operated. integral convenience receptacles as this can result in a risk of fire 2.
- Page 8 Batteries- Safety Instructions IMPORTANT READ THIS SECTION CAREFULLY BEFORE PROCEEDING! Make sure to insert the battery aligning the correct polarity - the positive and negative ends should be facing in the correct direction as marked on equipment. Incorrect fitting may cause leakage or, in extreme cases, fire or even an explosion.
- Page 9 Batteries- Safety Instructions Remember that small button cell batteries such as used in some hearing aids, toys, games and other appliances, may be easily swallowed by young children and this is dangerous. Keep loose button cells away from young children. Make sure appliance battery compartments are securely closed.
-
Page 10: Remote Controller
Remote Controller • Always use AAA bateries and do not use the rechargeable batteries. • If the batteries run out, remove the old batteries and replace them with new ones within several minutes. • If the batteries are placed incorrectly, thay can cause explosion. •... -
Page 11: Front And Rear Panel
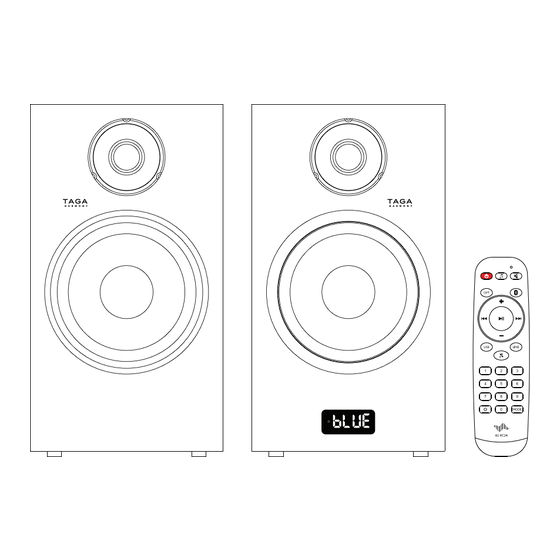
Remote Controller 1. LED Indicator 2. Standby Button ( ) 3. TONE (Treble / Bass) Button ( ) 4. OPTICAL function Button (OPT) 5. Volume Up Button (+) Treble / Bass Up Button (+) 6. Play / Pause Button ( 7. - Page 12 Front and Rear Panel Rear Panel (Active Speaker): 3. Input Selector (INPUT) Standby Button ( ) 4. Previous Button ( Search Backward Button ( 5. Play / Pause Button ( 6. Next Button ( Search Forward Button ( 7. TONE (Treble / Bass) Button ( ) 8.
-
Page 13: Hooking Up Speaker Cables
Hooking Up Speaker Cables The System is supplied with a speaker cable (without plugs) to connect the Active and the Passive Speakers. The Speaker Connectors can accommodate up to 10AWG speaker cables as well as most of popular plugs (banana etc.) - you can upgrade the supplied speaker cable with plugs. -
Page 15: Hooking Up The System
Hooking Up the System Connecting Speakers Using speaker cables connect the Passive Speaker to the SPEAKER OUT connectors in the Active Speaker. Check “Hooking Up Speaker Cables” for more details. Only a speaker within the range of impedance 4 - 8ohm may be connected to the Active Speaker. - Page 16 Hooking Up the System External audio equipment connection options: Signal Input / Output Input / Output Connection cable TAV-500B v.2 external equipment Analog LINE IN input Output – RCA sockets RCA-RCA interconnect (not supplied) Subwoofer inputs: RCA-RCA subwoofer interconnect (not supplied)
-
Page 17: Operation
Operation Display In relation to the System features and operation, unless said otherwise, the square brackets [ ] indicate that the information they contain will be displayed on the Display. Connecting to the Electrical Outlet Plug the Power Cable to the System and into the electrical outlet. Turn on the System - press the Power Switch to ON. - Page 18 Operation Sound Control VOLUME regulation (+/–): Using the + and – Buttons or the VOLUME knob, you can adjust the sound volume from minimum [0] to maximum [40]. The volume level will be displayed. After a while, if no other button is pressed, the Display will return to the previous content.
-
Page 19: Play From A Usb Flash Drive
Play from a USB Flash Drive Maximum supported USB flash drive capacity is 64GB. Not all USB flash drives may be compatible and supported. 1.Insert a USB Flash Drive into the USB port. 2.Use the INPUT button or press the USB button on the remote controller to select the USB input. - Page 20 Play from a USB Flash Drive Supported File Formats The System can only play files in APE, FLAC, MP3, WAV formats. Note! Depending on the sampling rate (kHz), bitrate (kbps) and other parameters, some files in listed formats may not be played - for more information check product page on www.TagaHarmony.com.
-
Page 21: Play Via Bluetooth
Bluetooth devices. ® 4. After a short time “TAV-500B v.2” will appear on the screen of your audio source. 5. Select “Pair” on your audio source device to connect with the System. After connection is successful [bLUE] stops blinking. - Page 22 System or it may even require to repeat the pairing procedure each time the Bluetooth connection is lost. ® Note! If your Bluetooth audio source is not able to find the “TAV-500B v.2” device or ® connect to it then switch off, clear the pairing history and repeat the pairing procedure.
-
Page 23: Additional Information
Additional Information Break-In Your TAGA Harmony System sounds great immediately after it is taken out of the carton but as all electronic devices, this System requires a “break-in” period to reach its full sonic capabilities. During the “break-in” period it is recommended to operate the System at moderate volume levels. -
Page 24: Kit Content
Kit Content System (2 speakers) 1 EA Remote Controller (without batteries) 1 EA Power Cable 1 EA Speaker cable 1 EA Instruction Manual 1 EA... -
Page 25: Specifications
Specifications 2 x 40W RMS 4ohm Amplifier power 100W Dynamic Peak Class D Wireless connectivity Bluetooth ® Frequency response 30Hz - 20kHz Bassreflex Single, rear, slotted Impedance 6ohm Amplifier input: 450mV Sensitivity Passive Speakers: 87dB High-frequency driver 25 mm (1”), TWG-I Bass-Midrange driver 165 mm (6.5”) USB (APE, FLAC, MP3, WAV) - Page 26 EU declaration of conformity Your product is marked with the symbol shown on the left. As its manufacturer, hereby we declare that the product is in compliance with the following EU directives and regulations: 2014/30/EU (EMC) & 2014/35/EU (LVD) & 2014/53/EU (RED) & 2011/65/EU (RoHS) The full text of the EU declaration of conformity is available from the manufacturer.
- Page 27 Notes...
- Page 28 Notes...
Need help?
Do you have a question about the TAV-500B v.2 and is the answer not in the manual?
Questions and answers