Table of Contents

Related Manuals for Getac ZX80


Summary of Contents for Getac ZX80
- Page 1 ZX80 Quick Guide Kurzanleitung Guía rápida Guide rapide Краткое руководство Guida rapida 快速指南 快速指南 GET MORE FROM GETAC. REGISTER TODAY. Getac Technology Corporation register.getac.com...
- Page 3 English ......... 1 Deutsch ........6 Español ........10 Français ........14 Italiano ........18 Pусский ........22 简体中文 ........26 繁體中文 ........31 NOTE: The information in this document is subject to change without notice. Depending on the specific model you purchased, the look of your model may not exactly match the graphics shown in this document.
-
Page 5: Identifying Hardware Components
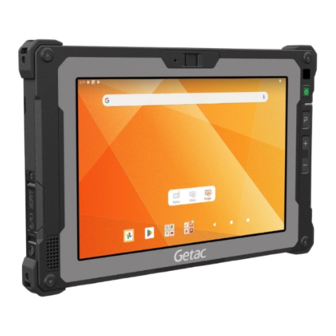
Identifying Hardware Components Barcode reader lens 1, 2 Camera lens Microphone Light sensor Power button Combo audio Battery Charge connector indicator Programmable USB 3.2 Gen 1 button Type-C connector Volume up Volume down Touchscreen Speaker Flash LED Microphone Camera lens NFC antenna 1, 3 Additional battery pack... -
Page 6: Getting Started
3. Connect the power adapter. (The power other side ( adapter shown here as the example is the one available from Getac.) The Battery Charge indicator glows in amber when charging is in progress. When the battery is fully charged,... -
Page 7: Safety Precautions
User Manual available on the device. • Do not use unauthorized chargers. To open the User Manual, tap the Getac folder • icon on the Home screen and then tap the User Do not force a reverse-charge or a reverse- Manual icon. -
Page 8: Regulatory Information
• Never place your device or power adapter on furniture or any other surface that might be Company name Getac Inc. marred by exposure to heat since the base of 15495 Sand Canyon Rd., Suite 350 Address your device and the surface of the power... -
Page 9: Energy Star
EPA website. Phone +49 (0) 211-984819-0 https://www.energystar.gov/products NOTE: ZX80 complies with ENERGY STAR® only EU RoHS if it is used with the power adapter supplied by Getac for ZX80. Getac products meet the requirements of... - Page 10 Komponentenbeschreibung Barcodeleser-Linse 1, 2 Kameraobjektiv Mikrofon Lichtsensor Netzschalter Kombi-Audio- Ladeanzeige anschluss Programmierbare USB-3.2-Gen-1- Taste Type-C- Lauter Anschluss Leiser Touchscreen Lautsprecher Blitz-LED Mikrofon Kameraobjektiv NFC-Antenne 1, 3 Zusätzlicher Akku Dockinganschluss Tri-Antennen-Durchleitung Nur ausgewählte Modelle Öffnen Sie die Abdeckung zur Nutzung der Kamera. Falls Sie das Modell mit hoher Akkukapazität haben, unterscheidet sich der Akku von der hier gezeigten Darstellung.
-
Page 11: Erste Schritte
) und drücken Sie dann die andere Seite nach unten ( 3. Schließen Sie das Netzteil an. (Das hier bei- spielhaft gezeigte Netzteil ist bei Getac erhältlich.) Während des Ladevorgangs leuchtet die Ladeanzeige gelb. Wenn der Akku voll aufgeladen ist, wobei die... -
Page 12: Weitere Informationen
Die nachstehend aufgelisteten handbuch. Sicherheitshinweise müssen befolgt werden. Öffnen Sie die Benutzerhandbuch, indem Sie Gefahr das Symbol des Getac-Ordners am Startbild- schirm antippen und dann auf das Symbol • Sie dürfen den Akku nicht an Orten mit hohen Benutzerhandbuch tippen. - Page 13 Text der EU Konformitätserklärung ist verfügbar unter: HINWEIS: ZX80 stimmt nur dann mit ENERGY https://support.getac.com/Portal/Page/846 STAR® überein, wenn es mit dem von Getac für ZX80 bereitgestellten Netzteil verwendet wird. Dieses Gerät darf nur in Innenräumen verwen- det werden, wenn es im Frequenzbereich von...
- Page 14 Identificar los componentes del hardware Lente del lector de código de barras 1, 2 Objetivo de la cámara Micrófono Sensor de luz Botón de Conector de encendido audio Indicador de carga combinado de la batería Botón Conector programable USB 3.2 Gen 1 Type-C Subir volumen Bajar volumen...
- Page 15 ángulo ( ) y, a continuación, presione el otro lateral ( 3. Conecte el adaptador de alimenta- ción. (El adaptador de alimentación que se muestra aquí como ejemplo es el que está disponible en Getac).
-
Page 16: Más Información
Para abrir el manual del usuario, pulse el icono (más de 80 °C / 176 °F), como cerca del fuego, Carpeta de Getac de la pantalla Inicio y, a conti- un calentador, en un vehículo a la luz del sol, nuación, pulse el icono Manual de Usuario. - Page 17 Cumple con los limites de temperatura RoHS EU de cualquier superficie accesible al usuario Los productos Getac cumplen los requisitos de la definidos por los Estándares Internacionales de directiva 2011/65/UE sobre la restricción del uso Seguridad. Aun así, el contacto constante con...
- Page 18 Identifier les composants du materiel Lentille de lecteur de code-barres 1, 2 Objectif de la camera Micro Capteur de lumière Bouton d’alimentation Connecteur Indicateur de audio combo charge Bouton Connecteur programmable USB 3.2 Gen 1 Type-C Volume + Volume – Ecran tactile Haut-parleu LED flash...
-
Page 19: Mise En Route
batterie en formant un angle ( ) puis appuyez vers le bas sur l’autre côté ( 3. Raccordez l’adaptateur secteur. (L’adaptateur secteur présenté ici à titre d’exemple est celui disponible auprès de Getac.) -
Page 20: Plus D'informations
Pour accéder au manuel de l’utilisateur, appuyez batterie dans des lieux où la température est sur l’icône Dossier Getac sur l’écran d’accueil, élevée (plus de 80 °C / 176 °F), comme à proxi- puis appuyez sur l’icône Manuel de l’utilisateur. -
Page 21: Informations Réglementaires
Pour minimiser les risques quences de 5150 à 5350 MHz. potentiels liés à la chaleur, respectez les précau- Nom de la compagnie Getac Technology GmbH. tions suivantes : Kanzlerstrasse 4 •... - Page 22 Les produits Getac portant le label ENERGY STAR® sont listés sur le site Web de l’EPA. https://www.energystar.gov/products REMARQUE : Le ZX80 est conforme à ENERGY STAR® uniquement s’il est utilisé avec l’adapta- teur secteur fourni par Getac pour le ZX80.
- Page 23 Identificazione dei componenti hardware Lente del lettore di codici a barre 1, 2 Obiettivo fotocamera Microfono Sensore della luminosità Pulsante di alimentazione Connettore Indicatore di audio combo carica Tasto Connettore programmabile USB 3.2 Gen 1 Type-C Volume su Volume giù Touchscreen LED flash Altoparlante...
-
Page 24: Per Iniziare
( 3. Collegare l’adattatore di alimentazione. (L’adattatore di alimentazione mostrato qui come esempio è quello disponibile da Getac.) Durante il caricamento, l’indicatore di carica si illumina di colore ambra. Quando la batteria è completamente carica, l’indicatore diventa verde. -
Page 25: Altre Informazioni
(oltre 80 °C / Per aprire il Manuale Utente, toccare l’icona 176 °F), ad esempio accanto a fuoco, stufe, Cartella Getac nella schermata Home, quindi in auto alla luce solare diretta, ecc. toccare l’icona Manuale Utente. -
Page 26: Informazioni Normative
EPA. questo dispositivo è conforme ai https://www.energystar.gov/products requisiti essenziali e alle altre dispo- NOTA: ZX80 è conforme a ENERGY STAR® solo se sizioni pertinenti con la direttiva viene utilizzato con l’adattatore di alimentazione 2014/53/EU. Il testo completo della dichiarazione fornito da Getac per ZX80. -
Page 27: Внешний Вид Устройства
Внешний вид устройства Линза сканера штрихкодов 1, 2 Объектив камеры Микрофон Датчик освещения Кнопка питания Комбинирован- Индикатор ный разъем заряда аудио аккумулятора Программируем Разъем USB 3.2 ая кнопка Gen 1 Type-C Увеличение громкости Уменьшение громкости Сенсорный экран Динамик Светодиодная вспышка Микрофон... -
Page 28: Перед Началом Работы
и нажмите на противоположную сторону крыш- ки отсека ( 3. Подключите адаптер питания. (В качестве примера здесь показан адаптер питания, который поставляет компания Getac.) В процессе зарядки индикатор заряда батареи светится желтым цветом. После полной зарядки аккумулятора индикатор станет... -
Page 29: Первоначальный Запуск
может привести к пожару, задымлению или на устройстве. взрыву, а функциональность аккумулятора может значительно ухудшиться. Необходимо Чтобы открыть Руководство пользователя, кос- соблюдать приведенные ниже правила техники нитесь значка Папка Getac на главный экран, а безопасности. затем значка Руководство пользователя. Опасно! Уведомления о безопасности •... - Page 30 изделие соответствует рекомендациям ENERGY допустимой для пользователя температуре STAR® по энергосбережению. поверхности, установленным международными Все изделия Getac с логотипом ENERGY STAR® стандартами безопасности. Тем не менее, непре- соответствуют требованиям стандарта ENERGY рывный продолжительный контакт с нагревающи- мися поверхностями может причинить неудоб- STAR®, а...
- Page 31 了解硬件组件 条码扫描镜头 1, 2 相机镜头 麦克风 光传感器 电源钮 充电指示灯 复合式音频端口 P 按钮(自定义) USB 3.2 Gen 1 Type-C 端口 增加音量 降低音量 触摸屏 LED 闪光灯 扬声器 麦克风 相机镜头 NFC 天线 简 体 中 文 1, 3 额外电池组 底座接口 三合一天线直通接口 限特定型号 推开镜头盖以便使用相机。 如果您的型号配备的是高容量电池组,其外观和此处所示者略不同。...
- Page 32 品出货。 2. 打开设备左侧的保护门盖。 3. 将托盘装回原来位置。 门闩 方法为:用指甲尖将门闩往 4. 如果您的机台为基本款,请装回电池槽盖并锁 外拨到解锁位置 ( ),然后 好。(参照下一小节所述的方法。) 掀开保护门盖 ( )。 安装额外电池组(限特定型号) 如果您的型号包含额外电池组,请依照下述步骤安 装电池组。 1. 注意电池组的方向性,先将接口端以倾斜角度插 入槽内 ( ),再压下另一端 ( )。 简 体 3. 接上电源适配器。(此图所显示的范例为 Getac 中 所供应的电源适配器。) 文 充电指示灯亮橙色表示充电进行中。 充满电时,充电指示灯改亮绿色。...
- Page 33 • 切勿在高温(高于 80 °C / 176 °F)处充放电或存 备。 放电池,例如靠近火源、加热器之处、日光直射 的汽车里…等等。 更多信息 • 切勿使用不明充电器。 关于本产品的完整信息,请查看设备上提供的用户 • 切勿强行反向充电或反向连接。 手册。 • 切勿拆解电池。 点击主屏幕的 [Getac 文件夹] 图标, 然后点击 [用户 • 设备和电池需远离大气压力极低的环境,因为该 手册] 图标即可打开用户用手册。 环境可能导致电池爆炸或者易燃液体或气体泄 安全注意事项 漏。 警告 • 长时间以最高音量听音乐可能会损害听力。 • 电池需远离婴幼儿。 关于充电 • 电池发生明显异常现象时, 例如: 异味、 发热、 变...
- Page 34 Corporation 确保本产品符合 ENERGY STAR ® 的节 能规范。 所有获得 ENERGY STAR ® 标章的 Getac 产品皆符 合 ENERGY STAR ® 规范。电源管理功能在默认状态 下是启动的。Getac 符合 ENERGY STAR ® 的产品可 见于 EPA 网站: 简 https://www.energystar.gov/products 体 中 注: ZX80 必须是在搭配 Getac 提供的电源适配器情 文 况下使用才符合 ENERGY STAR ® 。...
- Page 35 ZX80 平 板 電 腦 快速指南 繁 體 中 文...
- Page 36 產品外觀介紹 條碼掃描鏡頭 相機鏡頭 1, 2 麥克風 光線感應器 電源鈕 充電指示燈 複合式音訊接頭 P 按鈕(自定義) USB 3.2 Gen 1 Type-C 接頭 調高音量 調低音量 觸控螢幕 LED 閃光燈 喇叭 麥克風 相機鏡頭 NFC 天線 額外電池組 1, 3 繁 底座接頭 體 中 文 三合⼀天線直通式接頭 限特定型號 推開鏡頭蓋以便使用相機。 如果您的型號配備的是高容量電池組,其外觀和此處所示者略不同。...
- Page 37 2. 打開裝置左側的保護門蓋。 門閂 3. 將托盤裝回原來位置。 方法為:用指甲尖將門閂往 4. 如果您的機台為基本款,請裝回電池槽蓋並鎖 外撥到解鎖位置 ( ) , 然後掀 好。(參照下⼀⼩節所述的方法。) 開保護門蓋 ( )。 安裝額外電池組(限特定型號) 如果您的型號包含額外電池組,請依照下述步驟安 裝電池組。 1. 注意電池組的方向性,先將接頭端以傾斜角度插 入槽內 ( ),再壓下另⼀端 ( )。 3. 接上電源整流器。(此圖所顯示的範例為 Getac 所供應的電源整流器。) 充電指示燈亮橙色表示充電進行中。 充飽電時,指示燈改亮綠色。 繁 體 中 文...
- Page 38 完成後,系統將顯示主螢幕,您即可開始使用 切勿在高溫(高於 80 °C / 176 °F)處充放電或存 • 本裝置。 放電池,例如靠近火源、電熱器之處、日光直射 的汽車裡…等等。 更多訊息 • 切勿使用非正版的充電器。 關於本產品的完整資訊,請查看裝置上提供的使用 • 切勿強行反向充電或反向連接。 手冊。 • 裝置和電池需遠離大氣壓力極低的環境,因為該 點選主螢幕的 [Getac 資料夾] 圖示,然後點選 [使用 環境可能導致電池爆炸或者易燃液體或氣體外 手冊] 圖示即可開啟使用手冊。 洩。 警告 安全注意事項 • 電池需遠離嬰幼兒。 • 減少電磁波影響,請妥適使用。 • 電池發生明顯異常現象時,例如:異味、發熱、變 形、變色,請即停止使用。 關於充電 •...
- Page 39 ® 不適的程度,請將裝置拿開,放在穩定的檯面上 範。電源管理功能在預設狀態下是啟動的。Getac 符 工作。 合 ENERGY STAR 的產品可見於 EPA 網站: ® • 裝置底部和電源整流器表面在正常使用下溫度 https://www.energystar.gov/products 會升高,因此請勿將裝置或電源整流器放在遇熱 註 : ZX80 必須是在搭配 Getac 提供的電源整流器情 會受損的家具或其他表面上。 況下使用才符合 ENERGY STAR 。 ® 關於健康的保護 • 警告:使用過度恐傷害視力。 • 使用 30 分鐘請休息 10 分鐘。 • 未滿 2 歲幼兒不看螢幕,2 歲以上每天看螢幕不...
- Page 40 5 6 1 5 G A 7 5 0 0 0 1 R 0 0...
Need help?
Do you have a question about the ZX80 and is the answer not in the manual?
Questions and answers