Table of Contents
Advertisement
Advertisement
Table of Contents

Related Manuals for TRENDnet TEW-MFP1


Summary of Contents for TRENDnet TEW-MFP1
- Page 1 Cover Page TRENDnet User’s Guide...
-
Page 2: Table Of Contents
Change Wireless settings ..................... 14 Wireless Site Survey ..................... 14 Wireless Security settings .................... 15 WPS Setting ......................... 15 Change device IP address .................... 16 Change Device Information ..................16 UPnP ..........................17 Change Language ......................17 © Copyright 2012 TRENDnet. All Rights Reserved. -
Page 3: Product Overview
USB printers into a shared network resource. Install your multifunction printer in the most ergonomic location and then connect the compact TEW-MFP1 to a high speed Wireless N network. An intuitive utility supports Windows and Mac operating systems and provides a seamless user experience. -
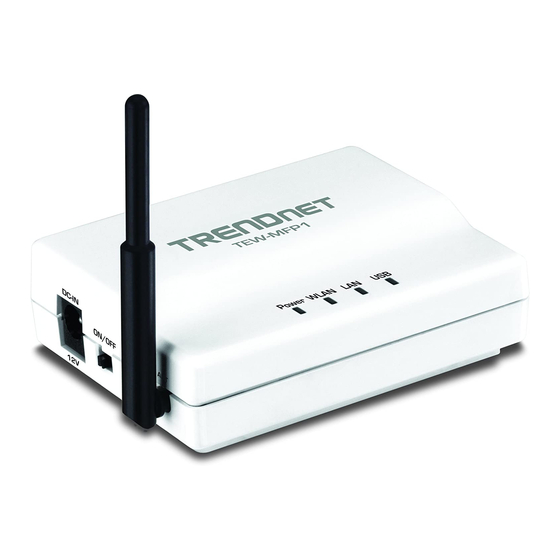
Page 4: Product Hardware Features
USB port. your network through the use of the included USB software utility. • LAN Port - Connect Ethernet cables (also called network cables) to your router or network LAN ports. © Copyright 2012 TRENDnet. All Rights Reserved. -
Page 5: Application Diagram
In addition to its print server Note: Use only the adapter that came with your router. functionality the TEW-MFP1 can also allows you to share USB storage devices over the network. •... -
Page 6: Utility Installation
1. For each computer that requires access to the print server, insert the Utility CD- ROM into your computer's CD-ROM Drive. 5. The utility will automatically find the TEW-MFP1 and your printer. When the TEW- 2. Click Install Utility MFP1 is connected to your network. -
Page 7: Network Installation
4. You will be prompted to install the utility. Click Install to start the installation. There are 2 ways to install the TEW-MFP1. The easiest way is to use Wi-Fi Protected Setup (WPS) Push Button Configuration (PBC) setup. This feature allows you to setup your TEW-MFP1 with your wireless network with just a push of a button. -
Page 8: Manual Setup
Verify that the WPS feature is enabled and functioning. Please refer to your wireless router or access point’s manual or contact their technical support for 1. Plug the TEW-MFP1 with the provided network cable to one of the LAN ports of instructions. - Page 9 10. Under the Site Survey Setting section, click Apply. The TEW-MFP1 will scan your environment for available wireless networks. 14. Move the power switch of the TEW-MFP1 to the “Off” position and disconnect the power adapter and network cable. 15. Place theTEW-MFP1 in the desired location with the near your printer.
-
Page 10: Using The Utility
Windows and Macintosh operating systems. 19. Verify that the status LED indicators on the front of the TEW-MFP1 are fully functional (Power is solid green, WLAN is solid green and USB port is solid green). -
Page 11: Utility Main Window
Please refer to see Log into your router management page option will disable the utility from automatically starting when logging on. see “Access your router management page” on page 14 for additional information on advance settings. © Copyright 2012 TRENDnet. All Rights Reserved. -
Page 12: Connect
USB device you would like to establish connection too. Windows OS To send t a request to connect to a USB device, click the Request to Connect button. © Copyright 2012 TRENDnet. All Rights Reserved. - Page 13 If the remote computer accepts the request, the local computer will display the message below. Click Close to close the message. The local computer sending the request will show the status message below. • Reject – Clicking this option will disregard the request. © Copyright 2012 TRENDnet. All Rights Reserved.
-
Page 14: Connect To A Printer
3. Once your computer is connected, you can send print jobs to the printer. 4. After you have finished printing, click Disconnect, to make the printer available to other computers on your network that use the printer, or, you can use the Auto- Connect Printer Feature. © Copyright 2012 TRENDnet. All Rights Reserved. -
Page 15: Connect To A Scanner
Before • When the TEW-MFP1 is set to DHCP the easiest way to access the management installing the scanner drivers, connect your computer to the printer using the USB utility page is through the USB Control Center Utility. -
Page 16: Change Wireless Settings
The selected wireless network will automatically be entered in the SSID field. • Ad-Hoc: Peer to Peer connection type If you cannot see your wireless network click on Scan AP to refresh the list. © Copyright 2012 TRENDnet. All Rights Reserved. -
Page 17: Wireless Security Settings
Similar to the previous section, you can change the wireless security settings of the device when changes were made on your wireless network. The TEW-MFP1 supports WEP, WPA-PSK and WPA2-PSK security types. WEP is the only security type that can be used when the device is set to Ad-Hoc Network Type. -
Page 18: Change Device Ip Address
4. Click Apply. may cause issues. 1. Log into your router management page (see “Access your router management page” on page 13). Click on General tab and scroll down to the TCP/IP section. © Copyright 2012 TRENDnet. All Rights Reserved. -
Page 19: Upnp
3. Select your desired language on the pull down menu. steps below. 4. Click Apply to save settings. Note: Changes to these settings are case sensitive and should be written down somewhere and stored. © Copyright 2012 TRENDnet. All Rights Reserved. -
Page 20: Maintenance
4. Click Yes to confirm the reset 1. Log into your router management page (see “Access your router management page” on page 13). 2. Click on Maintenance tab © Copyright 2012 TRENDnet. All Rights Reserved. -
Page 21: Upgrade Firmware
7. Return back to the device management screen and click the Upgrade Firmware button 3. Select System Status tab 8. Click Browse and select the firmware file from the unzipped folder 9. Click the Upload button to upgrade the device firmware © Copyright 2012 TRENDnet. All Rights Reserved. -
Page 22: Network Status
2. Click on Status 1. Log into your router management page (see “Access your router management page” on page 13). 2. Click on Status tab 3. Select Network Status tab 3. Select Wireless Status tab © Copyright 2012 TRENDnet. All Rights Reserved. -
Page 23: Management Page Structure
Channel No • WPS Setting Network Type Link Quality Administrator Signal Strength • Set Administrator Security Administrator user name Administrator Password • User Account List User account username User account password User account Permission © Copyright 2012 TRENDnet. All Rights Reserved. -
Page 24: Troubleshooting
2. Make sure the Power and LAN lights are lit. Answer: 3. Make sure your network adapter TCP/IP settings are set to Obtain an IP address 1. No, the TEW-MFP1 only supports Wi-Fi Protected Setup (WPS) Push Button automatically or DHCP (see the steps below). Configuration (PBC). -
Page 25: Appendix
2. In the Network Preference window, next to "Show:", select Network Status. You'll see your network status and your IP address settings displayed. Note: If you are experiencing difficulties, please contact your computer or operating system manufacturer for assistance. © Copyright 2012 TRENDnet. All Rights Reserved. - Page 26 6. Any device operating on the 2.4GHz frequency will cause interference. Devices and click the Apply button. such as 2.4GHz cordless phones or other wireless remotes operating on the 2.4GHz frequency can potentially drop the wireless signal. © Copyright 2012 TRENDnet. All Rights Reserved.
-
Page 27: Federal Communication Commission Interference Statement
The availability of some specific channels and/or operational frequency bands are country dependent and are firmware programmed at the factory to match the intended destination. The firmware setting is not accessible by the end user. © Copyright 2012 TRENDnet. All Rights Reserved. -
Page 28: Technical Specifications
** Control Center utility installation required for each computer in order to access the print server Storage: -10 ~ 60°C (13.9~139 °F) Temperature Operating: 5 ~ 40°C (41~104 °F) Humidity Max. 90% (non-condensing) © Copyright 2012 TRENDnet. All Rights Reserved. - Page 29 Download section limited to, duty, tax, and other fees. and look for the desired TRENDnet product to access to the GPL Code or LGPL Code. These codes are distributed WITHOUT WARRANTY and are subject to the copyrights of WARRANTIES EXCLUSIVE: IF THE TRENDNET PRODUCT DOES NOT OPERATE AS the developers.
Need help?
Do you have a question about the TEW-MFP1 and is the answer not in the manual?
Questions and answers