Denon AVR-4310CI Owner's Manual
Denon avr-4310ci: user guide
Hide thumbs
Also See for AVR-4310CI:
- Code list (6 pages) ,
- Brochure & specs (2 pages) ,
- Getting started (2 pages)
Table of Contents
Advertisement
Advertisement
Table of Contents

Related Manuals for Denon AVR-4310CI


Summary of Contents for Denon AVR-4310CI
- Page 1 Use this manual in combination with the operating guide displayed on the GUI screen. GUI Menu Operation (vpage 26) GUI Menu Map (vpage 25) Language (vpage 45) Remote Control Unit Operations (vpage 89) AV SURROUND RECEIVER AVR-4310CI Owner’s Manual...
- Page 2 IMPOTANT SAFETY SAFETY PRECAUTIONS CAUTION: INSTRUCTIONS • The ventilation should not be impeded by covering the ventilation openings with items, such as newspapers, tablecloths, curtains, CAUTION etc. Read these instructions. RISK OF ELECTRIC SHOCK • No naked flame sources, such as lighted candles, should be Keep these instructions.
- Page 3 This product, when installed as indicated in the instructions contained in this manual, meets FCC requirements. et la poussière. Modification not expressly approved by DENON may void your authority, granted by the FCC, to use the product. • Avoid high temperatures.
-
Page 4: Table Of Contents
Playing an iPod ® Using a Control Dock for iPod ·························53 Preparations ··················································································3 Other Operations ········································································79 Playing an iPod ® Connected Directly to the AVR-4310CI’s Accessories ··················································································3 Playing a Blu-ray Disc Player Compatible with Insert Batteries in the Remote Control Unit ·································3 USB Port ·····················································································55... -
Page 5: Getting Started
Presetting ····················································································90 Check once again that all connections are correct and that there are Operating Preset Components ···················································90 Perform the operations leading to playback on the AVR-4310CI in the no problems with the connection cables. Setting the Remote ID ································································93 order shown below. -
Page 6: Preparations
(The In addition to the AVR-4310CI, the included main remote control unit product. supplied batteries are only for verifying operation.) (RC-1116) can also be used to operate the equipment listed below. -
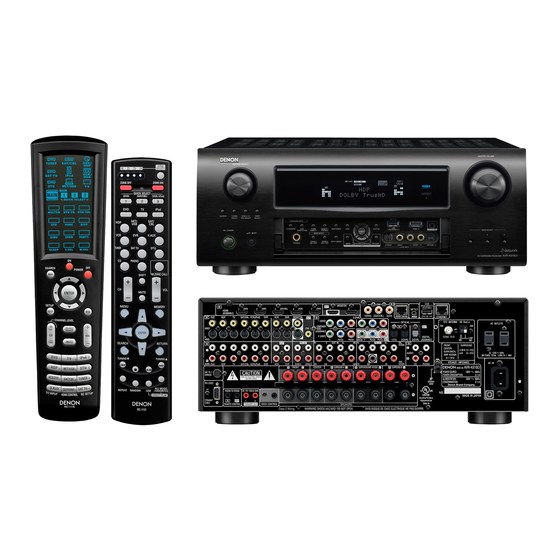
Page 7: Part Names And Functions
GWith the door openH Part Names and Functions Front Panel For buttons not explained here, see the page indicated in parentheses ( ). Q9 W0 Q7 W7 Headphones jack ········································ (70) HDMI IN connector ····································· (14) W8 ZONE2 ON/OFF button ······························ (87) USB (iPod DIRECT) port ·····························... -
Page 8: Display
This lights when the mute mode is selected. Input mode indicators PARTY indicators D.LINK indicator These indicators light during party mode. This lights when playing using DENON LINK • ORGANIZER connections. This lights to indicate that party mode has started as Organizer. -
Page 9: Rear Panel
Part Names and Functions Rear Panel SIRIUS connector ······································· (19) AC inlet ························································ (24) DENON LINK connector ····························· (20) RS-232C connector ····································· (22) AC OUTLETS ··············································· (24) COMPONENT VIDEO connectors ·········(15, 17) REMOTE CONTROL jacks ·························· (22) HD Radio antenna terminals ··············· (19, 20) HDMI connectors ········································... -
Page 10: Remote Control Unit
Operations Possible by Main Remote Control Unit Remote Control Unit Operations on the AVR-4310CI Main Remote Control Unit (RC-1116) Operations on 9 devices other that the AVR-4310CI • Preset the remote control codes of the devices to be operated ( v page 90). •... - Page 11 Part Names and Functions Sub Remote Control Unit (RC-1121) Selected Device Function button Button name select button indicator ZONE indicators ········································· (98) Preset Channel buttons ····················(58 ~ 61, 64) QUICK SELECT buttons ······················· (82, 88) Tuner system buttons ····························(57 ~ 60) Input source select buttons ·······················...
-
Page 12: Connections
• Do not bundle power cords together with connection cables. Doing Analog (White) so can result in humming or noise. Other cables connections (Red) (stereo, surround) DENON LINK Audio cable connections DENON LINK cable Analog connections Network (monaural, for connections Audio cable Ethernet cable subwoofer) Speaker connections... -
Page 13: Converting Input Video Signals For Output (Video Conversion Function)
This function automatically converts various formats of video signals input to the AVR-4310CI into the format used to output the video signals from the AVR-4310CI to a monitor. (vpage 107 “Relationship Resolutions of HDMI-compatible TVs can be checked at “HDMI Information” – “Monitor1” or “Monitor2”... -
Page 14: Installing / Setting The Speakers
Installing / Setting the Speakers When 7.1ch (Front Height Speaker) Connected When 7.1ch (Front Wide Speaker) Connected • The AVR-4310CI is compatible with various types of Front wide speakers Front height speakers surround playback. Front speakers • Decide on the surround modes to be played on Front speakers z1: 22 ~ 30˚... - Page 15 Installing/Setting the Speakers s Set the “Amp Assign” Mode According to the Speaker Layout The signals output from the AVR-4310CI’s SURR. BACK/AMP ASSIGN speaker terminals can be switched (vpage 34 “Amp Assign”). Amp assign SURR. BACK / Amp assign SURR. BACK /...
-
Page 16: Speaker Connections
B and + (red) and – (black) polarities on the speakers When the “Amp Assign” setting (vpage 34) is being connected to the AVR-4310CI, and be sure to “Bi-Amp”, connect as follows. interconnect the channels and polarities correctly. Subwoofer Front speakers Peel off about 0.03 ft/10... -
Page 17: Connecting Devices
Connections Connecting Devices Connecting Devices Equipped with HDMI Terminals The AVR-4310CI allows connection of inputs from up to 6 HDMI devices and output to 2 monitors. Important Information Video Digital Connecting Devices (vpage 14) Satellite cassette video About HDMI HD player... -
Page 18: Connecting The Monitor
When the AVR-4310CI is connected to other devices with HDMI For instructions on HDMI connections, see “Connecting Devices cables, also connect the AVR-4310CI and TV using an HDMI cable. For instructions on HDMI connections, see “Connecting Devices Equipped with HDMI Terminals” on page 14. - Page 19 Set other than when iPod is assigned to the VCR (iPod) terminal. “Input Assign” – “iPod dock“ (vpage 48) NOTE The SIGNAL GND terminal of the AVR-4310CI is not a safety ground connection. Connect it to reduce noise when noise is excessive. •...
-
Page 20: Connecting The Recording Components
Set as Necessary assigned. • To record video signals through the AVR-4310CI, use the same type “Input Assign” (vpage 46) Set this to change the input signal to which the input source is of video cable for connection between the AVR-4310CI and the assigned. - Page 21 Satellite Receiver / Cable Tuner (Set Top Box) XM Connector Connect the Tuner The AVR-4310CI is an XM Ready ® receiver. You can receive XM ® Select the terminal to use and connect the device. • Satellite Radio by connecting to the XM Mini-Tuner and Home Dock For instructions on HDMI connections, see “Connecting Devices...
- Page 22 SIRIUS Connector HD Radio Terminals NOTE The AVR-4310CI is a SIRIUS Satellite Radio Ready ® receiver. You can Keep the power cord unplugged until the SiriusConnect Home Tuner • HD Radio is a service that is only available within the United States.
-
Page 23: Connections To Other Devices
Bend in the reverse direction. Multi-channel playback is possible with BD, Super Audio CD, etc. Video camera / Game console (vpage 79 “Playing a Blu-ray Disc Player Compatible with DENON LINK 4th“, “Playing Super Audio CD“). a. With the antenna on top of any stable surface. - Page 24 USB port on the front panel. terminals (EXT. IN), set “Amp Assign” (vpage 34) to “Normal”. • To connect an iPod to the AVR-4310CI, use the USB cable supplied with the iPod. • When you want to playback a movie file stored on the iPod, use the DENON control dock for iPod (ASD-11R or ASD-1R, sold separately) (vpage 16 “Control Dock for iPod”).
-
Page 25: External Controller
TRIGGER OUT jacks • When using just one surround back speaker, connect it to the left Set this to use the RS-232C connector for the DENON RF remote The TRIGGER OUT output terminal outputs a maximum 12 channel (L). controller. -
Page 26: Connecting To A Home Network (Lan)
Connecting” (vpage 39). other sources. You can also control the AVR-4310CI from your PC via • With the AVR-4310CI, it is possible to use the DHCP and Auto IP Router the Web browser. functions to make the network settings automatically. -
Page 27: Connecting The Power Cord
Connecting the Power Cord Once Connections are Symbols used to indicate buttons in this manual Completed Button located on both the main unit Wait until all connections have been completed before connecting the BUTTON and the remote control unit power cord. <BUTTON>... -
Page 28: Settings
Settings GUI Menu Map Symbols used to indicate buttons in this manual Button located on both the main unit MENU Pressing displays the GUI menu. From this menu, you can move Source Select (vpage 46) BUTTON and the remote control unit to various setting screens. -
Page 29: Gui Menu Operation
GUI Menu Operation • When a TV is connected to the AVR-4310CI, the GUI menu, sound Examples of GUI Menu Screen Displays fi eld parameters, etc., can be displayed on the TV. This allows you to operate the AVR-4310CI and make settings on it Typical examples are described below. -
Page 30: Selecting The Input Source
Selecting the input source using the Source Select menu (GUI menu) • When using with an iPod connected directly to the AVR-4310CI’s USB pot, select “USB/iPod” for the [SOURCE SELECT] w Selecting the input source using the (Main remote control unit) input source. -
Page 31: Make The Optimal Speaker Settings, And Correct The Room Acoustics (Audyssey Auto Setup)
Make the Optimal Speaker Settings, and Correct the Room Acoustics (Audyssey Auto Setup) The acoustic characteristics of the connected speakers and listening room are measured and the optimum settings are made automatically. When Using the Front Height Speakers Important information Audyssey Auto Setup Flow GExample qH GExample wH... - Page 32 Turn on the TV and subwoofer power. Setup be affected by these sounds. Change the TV input to AVR-4310CI input. microphone Cell phones should be placed away from all audio electronics during the measurement process as Radio Frequency Interference (RFI) Turn on the AVR-4310CI power.
- Page 33 The signal output from the SURR.BACK/AMP ASSIGN speaker If you set the channels you will not use beforehand, those channels terminal of the AVR-4310CI can be switched to match your speaker will not be measured. Therefore, you can save an amount of time Select “Measure”...
- Page 34 Repeat step the actual distance due to added electrical delay common in that the speakers are not connected properly. Turn the AVR-4310CI subwoofers. measuring positions off, check the speaker connections and repeat the measurement 3 ~ 8.
-
Page 35: Error Messages
When Performing Audyssey Auto Setup Over • Included setup microphone is not connected. • Connect the included setup microphone to the Again SETUP MIC jack of the AVR-4310CI. ENTER Press to select “Retry”, and then press • Not all speakers could be detected. - Page 36 Make the Optimal Speaker Settings, and Correct the Room Acoustics (Audyssey Auto Setup) Subwoofer Level Error Message and How to Adjust Check the Measuring Results and The optimal level of the subwoofer channel is 75 dB. During subwoofer level measurement (“ STEP2 : Speaker Detection” (vpage 30), Equalizer Type after Audyssey Auto Perform Audyssey Auto Setup, 1 - q), an error message is displayed when the subwoofer level is outside the 72 ~ 78 dB range.
-
Page 37: Making Detailed Settings (Manual Setup)
Front Height : Outputs front height channel audio. Front Wide : Outputs front wide channel audio. Since “Amp Assign” of AVR-4310CI is set to “ZONE2” by default, Making the audio settings (Audio Setup) v page 38 audio is not output from the surround back speakers. When using the surround back speakers with MAIN ZONE, change the “Amp Assign”... - Page 38 Making Detailed Settings (Manual Setup) Setting items Setting contents Setting items Setting contents Speaker Configuration Surround A : Set the presence and size of the surround speakers A. Speaker Configuration Front Height : Set the presence and size of the front height speakers. (Continued) •...
- Page 39 7CH STEREO : Set the surround speakers to use during 7CH STEREO mode. • Speakers set to “None” in the “Speaker Configuration” (vpage 34) DSP SIMULATION : Set the surround speakers to use during the DENON settings are not displayed. original surround mode. •...
- Page 40 This can be set when “Control“ is set to “ON“. controls operations of a Control Function”). Power Off Control : The power of the AVR-4310CI and external device TV that is compatible with Monitor Out Auto (Dual) : The presence of a TV connected to the MONITOR 1 or turn off together.
- Page 41 Making Detailed Settings (Manual Setup) Setting items Setting contents Making the Audio Settings (Audio Setup) 2ch Direct/Stereo SW Mode : Select low range signal to be reproduced by subwoofer. Default settings are underlined. (Continued) • LFE : When the “2ch Direct/Stereo” – “Front” setting is set to “Large”, the LFE signal alone is output from the subwoofer.
- Page 42 “ON” in the AVR-4310CI’s default settings. function. • If the AVR-4310CI is being used connected to a network without the When connecting to a network that has no DHCP function, perform the DHCP function, the network settings must be made. In this case, some setting in step 3.
- Page 43 / tur Cancel RETURN Friendly Name Edit : The Friendly Name is the name AVR-4310CI Proxy server is used displayed on the network. Up to 63 characters can be input. The default Friendly Name on fi rst use is “DENON:[AVR-4310CI]”.
- Page 44 You can set to the upper limit set with “Volume Limit” (vpage 42) . • The password may not contain underscores ( _ ). Network Status : Displays up to a maximum of 10 DENON products Napster Account Username / Password connected on the same network.
- Page 45 OFF : Screen saver is not activated. Wall Paper : Set wallpaper to display the background when playback is stopped, etc. • Picture : Set the background to a picture (DENON logo). • Black : Set the background to black. •...
- Page 46 Making Detailed Settings (Manual Setup) Setting items Setting contents Setting items Setting contents Format : Set the video signal format to be output for the TV you are Quick Select Name 1. Use to select the name of the Quick Select setting you want to (Continued) using.
- Page 47 Zone” is selected, and when the input source set to “ON” with Used when receiving “When Setting for Input Source” is selected. Only use this function if so instructed by a DENON serviceperson or maintenance from a DENON installer. When setting for “Vertical Stretch” service engineer or custom Activate trigger out through linkage when “Vertical Stretch”...
- Page 48 • • In the event of an update error during update or upgrade, turn the AVR-4310CI’s power off and then on again. “Update Retry” appears on the display and update restarts from the point at which update failed. If the error continues despite this, check the network environment.
-
Page 49: Making The Input Settings (Source Select)
Making the Input Settings Important Information (Source Select) About the Display of Input Sources in This Manual For details on how to select, set and cancel settings for each menu, see “GUI Menu In this manual, the names of input sources that can be set at the different items are indicated as shown Operation”... - Page 50 3 / D.LINK (DENON LINK) z The “INPUT ASSIGN” screen is displayed. z : “D.LINK” is set when the AVR-4310CI is connected by DENON LINK to a DENON Blu-ray disc / DVD player (vpage 20 “Components INPUT ASSIGN [1/2] Equipped with a DENON LINK Connector”).
- Page 51 V.AUX SIRIUS source displayed as “– – –”. • If control dock for iPod is not connected to the AVR-4310CI, assignment Default OPT 2 OPT 3 None of the “iPod dock” is disabled, and you can use it as a standard input setting source.
-
Page 52: Input Mode
Changing the Input Mode and Decoding Mode • When “Video Convert” is set to “OFF”, the video conversion function does not work. In this case, connect the AVR-4310CI and TV with the (Input Mode) same type of cable. Default settings are underlined. -
Page 53: Source Level
Making the Input Settings (Source Select) Setting items Setting contents Correcting the Input Source’s Playback Level Decode Mode (Source Level) This can be set when the input source is Set the decode mode for V.AUX . SAT/CBL Default settings are underlined. input source Auto : Detect type of digital input signal and decode and play •... -
Page 54: Playback Mode
Making the Input Settings (Source Select) Setting the NET/USB Playback Mode Automatically Presetting Radio Stations (Playback Mode) (Auto Preset) Default settings are underlined. Default settings are underlined. This can be set when the input source is NET/USB . Setting items Setting contents Setting items Setting contents... -
Page 55: Parental Lock
Making the Input Settings (Source Select) Setting SIRIUS Radio Reception Restrictions Giving Names to Preset Stations (Preset Name) (Parental Lock) Default settings are underlined. Default settings are underlined. Setting items Setting contents This can be set when the input source is SIRIUS . •... -
Page 56: Playback
Playback preparation. q Connecting the DENON control dock for iPod to the AVR- 4310CI (vpage 16 “Control Dock for iPod”). w Set the iPod ® in the DENON control dock for iPod. Playing Components Turn the AVR-4310CI power on. (vpage 24 “Turning the Power On“) - Page 57 Photos and videos on an iPod ® equipped with a slide show or video There are two modes for display the contents recorded on the Fast-forwarding or fast-reversing (vpage 70) function can be played using a DENON ASD-1R control dock for iPod. iPod. To cue to the beginning of a track (vpage 70)
-
Page 58: Playing An Ipod ® Connected Directly To The Avr-4310Ci's Usb Port
Control Unit”). BUTTON and the remote control unit • Music stored on an iPod can be played on the AVR-4310CI when the <BUTTON> Button only on the main unit When no control dock for iPod is connected, this operation is also AVR-4310CI and iPod are connected by USB cable. -
Page 59: Tuning In Radio Stations
To subscribe to SIRIUS, U.S. and Canadian customers can call 1-888- HD Radio™ technology manufactured under license from iBiquity • DENON will accept no responsibility whatsoever for any loss of iPod 539-SIRI (1-888-539-7474) or visit sirius.com (US) or siriuscanada.ca Digital Corporation. iBiquity Digital, the HD Radio logo, and the data. -
Page 60: Listening To Xm Satellite Radio
Symbols used to indicate buttons in this manual Press <STATUS> until “SIGNAL” appears on the Button located on both the main unit When operating XM with the AVR-4310CI via the main remote control display. BUTTON [SAT TU] and the remote control unit... -
Page 61: Listening To Sirius Satellite Radio
Listening to SIRIUS Satellite Radio Press Your favorite broadcast channels can be preset so that you can tune When operating SIRIUS with the AVR-4310CI via the main remote them in easily. Up to 56 stations can be preset. [SAT TU] control unit or sub remote control unit, use Tune in the broadcast channel you want to preset. - Page 62 Tuning in Radio Stations – SIRIUS Satellite Radio Checking the SIRIUS Signal Strength and Radio ID Presetting Radio Channels (Preset Memory) Symbols used to indicate buttons in this manual Press <STATUS> until “SIGNAL” appears on the Your favorite broadcast channels can be preset so that you can tune Button located on both the main unit display.
-
Page 63: Listening To Hd Radio Stations
Tuning in Radio Stations – SIRIUS Satellite Radio and HD Radio Searching Categories Press • Channels under Parental Lock cannot be tuned in by performing • If the desired station cannot be tuned in with auto tuning, tune it in Tuning Up/Down or by category search. - Page 64 Tuning in Radio Stations – HD Radio Listening to Preset Stations Direct Frequency Tuning Symbols used to indicate buttons in this manual [A ~ G] You can enter the receiving frequency directly to tune in. Press to select the memory block (A to G). Button located on both the main unit BUTTON and the remote control unit...
-
Page 65: Playing Network Audio, Usb Memory Devices
This function lets you play music files and playlists (m3u, wpl) stored Memory Devices be displayed while playing the file. on a computer (media server) connected to the AVR-4310CI via a network. Slide Show Function This procedure can be used to play Internet radio stations or With the AVR-4310CI’s network audio playback function, connection... -
Page 66: Listening To Internet Radio
Press to select the station, then press ENTER of music they want to hear on the AVR-4310CI. Before you can use Napster, you will need to visit the Napster website on your PC to Playback starts once buffering reaches “100%”. - Page 67 “Server Full” or “Connection Down” is displayed if the station is busy or not broadcasting. • On the AVR-4310CI, folder and fi le names can be displayed as Press to select “Yes”. titles. Any characters that cannot be displayed are replaced with...
-
Page 68: Playing Files Stored On A Computer
Playing Network Audio, USB Memory Devices Playing Files Stored on a Computer Symbols used to indicate buttons in this manual • When playing still picture (JPEG) fi les, fi les can also be selected Button located on both the main unit Use this procedure to play music fi les, image fi les or playlists. -
Page 69: Playing Files Stored On Usb Memory Devices
AC adapter. Playback starts once buffering reaches “100%”. [Input characters] • It is not possible to connect and use a computer via the AVR-4310CI’s Adjust the items below. USB port using a USB cable. GLower case charactersH abcdefghijklmnopqrstuvwxyz Adjusting the master volume •... - Page 70 Playing Napster Enter a Character Search For the Track You Want Registering Tracks in My Napster Library Symbols used to indicate buttons in this manual to Listen to Press while the track you wish to register is Button located on both the main unit Press [SEARCH] playing.
-
Page 71: Listening To Rhapsody
Playing Rhapsody Select the Search Mode Listening to Rhapsody After inputting the “Username” and “Password”, select “OK”, then press ENTER Playback preparation. [1/4] If the “Username” and “Password” match, the top menu for Rhapsody Rhapsody is displayed. q Check the network environment, then turn on the AVR- Rhapsody Music Guide 4310CI’s power (vpage 23 “Connecting to a Home Search... - Page 72 Playing Rhapsody Track Menu e Search From the Rhapsody Internet Radio Station Symbols used to indicate buttons in this manual Press during playback to display the Track Menu. to select “Rhapsody Channels”, then press Button located on both the main unit BUTTON and the remote control unit ENTER...
-
Page 73: Operations During Playback
Operations During Playback To Stop Shuffling Playback During playback, either press and hold ENTER or press Press [RANDOM] Adjusting the Master Volume Albums : Shuffle songs from current album only. Songs : Shuffle all songs. MASTER VOLUME to adjust the volume. : Cancel shuffle mode. -
Page 74: Selecting The Surround Mode (Surround Mode)
DTS 96/24 (z3) other than “None”. z1 : This is displayed when the input signal is “DTS-ES Matrix 6.1” and the AVR-4310CI’s “AFDM” setting is set to “ON” z2 : This is displayed when the input signal is “DTS-ES Discrete 6.1”. -
Page 75: Stereo Playback
“DIRECT”. The desired mode according to the program source and viewing providing extremely high quality sound. situation can be selected from among 10 DENON original surround modes. Playing the source (vpage 53). Displaying the Currently Playing Surround Mode Playing the source (vpage 53). -
Page 76: Adjusting The Sound And Picture Quality
Adjusting the Sound and Picture Quality (Audio/Video Adjust) For details on how to select, set and cancel settings for each menu, see “GUI Menu Operation” (vpage 26). Setting items Setting contents Adjusting the Sound (Audio Adjust) Surround Parameters LFE : Adjust the low-frequency effects level (LFE). Default settings are underlined. - Page 77 Adjusting the Sound and Picture Quality (Audio/Video Adjust) Setting items Setting contents Setting items Setting contents PLgx CINEMA z 3 : Generate and play the surround back signals by Surround Parameters Front Height : Set the Dolby PLgz Height mode to ON or OFF. Surround Parameters (Continued) •...
- Page 78 Adjusting the Sound and Picture Quality (Audio/Video Adjust) Setting items Setting contents Setting items Setting contents Audyssey Settings MultEQ XT : Corrects both time and frequency response problems in the Audyssey Settings Dynamic EQ / Volume : OFF Dynamic EQ : ON/Volume : OFF Set MultEQ XT, Dynamic EQ listening area.
- Page 79 Adjusting the Sound and Picture Quality (Audio/Video Adjust) Setting items Setting contents Setting items Setting contents Dynamic Volume : Solves the problem of large variations in volume level Audyssey DSX Settings DSX : Provides more immersive surround sound by adding the new Audyssey Settings between TV, movies and other content (between quiet passages and loud Adjust...
-
Page 80: Adjusting The Picture Quality (Picture Adjust)
Adjusting the Sound and Picture Quality (Audio/Video Adjust) Setting items Setting contents Setting items Setting contents Manual EQ Adjust CH : Correct the tone of each speaker. RESTORER About the RESTORER function Use the graphic equalizer (Continued) q Select the speaker tone adjustment method. •... -
Page 81: Checking The Status (Information)
Checking the Status (Information) Setting items Setting contents Setting items Setting contents Quick Select 1 / Quick Select 2 / Quick Select 3 / ZONE2 Quick Select MAIN ZONE Quick Select / ZONE3 Quick Select Status Shows information about settings for MAIN ZONE. •... -
Page 82: Other Operations And Convenient Functions
• When a BD is played with the input mode set to “Auto”, playback is performed in the DENON LINK 4th mode. When a disc other than a BD is played with the input mode set to “Auto”, playback is automatically performed in the DENON LINK 3rd mode. -
Page 83: Recording On An External Device (Rec Out Mode)
, then turn Should any of the operations below be performed, the interlocking • When you want to listen to TV audio by AVR-4310CI, connect optical SELECT> until “ZONE2 SOURCE” is displayed. function may be reset, in which case, repeat step’s 1 and 2. -
Page 84: Setting The Power To Standby After A Certain Amount Of Time (Sleep Timer Function)
<BUTTON> Button only on the main unit With this function, you can set the AVR-4310CI so that the power is Adjust the Volume of the Different Speakers [BUTTON] Button only on the remote control unit... -
Page 85: Saving Frequently Used Settings (Quick Select Function)
DIRECT) can be played on multiple DENON products equipped with • If there are fewer than four attendees, a device can join the party the Party Mode function and connected in a network. -
Page 86: Operating A Wireless Lan-Compatible Mobile Terminal To Play Music And Videos
Select a player Mobile terminal device When selecting the AVR-4310CI from the mobile terminal device, the name of the AVR-4310CI is displayed at “Friendly Name” (vpage 40 “Friendly Name Edit”). From the mobile terminal device, browse the media server in the same network and The following operations are possible from the mobile terminal device: •... -
Page 87: Operating The Avr-4310Ci With A Browser (Web Control Function)
Normally, there is a change to the latest information each time you operate. When operated from the main unit, click because For example, if the IP address of AVR-4310CI is “192.168.100.33”, the screen is not updated. enter “http://192.168.100.33”. -
Page 88: Various Memory Functions
Convenient Functions GExample 2H Setup menu screen GExample 4H PDA menu screen GExample 6H Dedicated iPod Touch screen When accessed from the iPod Touch browser, an optimized operation screen is displayed. z18: Select to operate each zone. NOTE You cannot change setup menu operations and zone name on the PDA menu screen. -
Page 89: Playing In Zone2/Zone3 (Multi-Zone Function) ·86
Audio Connections (ZONE2, ZONE3) The source selected for ZONE2 is also output from the recording output connectors. The video signals of the AVR-4310CI’s ZONE2 video output terminal The audio signals of the AVR-4310CI’s ZONE2 and ZONE3 audio are played by the ZONE2 TV. -
Page 90: Playback
Output” and “w Zone Playback by Audio Output (PRE OUT)”. Operation on the main unit <BUTTON> Button only on the main unit Turn on the AVR-4310CI’s power. [BUTTON] <ZONE2/3/ REC SELECT> Button only on the remote control unit P ress... -
Page 91: Menu Operation
Calling the Settings Out The sleep timer is also canceled when the AVR-4310CI is set to the Press [MENU] to enter the setting. standby mode or the ZONE2 or ZONE3 power is turned off. -
Page 92: Operating The Main Remote Control Unit
In the “MAIN”, “SAT TU”, “DTU”, “iPod” and “NET/USB” : MAIN / ZONE2 / ZONE3 / ZONE4 z / MACRO modes, when the remote ID is set, the AVR-4310CI can be used independently even in an environment containing multiple DENON : Cannot be used. -
Page 93: Presetting
Operating the Main Remote Control Unit Presetting Operating Preset Components The included main remote control unit can be preset to operate Press [DEVICE SELECTOR] for the component to be CD Player / CD Recorder devices of various brands. operated. EL Display The mode indicator of the device to be operated flashes. - Page 94 Operating the Main Remote Control Unit Digital Video Recorder / Video cassette Recorder / Set top box for Satellite / Cable / IP TV / HD TV Cassette Deck EL Display EL Display EL Display EL Display EL Display EL Display Device select Device select button...
- Page 95 Operating the Main Remote Control Unit iPod XM / SIRIUS HD Radio EL Display EL Display EL Display EL Display EL Display EL Display Device select Device select Device select button button button A ~ G Preset memory block selection A ~ G Preset memory block selection 1-track/All-track repeat play...
-
Page 96: Setting The Remote
NET/USB Signal Setting the Remote ID transmission EL Display indicator EL Display When using multiple DENON AV receivers in the same room, make this setting so that only the desired AV receiver operates. Device select [DEVICE button SELECTOR] Press [MAIN] to light the “MAIN”... -
Page 97: Learning Function
• With some remote control units, the signals cannot be learned or the If your AV devices are of a brand other than DENON or if they cannot This function lets you register a series of operations at a single... -
Page 98: Punch Through Function
Operating the Main Remote Control Unit Calling out Signal Setting the Time the Backlight Stays Lit transmission [MAIN] Press , to select “MACRO”. indicator Press and hold in [RC SETUP] for at least 3 seconds. SAT/CBL] The signal transmission indicator flashes twice. [DEVICE [MACRO] Press... -
Page 99: Specifying The Zone Used With The Main Remote Control
Operating the Main Remote Control Unit MACRO Function Specifying the Zone Used with the Main Resetting the Main Remote Control Unit [RC SETUP] Press and hold in for at least 3 seconds. Remote Control Learning Function The signal transmission indicator flashes twice. [MAIN] When the Device Select button is pressed, only the set... -
Page 100: Operating The Sub Remote Control Unit
ZONE OFF Power turned off ( b 1) • The sub remote control unit can also be used for multi-zone, so you can use it to control the AVR-4310CI from other rooms. ZONE ON Power turned on ( b 1) •... -
Page 101: Switching Zones
Setting the Remote ID Remote Control Unit is Used Use this procedure to select the zone to be operated by the sub When using multiple DENON AV receivers in the same room, make this (ZONE SELECT LOCK Mode) remote control unit. -
Page 102: Other Information
Explanation of Terms DTS Surround Dolby Pro Logic gx is a further improved version of the Dolby Pro The AVR-4310CI is equipped with a digital signal processing circuit Logic g matrix decoding technology. DTS Digital Surround that lets you play program sources in the surround mode to achieve Audio signals recorded in 2-channels are decoded to achieve a natural the same sense of presence as in a movie theater. - Page 103 Explanation of Terms Audyssey Dynamic Surround Expansion™ (DSX) DTS 96/24 Audyssey Realistic reproduction of sound relies on the ability of audio systems DTS 96/24 is a digital audio format enabling high sound quality to match human hearing performance. Three key requirements are: playback in 5.1-channels with a sampling frequency of 96 kHz and 24 Audyssey MultEQ ®...
- Page 104 A copyright-protected technology developed by Microsoft. DENON LINK 4th uses the clock of the AV amplifier connected by Content providers are using the digital rights management technology DENON LINK to achieve HDMI signal transfer with little jitter when for Windows Media contained in this device (WM-DRM) to protect playing BD.
-
Page 105: Surround Modes And Parameters
Surround Surround Modes and Parameters Signals and adjustability in the different modes Channel output Parameter (default values are shown in parentheses) Surround Mode Front Surround Surround Front Wide Front Height D. COMP AFDM Surround Center Subwoofer Cinema EQ. Mode Room Size Effect Level Back L/R Back... - Page 106 Surround Signals and adjustability in the different modes Parameter (default values are shown in parentheses) NEO:6 MUSIC Surround Mode PRO LOGIC g/gx MUSIC mode only EXT. IN only mode only Dynamic Delay Time Subwoofer Front Height Tone Control MultEQ XT Dynamic EQ RESTORER Volume...
- Page 107 Surround Differences in Surround Mode Names Depending on the Input Signals Button Input signals DTS-HD DOLBY DOLBY DIGITAL MULTI CH PCM Super Audio CD WMA (Windows LINEAR DTS-HD DOLBY DOLBY Note Media Audio) / DTS-HD DTS ES DTS ES DOLBY DOLBY DOLBY DOLBY...
- Page 108 Surround Button Input signals DTS-HD DOLBY DOLBY DIGITAL MULTI CH PCM Super Audio CD WMA (Windows LINEAR DTS-HD DOLBY DOLBY Note Media Audio) / DTS-HD DTS ES DTS ES DOLBY DOLBY DOLBY DOLBY Surround Mode ANALOG PCM / High DOLBY DIGITAL DIGITAL EX MP3 / MPEG-4...
- Page 109 Surround Button Input signals DTS-HD DOLBY DOLBY DIGITAL MULTI CH PCM Super Audio CD WMA (Windows LINEAR DTS-HD DOLBY DOLBY Note Media Audio) / DTS-HD DTS ES DTS ES DOLBY DOLBY DOLBY DOLBY Surround Mode ANALOG PCM / High DOLBY DIGITAL DIGITAL EX MP3 / MPEG-4...
- Page 110 Relationship Between Video Signals and Monitor Output MAIN ZONE MONITOR OUT Input Signals Output Signals GUI menu displayed Video Convert HDMI COMPONENT S-VIDEO VIDEO HDMI COMPONENT S-VIDEO VIDEO HDMI COMPONENT S-VIDEO VIDEO ON/OFF Only the GUI menu is displayed VIDEO VIDEO VIDEO VIDEO...
-
Page 111: Troubleshooting
• Check the connections to the input devices and the speaker cable 13 ~ 23 Even applying • The AVR-4310CI amplifier circuit has failed. Switch off the power – from speakers. connections. power, the power and please contact the DENON service adviser. - Page 112 Page Symptom Cause / Countermeasure Page No picture appears. • Check the connections of the AVR-4310CI’s video output 14, 15 No sound is produced • When playing monaural audio sources, select a surround mode 71, 72 terminals and the TV’s input terminals.
- Page 113 “PC Application” , it is registered to “My Internet radio programs in MP3 and WMA can be played on this Library” . In this way, the playlist can be played in AVR-4310CI. set. Cannot delete •...
-
Page 114: Restoring All The Settings To As They Were At The Time Of Purchase (Resetting The Microprocessor)
”ANTENNA ERROR” • The antenna is not connected. Check that the connections are displayed. the AVR-4310CI. Confirm the XM Mini-Tuner is fully seated in the is displayed. correct. dock and check the XM Mini-Tuner dock cable is connected to the AVR-4310CI. -
Page 115: Specifications
Specifications Audio section HD Radio section [FM] [AM] • Power amplifier (note: µV at 75 Ω/ohms, 0 dBf = 1 x 10 Rated output: Front: Receiving Range: 87 .5 MHz ~ 107 .9 MHz 530 kHz ~ 1710 kHz 130 W + 130 W (8 Ω/ohms, 20 Hz ~ 20 kHz with 0.05 % T.H.D.) Usable Sensitivity: 1.5 µV (14.8 dBf) 20 µV... - Page 116 Blu-ray Disc Player Humax 31588 Polaroid 31061, 31086 30690 Universum 30591 Soundworks Hyundai 30850 Polk Audio 30539 Urban Concepts 30503, 30539 30789 Denon 32258 Insignia 30675, 31268 Portland 30770 Wharfedale 30686 Insignia 30675 Centrex 30672 Integra 30571, 30627, 31634, 31769 Presidian 30675...
- Page 117 Bell & Howell 20048 Janeil 20240 Philco 20081 40468 40003, 40766, 40873, 42867, 20045, 20048, 20081, 20616, Broksonic 20348 Jensen 20067 Denon Philips 40000, 40032, 40087, 40179, 42868, 43867, 43868 20618, 20739 Realistic 40420, 40468 Calix 20037 20067, 21162 40000 Pilot 20037...
- Page 118 10009, 10011, 10163, 10171, Curtis Mathes Pioneer 21337 Carver 20029 Amstrad 10145, 10154, 10166, 10178, 20240 10371, 10433 10702, 11147, 11347 20880 Denon 20076, 20371, 22471 TNIX 20037 Amtron 10000 10009, 10036, 10092, 10109, ReplayTV 20614, 20616 Garrard 20308 Tocom...
- Page 119 10037, 10073, 10163, 10217, Hallmark 10178 Onwa 10602 Runco 10017, 10030, 10060, 11629 Tandy 10217, 10218 Lumatron 10264, 10361, 10556 10030, 10150, 10154, 10166, 10000, 10037, 10051, 10217, Hanseatic 10556 Saisho 10011 Optimus Tatung Luxor 10163 10178, 10650 11756 10000, 10030, 10060, 10178, Sampo 10030, 10047, 11755, 11756 Harley Davidson...
- Page 120 XR-1000 10154, 10171 Symphonic 11944, 30821 Asat 00200 Omega 00887 Director 00476 00455, 00497, 00847, 00887, Yamaha 10030, 10650 Toshiba 11945, 31045 Aston 00142 Fosgate 00276 Pace 01175 Yorx 10030 Atlantic Telephone 01333 General Instrument 00003, 00276, 00476 Panarex 01159 10000, 10017, 10030, 10037, Austar 00497, 00863, 01176...
- Page 121 DVD-2500BT DVD-3800BD DVD-A1UDCI : Preset codes set upon shipment from the factory. : Les codes préréglés diffèrent en fonctiom des livraison de l’usine. DVD Player DENON [32134] Video Cassette Recorder Tivo [20739] Television SONY [10810] Satellite Set Top Box DirecTV [01377]...
- Page 122 Denon Brand Company, D&M Holdings Inc. Printed in Japan 5411 10299 000D...
Need help?
Do you have a question about the AVR-4310CI and is the answer not in the manual?
Questions and answers