Miller ProHeat 35 Owner's Manual
Heavy duty induction cooler
Hide thumbs
Also See for ProHeat 35:
- Owner's manual (98 pages) ,
- Owner's manual (76 pages) ,
- Owner's manual (98 pages)
Table of Contents
Advertisement
Quick Links
Advertisement
Table of Contents
Troubleshooting

Related Manuals for Miller ProHeat 35


Summary of Contents for Miller ProHeat 35
- Page 1 OM-271973J 2023-03 Processes Induction Heating Description Heavy Duty Induction Cooler (24 Volts) ProHeat Heavy Duty ™ Induction Cooler OWNER’S MANUAL For product information, Owner’s Manual translations, and more, visit www.MillerWelds.com...
- Page 2 We know you don’t have time to do it any other way. That’s why when Niels Miller first started building arc welders in 1929, he made sure his products offered long-lasting value and superior quality.
-
Page 3: Table Of Contents
TABLE OF CONTENTS SECTION 1 – SAFETY PRECAUTIONS – READ BEFORE USING..............1 Symbol Usage . -
Page 5: Declaration Of Conformity
DECLARATION OF CONFORMITY for European Community (CE marked) products. MILLER Electric Mfg. LLC, 1635 West Spencer Street, Appleton, WI 54914 U.S.A. declares that the product(s) identified in this declaration, when used exclusively with MILLER induction heating cables and inductors, conform to the essential requirements and provisions of the stated Council Directive(s), Commission Regulation(s) and Standard(s). - Page 6 DECLARATION OF CONFORMITY For United Kingdom (UKCA marked) products. MILLER Electric Mfg. LLC, 1635 West Spencer Street, Appleton, WI 54914 U.S.A. declares that the product(s) identified in this declaration, when used exclusively with MILLER induction heating cables and inductors, conform to the essential requirements and provisions of the stated Regulation(s) and Standard(s).
-
Page 7: Section 1 - Safety Precautions - Read Before Using
SECTION 1 – SAFETY PRECAUTIONS – READ BEFORE USING Protect yourself and others from injury—read, follow, and save these important safety precautions and operating instructions. 1-1. Symbol Usage DANGER! – Indicates a hazardous situation which, if not avoided, will result in death or serious injury. The possible hazards are shown in the adjoining symbols or explained in the text. -
Page 8: Additional Hazards For Installation, Operation, And Maintenance
� Read and understand the Safety Data Sheets (SDSs) and the FIRE OR EXPLOSION hazard. manufacturer’s instructions for adhesives, coatings, cleaners, con- sumables, coolants, degreasers, fluxes, and metals. � Do not overheat parts. � Wear body protection made from leather or flame-resistant cloth- �... -
Page 9: California Proposition 65 Warnings
−by or conduct individual risk assessment for welders. All welders see the bulletin at this location: https://www.millerwelds.com/-/media/ should use the following procedures in order to minimize exposure to miller-electric/files/pdf/safety/bulletins/bulletin-on-induction-heating- EMF fields from the welding circuit: and-emf-exposure.pdf 1. Keep cables close together by twisting or taping them, or using a About Implanted Medical Devices: cable cover. -
Page 10: Section 2 - Consignes De Sécurité - Lire Avant Utilisation
SECTION 2 – CONSIGNES DE SÉCURITÉ - LIRE AVANT UTILISATION Pour écarter les risques de blessure pour vous-même et pour autrui — lire, appliquer et ranger en lieu sûr ces consignes relatives aux précautions de sécurité et au mode opératoire. 2-1. -
Page 11: Symboles De Dangers Supplémentaires En Relation Avec L'installation, Le Fonctionnement Et La Maintenance
� Ne pas chauffer dans des endroits se trouvant à proximité d’opé- � Une fois le travail achevé, assurez-vous qu’il ne reste aucune rations de dégraissage, de nettoyage ou de pulvérisation. La cha- trace d’étincelles incandescentes ni de flammes. leur peut réagir en présence de vapeurs et former des gaz �... -
Page 12: Proposition Californienne 65 Avertissements
LES LIQUIDES SOUS HAUTE LE RAYONNEMENT HAUTE PRESSION peuvent provoquer des FRÉQUENCE (HF) risque de blessures ou la mort. provoquer des interférences. � Liquide de refroidissement sous haute pression. � Le rayonnement haute fréquence (HF) peut provo- � Libérez la pression avant d’intervenir sur le refroidisseur. quer des interférences avec les équipements de radio-navigation et de communication, les services de sécurité... -
Page 13: Principales Normes De Sécurité
Tous les soudeurs doivent ap- (CEM), se reporter au communiqué suivant: pliquer les procédures suivantes pour minimiser l’exposition aux CEM https://www. millerwelds. com/-/media/miller-electric/files/pdf/safety/ provenant du circuit de soudage: bulletins/bulletin-on-induction-heating-and-emf-exposure.pdf 1. Rassembler les câbles en les torsadant ou en les attachant avec En ce qui concerne les implants médicaux :... -
Page 14: Section 3 - Definitions
Safe Safe Use lift eye to lift unit and properly installed accessories only, not gas cylinders. Do not exceed maximum lift e Engine fuel plus flames or sparks can cause fire. SECTION 3 – DEFINITIONS rating (see Specifications). Do not grip material near cutting path. Safe 3-1. -
Page 15: Miscellaneous Symbols And Definitions
3-2. Miscellaneous Symbols And Definitions � Some symbols are found only on CE products. Amperage Line Connection Primary Voltage Protective Earth Alternating Current Single Phase (Ground) Degree of Conventional Load Voltage Input Protection Voltage Rated Welding Circulating Unit With Primary Current Current Coolant Pump Hertz... -
Page 16: Section 4 - Specifications
SECTION 4 – SPECIFICATIONS 4-1. Serial Number And Rating Label Location The serial number and rating information for the power source is located on the front of the machine. Use the rating labels to determine input power requirements and/or rated output. For future reference, write serial number in space provided on back cover of this manual. 4-2. - Page 17 Normal Operation With Coolant NOTICE – The Miller ProHeat 35 Rolling Inductor is rated for operation between 14° F and 140° F (−10° C to 60° C). For operation at -40° F to 14° F (−40° C to -10° C), take the following precautions to prevent equipment damage: �...
-
Page 18: Section 5 - Installation
SECTION 5 – INSTALLATION 5-1. Selecting A Location -1. Selecting A Location Do not move or operate unit where it could tip. Loc_cooler 2016-08 OM-271973 Page 12... -
Page 19: Installing Power Source To Cooler
5-2. Installing Power Source To Cooler tools/ allen_set flathead philips head wrench crescent wrench needlenose knife steelbrush nutdriver chippinghammer heavy-duty workclamp light-duty workclamp wirecutter frontcutter stripcrimp 272546-B rewdriver 3/8 in. greasegun socket wrench wrench drill filterwrench Turn Off welding power source, and Remove screws from right side panel, un- Keep hands and fingers away from disconnect input power. -
Page 20: Coolant Hose Connections To Cooler
5-3. Coolant Hose Connections To Cooler 272547-A 6 Flow Indicator/Sensor � 1 Power Source/Cooler Assembly Coolant hose fittings have left-hand threads. Flow indicator/sensor spins to indicate cool- 2 Coolant Hose ant is flowing in the system. If coolant flow is Connect coolant hoses to fittings on cooler. -
Page 21: Coolant Hose Connections To Single Output Cable
5-4. Coolant Hose Connections To Single Output Cable 272548-A Connect output cable to output #1 on power To remove coolant hoses, grasp black ring 1 Power Source/Cooler Assembly source. Connect protective plug to power on coolant hose fitting and pull away from source output #2. -
Page 22: Coolant Hose Connections To Dual Output Cable
5-5. Coolant Hose Connections To Dual Output Cable Cooler 272549-A coolant hose between output cable #1 and 1 Power Source/Cooler Assembly � Fittings have spring loaded valves in- output cable #2 fittings by pushing coolant side that close when fitting is discon- hose fitting onto output cable fitting. -
Page 23: Installing Optional Heat Exchanger
5-6. Installing Optional Heat Exchanger 269886-A Align heat exchanger mounting holes with Route hoses through supplied cushion 1 Base Screw holes in base. Secure heat exchanger with clamps. screws removed in previous step. Remove two screws from base of unit as Align clamps with vacated hole in base and shown. -
Page 24: Section 6 - Maintenance And Troubleshooting
Months � � Hoses � � Labels ◇ Replace coolant (If using water) Every Months ◇ Replace coolant (If using Miller coolant) 6-2. Coolant Maintenance Disconnect cooler plug from weld- ing power source receptacle be- fore maintaining. Dispose of used coolant according to national, state, and local codes. -
Page 25: Cooling System Flush Procedure
Adapt an air hose to the 1/4 in. NPT threads To prevent damage to the pump impeller, of a male quick disconnect fitting for connec- 2 Turn on ProHeat 35 and allow 1 minute for use a shop vacuum to remove sand or tion to the Cooler In fitting. -
Page 26: Flow Direction W/Single Accessory
6-4. Flow Direction w/Single Accessory A. Flow Direction With Single Accessory Induction Coil Flow Pump Filter Bypass Indicator/Sensor Radiator Filter Tank B. Flow Direction With Two Accessories Second First Induction Induction Coil Coil Flow Pump Bypass Filter Sensor Heat Filter Exchanger Tank OM-271973 Page 20... -
Page 27: Troubleshooting Table
C. Flow Direction With External Heat Exchanger Second First Induction Induction Coil Coil Flow Pump Bypass Filter Sensor External Internal Filter Heat Heat Exchanger Exchanger Tank 6-5. Troubleshooting Table Trouble Remedy Coolant system does not work. Be sure coolant input power cord and communication cables from the power source are connected to cooler receptacles (see Section 5-2). -
Page 28: Section 7 - Electrical Diagrams
SECTION 7 – ELECTRICAL DIAGRAMS 272646-A Figure 7-1. Circuit Diagram OM-271973 Page 22... - Page 29 Notes...
-
Page 30: Section 8 - Parts List
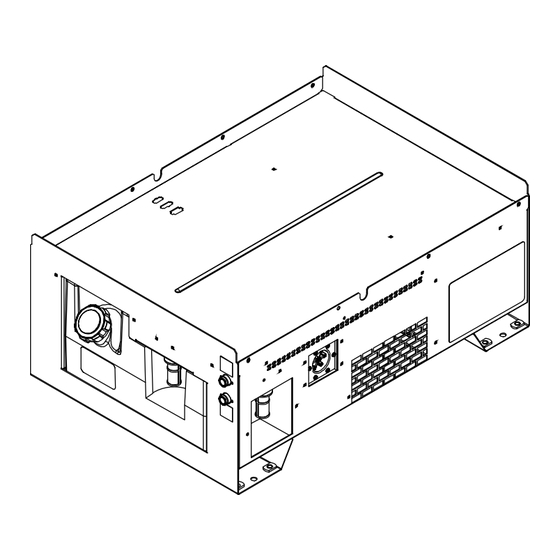
SECTION 8 – PARTS LIST 270789-J Figure 8-1. Main Assembly OM-271973 Page 24... - Page 31 Main Assembly Item No. Dia. Mkgs. Part No. Description Quantity +270790 Base, Assy,Welded Cooler 271825 Label, Warning Gen Precaution Induction Cooler w/Fr 219968 Mount, Support Motor 249587 Spacer, Washer .31 Id x 1.00 Od x.25 Thk Rubber 271099 Radiator, Heat Exchanger w/Fittings 1/2 in. Tbg 270468 Blower/ Motor Assy, 24VDC w/Leads (M2) 242783...
- Page 32 804441-A Figure 8-2. Single Output Coolant Hose Assembly Single Output Coolant Hose Assembly Item No. Dia. Mkgs. Part No. Description Quantity 201430 Hose Assy, Coolant 36 In Lh Thread To Quick Connect 204955 Ftg, Plstc Qdisc Coupler x 1/4 Npt Female To maintain the factory original performance of your equipment, use only Manufacturer’s Suggested Replacement Parts.
- Page 33 269866-A Figure 8-4. External Heat Exchanger Assembly Single Output Coolant Hose Assembly (269871) Item No. Dia. Mkgs. Part No. Description Quantity 269791 Bracket, Mtg External Heat Exchanger 216257 Radiator, Heat Exchanger 8.0 x 18.5 023562 Clamp, Hose .312 - .875 Clp Dia 153403 Bushing, Snap-In Nyl .750 Id x 1.000 Mtg Hole Cent 137605...
- Page 34 Notes...
- Page 35 Effective January 1, 2023 (Equipment with a serial number preface of ND or newer) This limited warranty supersedes all previous Miller warranties and is exclusive with no other guarantees or war- ranties expressed or implied. � CoolBelt, PAPR Blower, and PAPR Face...
-
Page 36: Owner's Record
Appleton, WI 54914 USA tact your distributor and/or equipment manu- facturer’s Transportation Department. International Headquarters–USA USA Phone: 920-735-4505 USA & Canada FAX: 920-735-4134 International FAX: 920-735-4125 For International Locations Visit www.MillerWelds.com ORIGINAL INSTRUCTIONS – PRINTED IN USA © Miller Electric Mfg. LLC 2023-03...
Need help?
Do you have a question about the ProHeat 35 and is the answer not in the manual?
Questions and answers