
Subscribe to Our Youtube Channel
Related Manuals for Miller ArcStation 60SX


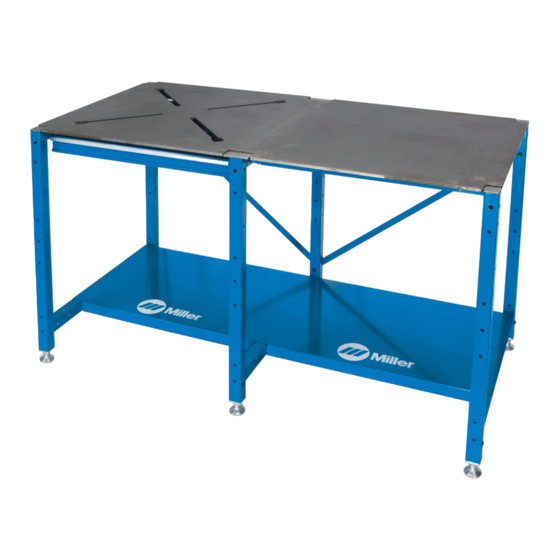
Summary of Contents for Miller ArcStation 60SX
- Page 1 OM-244997D 2018−12 Place serial number or lot code sticker here. ArcStation 60SX File: Accessory For product information, Owner’s Manual translations, and more, visit www.MillerWelds.com...
- Page 2 1929, he made sure his products offered long-lasting value and superior quality. Like you, his customers couldn’t afford anything less. Miller products had to be more than the best they could be. They had to be the best you could buy.
-
Page 3: Table Of Contents
TABLE OF CONTENTS SECTION 1 − SAFETY PRECAUTIONS − READ BEFORE USING ........1-1. -
Page 5: Section 1 − Safety Precautions − Read Before Using
SECTION 1 − SAFETY PRECAUTIONS − READ BEFORE USING weld table_2018-01 Protect yourself and others from injury — read, follow, and save these important safety precautions and operating instructions. 1-1. Symbol Usage DANGER! − Indicates a hazardous situation which, if Indicates special instructions. -
Page 6: Section 2 − Consignes De Sécurité − Lire Avant Utilisation
SECTION 2 − CONSIGNES DE SÉCURITÉ − LIRE AVANT UTILISATION weld table_2018-01_fre Pour écarter les risques de blessure pour vous−même et pour autrui — lire, appliquer et ranger en lieu sûr ces consignes relatives aux précautions de sécurité et au mode opératoire. 2-1. -
Page 7: Section 3 − Assembly
SECTION 3 − ASSEMBLY 3-1. Hardware Description 247 341-A OM-244997 Page 3... -
Page 8: 60Sx Welding Table Specifications
3-2. 60SX Welding Table Specifications Total Maximum Load Capacity Maximum Shelf Load Capacity Maximum Tool Chest Drawer Capacity (Each Drawer) 1000 lb (454 kg) 100 lb (45 kg) 40 lb (18 kg) 3-3. Parts Layout 300 606 Top, solid 3/8 in. thick (1) 300 607 Top, X-pattern 3/8 in. -
Page 9: Support Rails
B. Table Tops Table Tops Wipe off rust inhibitor from table tops. Place table tops flat on the floor. Four holes must be Tops for 60SX model are together in center of tops. shown; solid tops use the same tapped hole layout. X-pattern top can be on either side. -
Page 10: Center Subframe And End Subframes
D. Center Subframe And End Subframes Tapped Holes For Center Subframe And End Subframes Center Subframe End Subframes Tools Needed: Place center and end subframes on table top as shown. Fasten one hex bit 3/16 in. subframe at a time to ease installation. -
Page 11: Connecting Center And End Subframes To Rails And Installing Leveling Feet
E. Connecting Center And End Subframes To Rails And Installing Leveling Feet Center Subframe End Subframes Use 16 bolts AA and 16 locknuts ZZ at each angle bracket as shown to connect center and end subframes and rails. Tighten all bolts and locknuts. Leveling Foot Install six leveling feet to bottom of leg assembly tubes. -
Page 12: Installing Bottom Trays
F. Installing Bottom Trays Use two people to rotate welding table. It is recommended that a piece of cardboard be placed on the floor to prevent damaging the finish on the end subframes. Rotate the welding table on its side as shown. Install shelves so that the wider flange is on the end subframe and the narrower flange is on... -
Page 13: Installing Stiffener Brackets And Work Lead Tab
H. Installing Stiffener Brackets And Work Lead Tab Stiffener Brackets Use three bolts EE and three locknuts ZZ and install two cross members to rear of center and end subframes. Tapped Holes For Work Lead Work Lead Tab Attach work lead tab with one bolt DD to bottom side and at the rear of the tops using any one of the four tapped holes. - Page 15 Effective January 1, 2018 (Equipment with a serial number preface of MJ or newer) This limited warranty supersedes all previous Miller warranties and is exclusive with no other guarantees or warranties expressed or implied. Warranty Questions? LIMITED WARRANTY − Subject to the terms and conditions below, 6 Months —...
- Page 16 Contact the Delivering Carrier to: File a claim for loss or damage during shipment. For assistance in filing or settling claims, contact your distributor and/or equipment manufacturer’s Transportation Department. ORIGINAL INSTRUCTIONS − PRINTED IN USA 2018 Miller Electric Mfg. LLC 2018−01...
Need help?
Do you have a question about the ArcStation 60SX and is the answer not in the manual?
Questions and answers