Chauvet MiN Wash User Manual
Chauvet min wash moving light fixtures: user manual
Hide thumbs
Also See for MiN Wash:
- Pocket manual (2 pages) ,
- Brochure & specs (24 pages) ,
- User manual (21 pages)
Table of Contents
Advertisement
Advertisement
Table of Contents

Subscribe to Our Youtube Channel
Related Manuals for Chauvet MiN Wash


Summary of Contents for Chauvet MiN Wash
- Page 1 Snapshot MiN Wash™ OK on Dimmer Outdoor OK Sound Activated DMX512 Master/Slave 115V/230V Switch Replaceable Fuse User Serviceable Duty Cycle USER MANUAL Chauvet, 3000 N 29 Ct, Hollywood, FL 33020 U.S.A. (800) 762-1084 – (954) 929-1115 FAX (954) 929-5560 www.chauvetlighting.com...
-
Page 2: Table Of Contents
To set the pan to inverting or non-inverting ................... 12 To set the tilt to inverting or non-inverting ..................... 12 To set the LED Readout to Inverting or Non-Inverting ................12 To set the DMX channel configuration ....................12 To set the maximum pan angle ......................12 To set the maximum tilt angle ....................... -
Page 3: Before You Begin
Save the carton and all packing materials. In the event that a fixture must be returned to the factory, it is important that the fixture be returned in the original factory box and packing. -
Page 4: Safety Instructions
• This product is intended for indoor use only! • To prevent risk of fire or shock, do not expose fixture to rain or moisture. Make sure there are no flammable materials close to the unit while operating. • The unit must be installed in a location with adequate ventilation, at least 20in (50cm) from adjacent surfaces. -
Page 5: Introduction
• Variable electronic strobe • Variable electronic dimmer (0 – 100%) • Vector speed channel for pan/tilt, RGB color mixing and color macros • Built-in movement macros via master/slave or DMX ADDITIONAL FEATURES • User-selectable basic or advanced operating modes •... -
Page 6: Dmx Channel Summary 5 Channel Mode
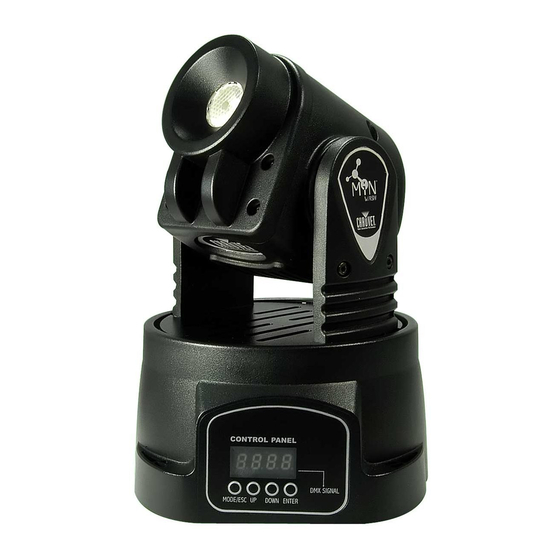
DMX Channel Summary 5 Channel Mode HANNEL UNCTION Tilt Shutter Color Macro Reserved Product Overview Lens Projector Head Readout Control Panel DMX In DMX Out IEC Power Connection w/ fuse holder Voltage Selector Switch CA-9 Controller Input MiN™ Wash User Manual... -
Page 7: Setup
Fixture Linking You will need a serial data link to run light shows of one or more fixtures using a DMX-512 controller or to run synchronized shows on two or more fixtures set to a master/slave operating mode. The combined number of channels required by all the fixtures on a serial data link determines the number of fixtures the data link can support. -
Page 8: Cable Connectors
3-PIN TO 5- PIN CON VER SION CHAR T If you use a controller with a 5 pin DMX output connector, you will need to use a 5 pin to 3 pin adapter. If you use a controller with a 5 pin DMX output connector, you will need to use a 5 pin to 3 pin adapter. -
Page 9: Master/Slave Fixture Linking
Master/Slave Fixture Linking 1. Connect the (male) 3 pin connector side of the DMX cable to the output (female) 3 pin connector of the first fixture. 2. Connect the end of the cable coming from the first fixture which will have a (female) 3 pin connector to the input connector of the next fixture consisting of a (male) 3 pin connector. -
Page 10: Operating Instructions
The Control Panel LED Display shows the menu items you select from the menu map on page #11. When a menu function is selected, the display will show immediately the first available option for the selected menu function. -
Page 11: Menu Map
Menu Map MiN™ Wash User Manual 2008-07-15/12:47... -
Page 12: User Configurations
Press enter to confirm your selection. T O R ES T O R E A L L SET T IN G S T O T H E IR F A C T O R Y D E F A U L T S: Press the mode button until the display reads Press enter to confirm your selection. -
Page 13: Operation
Operation Stand-Alone Mode (Auto Mode): This mode allows a single unit to run to a factory installed program in one of two speeds. To set the fixture in auto mode Fast, select . Once confirmed the display reads To set the fixture in auto mode Slow, select... -
Page 14: Dmx Channel Values (13 Channel)
DMX Channel Values (13 Channel) HANNEL ALUE UNCTION Pan Fine Tilt Tilt Fine 255 Vector Speed: (Normal → Slow) Dimmer/Strobe Closed 100-0% Strobe (slow → fast) Open 0-100% Green 0-100% Blue 0-100% Color Macros No Function White Green Blue Cyan... -
Page 15: Dmx Channel Values (5 Channel)
DMX Channel Values (5 Channel) HANNEL ALUE UNCTION 255 Pan Tilt Dimmer/Strobe Closed 100-0% Strobe (slow → Fast) Open Color Macros No Function White Green Blue Cyan Magenta Yellow Purple Orange Chartreuse Pink Brown Gold Crimson Violet Crepe Color-Change Macro 1... -
Page 16: Troubleshooting
If you still have a problem after trying the above solutions, please contact CHAUVET Technical Support at the location on the next page. MiN™ Wash User Manual... -
Page 17: Technical Support
DMX fixtures are designed to receive data through a serial Daisy Chain. A Daisy Chain connection is where the DATA OUT of one fixture connects to the DATA IN of the next fixture. The order in which the fixtures are connected is not important and has no effect on how a controller communicates to each fixture. -
Page 18: General Maintenance
Isopropyl Alcohol and a soft lint free cotton cloth or lens tissue. Apply solution to the cloth or tissue and drag dirt and grime to the outside of the lens. Gently polish optical surfaces until they are free of haze and lint. -
Page 19: Technical Specifications
CONTROL & PROGRAMMING Data input ....................locking 3-pin XLR male socket Data output ................... locking 3-pin XLR female socket Data pin configuration ................pin 1 shield, pin 2 (-), pin 3 (+) Protocols........................DMX-512 USITT DMX Channels ..........................5 or 13 ORDERING INFORMATION MiN™...
Need help?
Do you have a question about the MiN Wash and is the answer not in the manual?
Questions and answers