Table of Contents
Advertisement
Quick Links
Advertisement
Table of Contents

Related Manuals for Abus TECTIQ


Summary of Contents for Abus TECTIQ
- Page 1 T E C T I Q NARROW FRAME FITTING Assembly instructions abus.com...
- Page 2 This manual contains all the important information on using the described product in conjunction with the ABUS TECTIQ access control system. The information in this manual has been compiled to the best of our knowledge and is regularly checked and updated. Keep the manual for the duration of use of the product and ensure that you always have the appropriate manual for the product available.
-
Page 3: Table Of Contents
4.4. Cable routing between external and internal fitting Fitting the TECTIQ narrow frame fitting Fitting TECTIQ narrow frame fitting FIX-DIN-round with adapter plate Installing TECTIQ Scandinavian narrow frame fittings Installing TECTIQ narrow frame fitting Scandinavia FIX-wide with adapter plate Commissioning 10. Operation Care and maintenance 11.1. - Page 4 12.3. Replace cover 12.3.1. Replace inner panel 12.3.2. Replace outer panel 13. Decommissioning and dismantling 13.1. Logging the fitting out of the locking system 13.2. Dismantling the fitting 13.3. Reset to factory settings 14. Waste disposal TECTIQ ELECTRONIC FITTING...
-
Page 5: General Information
1. General information 1.1. Introduction ABUS TECTIQ is the wireless electronic locking and access control system for commercial and public buildings of almost any size. Developed and manufactured in Germany, the complete solution comprising hardware and software offers a comprehensive, high-performance access control and security solution. -
Page 6: Notes In These Instructions
Text passages preceded by a full stop − are part of an enumeration ▹ Text passages preceded by a triangle indicate an action step: You have to do something here. Please follow the order of the action steps - unless otherwise stated. TECTIQ ELECTRONIC FITTING... -
Page 7: Product Description
2. Product description 2.1. Function The electronic fittings in the TECTIQ product family are used for electronic access control for entrance doors and interior doors in public or private buildings. Their compact dimensions enable installation on solid leaf doors and framed doors, especially on doors with narrow profile widths. - Page 8 TECTIQ Security narrow frame fitting - with anti-drill protection – Without profile (closed) – With cut-out for Euro profile cylinder • TECTIQ narrow frame fitting FIX-DIN short: For fire-resistant doors ("FH doors") with 2-point screw fitting – Without profile (closed) – With cut-out for Euro profile cylinder PZ72 •...
-
Page 9: Accessories
6Locking cylinders (optional; depending on variant, available from specialist dealers) Without illustration: ABUS Updater cable (article number: ACAC00043); for programming the door components Battery cable DIN short plate / DIN round rosette Battery cable Standard / Security For spare parts, please use the product catalogue with a separate spare parts section. -
Page 10: Technical Data
Transmitter range 2 to 3 m (free field) Transmission power 1.1 mW / 0.4 dBm Connection USB2-Micro-B Line type ABUS Updater cable, see→ chapter 2.4 Accessories Internal clock Power reserve approx. 2 h Service life >500 000 closing cycles Battery life >80 000 closing cycles / up to 3 years... -
Page 11: Dimensions
27 mm 24 mm 2.7. Labelling On the sensor module inside the external fitting: • Manufacturer name/address • Mark of conformity • Label for safe disposal • QR code • Internal labelling • Serial number • Product type TECTIQ ELECTRONIC FITTING... -
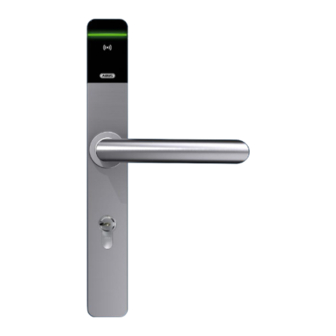
Page 12: Structure And Individual Parts
• TECTIQ narrow frame fitting • TECTIQ Security narrow frame fitting Image similar: • TECTIQ narrow frame fitting FIX-DIN short (with 2-point screw connection) • TECTIQ narrow frame fitting Scandinavia External fitting Interior fitting Outside handle fitting Lever handle Inside fitting... - Page 13 TECTIQ fitting - variants with adapter plate • TECTIQ narrow frame fitting FIX-DIN-round • TECTIQ narrow frame fitting with separate adapter plate Image similar: • TECTIQ narrow frame fitting Scandinavia FIX-wide External fitting Interior fitting Outside handle fitting Lever handle Inside fitting...
-
Page 14: Safety Instructions
Observe the prescribed maintenance intervals for doors, locks and fittings. • Replace the hardware on escape and fire doors once the maximum number of closing cycles has been reached (see→ Chap. 2.5 Technical data). 4. Assembly instructions 4.1. Tools required TECTIQ ELECTRONIC FITTING... -
Page 15: Pre-Programming Before Assembly
• The mortise lock is fitted. • Hardware and software for parameterising the door components for the TECTIQ system are available and ready for operation. For mortise locks with 10 mm square spindle: ▹ Fit the reducing sleeve into the square spindle of the lock. -
Page 16: Cable Routing Between External And Internal Fitting
• TECTIQ narrow frame fitting Scandinavia Cable routing B: Through the cylinder opening • Installation with adapter plate, without locking cylinder For: • TECTIQ narrow frame fitting FIX-DIN-short • TECTIQ narrow frame fitting FIX-DIN-round (with closed cover) TECTIQ ELECTRONIC FITTING... - Page 17 • Installation with adapter plate and with locking cylinder For: • TECTIQ narrow frame fitting FIX-DIN round (with open panel) • TECTIQ narrow frame fitting FIX-DIN-Kurz (for installation in doors with short backplate, e.g. FH doors) If the length of the existing connecting cable is not sufficient, it may need to be replaced with a longer one (see→...
-
Page 18: Fitting The Tectiq Narrow Frame Fitting
5. Fitting the TECTIQ narrow frame fitting For doors in which additional holes may be drilled. For standard doors: Cable routing A, see→ chapter 4.4. For doors with short plate screw connection: Cable routing C, see→ chapter 4.4. For doors with holes for round roses: Use adapter plate, see→ chapter 6. - Page 19 (5) of the outside fitting and carefully replace the cover (2). ▹ Tighten the cover (2) with the 6 housing screws (6). Tightening torque approx. 2 Nm. ▹ Replace the USB cover (1) on the USB port. TECTIQ ELECTRONIC FITTING...
- Page 20 ▹ Place the outer fitting (3) on the outside of the door. ▹ Guide the square spindle (5) and the connecting cams (6) through the holes until the outer fitting rests on the door leaf. Step 5: Installing the interior fitting TECTIQ ELECTRONIC FITTING...
- Page 21 ▹ Connect the inside fitting and outside fitting with the 3 connecting screws (FH doors: 2). Tightening torque: approx. 2 Nm. It must be possible to move the inside and outside handles without any problems. If in doubt, loosen the centre screw connection slightly. TECTIQ ELECTRONIC FITTING...
- Page 22 ▹ Insert the plug (3) of the connecting cable into the slot (4). Cable routing for FH doors (TECTIQ narrow frame fitting FIX-DIN short): ▹ Guide the connecting cable (1) upwards through the groove along the pressure sensor (2). ▹ Insert the plug into the slot (3) below the battery compartment.
- Page 23 (2). It must be possible to move the latchbolt and latch properly. If in doubt, loosen the forend screw slightly. ▹ Move the locking bolt back in. TECTIQ ELECTRONIC FITTING...
-
Page 24: Fitting Tectiq Narrow Frame Fitting Fix-Din-Round With Adapter Plate
6. Fitting TECTIQ narrow frame fitting FIX-DIN-round with adapter plate For doors with holes for round rose fittings. The cables are routed through the cylinder opening. If a standard fitting is used, it must first be converted, see→ chapter 12.1. - Page 25 ▹ Place the outer fitting (2) on the outside of the door. Guide the square spindle (3) and the connecting cams through the holes until the outer fitting rests on the door leaf. TECTIQ ELECTRONIC FITTING...
- Page 26 ▹ Place the inner fitting (1) on the adapter plate and tighten with the 3 connecting screws (8). Tightening torque: approx. 2 Nm. It must be possible to move the inside and outside handles without any problems. If in doubt, loosen the centre screw connection slightly. TECTIQ ELECTRONIC FITTING...
- Page 27 NOTE: Do not exceed the tightening torque! The fitting, the panel and the door leaf may be damaged. ▹ Unscrew the locking screw (3) on the underside of the inner fitting until the panel is locked. Tightening torque: approx. 1.2 Nm. TECTIQ ELECTRONIC FITTING...
- Page 28 Step 10: Secure the lever handle to the fitting ▹ Screw in the grub screws on both door handles - on the inside and outside. Tightening torque: approx. 2 Nm. TECTIQ ELECTRONIC FITTING...
-
Page 29: Installing Tectiq Scandinavian Narrow Frame Fittings
– The door is fully assembled. – The mortise lock is fitted. – Hardware and software for parameterising the door component for the TECTIQ system is available and ready for operation. Step 1: Drill holes for fittings Not for FH doors. Only the existing drill holes are used here. - Page 30 Place the renovation panel on the outside of the door leaf and then fit the external fitting (3). ▹ Guide the square spindle (4) and the connecting cams through the holes until the outer fitting rests on the door leaf. TECTIQ ELECTRONIC FITTING...
- Page 31 ▹ On the inside fitting, screw the locking screw (3) on the underside into the fitting to release the cover. ▹ Lift the cover (2) until it can be rotated freely. ▹ Guide the connecting cable (4) through the renovation plate (5, if present) into the inside fitting (1). TECTIQ ELECTRONIC FITTING...
- Page 32 The batteries are pre-assembled in the inside fitting when delivered. ▹ Pull out the insulating flag (2) on the battery compartment (1). = As soon as the fitting is supplied with power, the LEDs on the external fitting flash briefly (green-red-green-red). TECTIQ ELECTRONIC FITTING...
- Page 33 Tightening torque: approx. 1.2 Nm. Step 10: Secure the lever handle to the fitting ▹ Screw in the grub screws on both door handles - on the inside and outside. Tightening torque: approx. 2 Nm. TECTIQ ELECTRONIC FITTING...
-
Page 34: Installing Tectiq Narrow Frame Fitting Scandinavia Fix-Wide With Adapter Plate
8. Installing TECTIQ narrow frame fitting Scandinavia FIX-wide with adapter plate For doors with mortise lock to SS 817375 and mounting holes with ø 44 mm. Cable routing D - below the lock case, see→ chapter 4.4. The cables are routed through the cylinder opening. If a standard fitting is used, it must first be converted (see→... - Page 35 NOTE: Do not crush the cables! Damaged cables can render the fitting unusable. ▹ Place the outer fitting (2) on the outside of the door until the outer fitting rests on the door leaf and the square spindle (3) is inserted in the mortise lock. TECTIQ ELECTRONIC FITTING...
- Page 36 (2) and place the adapter plate on the door. ▹ Shorten the fastening screws (3) as required. ▹ Use the 4 fastening screws (3) to connect the adapter plate to the outside and screw tight. Tightening torque: approx. 2 Nm. TECTIQ ELECTRONIC FITTING...
- Page 37 ▹ Place the inner fitting on the adapter plate and tighten with the 3 connecting screws (4). Tightening torque: approx. 2 Nm. It must be possible to move the inside and outside handles without any problems. If in doubt, loosen the centre screw connection slightly. TECTIQ ELECTRONIC FITTING...
- Page 38 NOTE: Do not exceed the tightening torque! The fitting, the panel and the door leaf may be damaged. ▹ Unscrew the locking screw (3) on the underside of the inner fitting until the panel is locked. Tightening torque: approx. 1.2 Nm. TECTIQ ELECTRONIC FITTING...
- Page 39 Step 11: Secure the lever handle to the fitting ▹ Screw in the grub screws on both door handles - on the inside and outside. Tightening torque: approx. 2 Nm. TECTIQ ELECTRONIC FITTING...
-
Page 40: Commissioning
The operation of the product is described in the ABUS TECTIQ system documentation. 11. Care and maintenance ABUS TECTIQ fittings are maintenance-free. If installed correctly, no maintenance work is required apart from cleaning and battery replacement. If you are unsure, please contact your ABUS authorised dealer. NOTE The product may be damaged. -
Page 41: Change Batteries
• by changing the signalling: 3× red, 2× green • by display in the TECTIQ Access Manager (software If the battery is low, the fitting will only function for a limited time. • Replace the battery as soon as the fitting signals a low battery. - Page 42 14. ▹ Insert new batteries into the battery compartment. Observe polarity! ▹ Close the inside fitting again. After changing the battery, the internal clock must be reset. Follow the instructions in the TECTIQ system documentation. TECTIQ ELECTRONIC FITTING...
-
Page 43: Opening The Door When The Battery Is Flat
▹ Synchronise date/time, e.g. with parameter card or TECTIQ Admin App. ▹ Present locking medium with current access authorisation and open door. 11.4. Firmware update Updating the firmware is described in the ABUS TECTIQ system documentation. Firmware update TECTIQ Software updates should always be installed. -
Page 44: Repair
(5) next to the battery compartment. ▹ Close the sensor housing. Tightening torque: max. 0.5 Nm. ▹ Close the external fitting, see→ chapter 5 to 8. TECTIQ ELECTRONIC FITTING... -
Page 45: Replace Handle
▹ CAREFULLY pull off the retaining plate (2) with the pusher. Once accessible, fix the square nut (3) in the holder. ▹ Secure the square socket (3) in the handle holder with a cable tie or similar to prevent it from falling out. TECTIQ ELECTRONIC FITTING... - Page 46 (5) into the lever handle. ▹ Slide the retaining plate (1) with the new lever handle onto the lever handle holder and tighten with 4 screws (3) . Tightening torque: approx. 2 Nm. TECTIQ ELECTRONIC FITTING...
- Page 47 ▹ Fit the plug (7). ▹ Fit the cover (3) and close the fitting. ▹ Unscrew the screw (8) at the bottom and lock the cover. ▹ Screw in the grub screw (9). Tightening torque: approx. 2 Nm. TECTIQ ELECTRONIC FITTING...
-
Page 48: Replace The Lever Handle On The Outside
▹ Pull the cover (4) off the fitting (5). Step 2: Dismantling the handle On the old outer panel (1): ▹ Loosen the circlip (2) from the inside using circlip pliers. ▹ Pull the pusher (3) and sliding bush (4) out of the collar. TECTIQ ELECTRONIC FITTING... - Page 49 ▹ Guide the battery cable through the door leaf. Observe cable routing, see→ chapter 4.4. ▹ Mount the external fitting on the outside of the door leaf. Step 5: Refit the interior fitting See→ chapter 12.2.1 Step 4. TECTIQ ELECTRONIC FITTING...
-
Page 50: Replace Cover
▹ Fit the new inner cover onto the inner handle. ▹ Unscrew the screw and lock the cover. ▹ Screw in the grub screw. Tightening torque: approx. 2 Nm. Step 3: Refit the interior fitting Observe the installation chapters, see→ chapters 5 to 8. TECTIQ ELECTRONIC FITTING... -
Page 51: Replace Outer Panel
▹ Remove the cover (4) from the fitting (5) Step 2: Dismantling the handle On the old outer panel (1): ▹ Loosen the circlip (2) with circlip pliers. ▹ Pull the pusher (3) and sliding bush (4) out of the collar. TECTIQ ELECTRONIC FITTING... - Page 52 ▹ Guide the battery cable through the door leaf. Note the cable routing, see→ chapter 4.4. ▹ Mount the outside fitting on the outside of the door leaf. Step 5: Refit the interior fitting See→ chapter 12.2.1 Step 4. TECTIQ ELECTRONIC FITTING...
-
Page 53: Decommissioning And Dismantling
13.1. Logging the fitting out of the locking system Fittings that are removed from the system should be deregistered from the locking system using the TECTIQ Access Manager locking software. This ensures that invalid access authorisations are deleted from the TECTIQ system. - Page 54 ABUS l Security Centre GmbH & Co. KG abus.com Linker Kreuthweg 5 86444 Affing Germany Tel: +49 82 07 959 90-0© Fax: +49 82 07 959 90-100 All rights reserved. sales@abus-sc.com 09 / 2024...
Need help?
Do you have a question about the TECTIQ and is the answer not in the manual?
Questions and answers