Extron electronics PoleVault PVS 407D User Manual
Digital switcher
Hide thumbs
Also See for PoleVault PVS 407D:
- User manual (87 pages) ,
- Installation manual (81 pages) ,
- Setup manual (4 pages)

Related Manuals for Extron electronics PoleVault PVS 407D


Summary of Contents for Extron electronics PoleVault PVS 407D
- Page 1 PVS 407D PoleVault Digital Switcher User Guide PoleVault Systems 68-2776-01, Rev. A 08 24...
-
Page 2: Safety Instructions
Safety Instructions Safety Instructions • English Instructions de sécurité • Français AVERTISSEMENT : Ce pictogramme, , lorsqu’il est utilisé sur le produit, WARNING: This symbol, , when used on the product, is intended to signale à l’utilisateur la présence à l’intérieur du boîtier du produit d’une alert the user of the presence of uninsulated dangerous voltage within the tension électrique dangereuse susceptible de provoquer un choc électrique. - Page 3 • 安全说明 简体中文 警告: 产品上的这个标志意在警告用户, 该产品机壳内有暴露的危险电 压, 有触电危险。 注意: 产品上的这个标志意在提示用户, 设备随附的用户手册中有重 要的操作和维护(维修)说明。 关于我们产品的安全指南、遵循的规范、EMI/EMF 的兼容性、无障碍使 www.extron.com 用的特性等相关内容,敬请访问 Extron 网站 , ,参见 Extron 安 全规范指南,产品编号 68-290-01 。 安全記事 • 繁體中文 안전 지침 • 한국어 警告: 若產品上使用此符號, 是為了提醒使用者, 產品機殼內存在未隔離的危險 경고: 이 기호 가 제품에 사용될 경우, 제품의 인클로저 내에 있는 접지되지 電壓,...
-
Page 4: Fcc Class A Notice
FCC Class A Notice This equipment has been tested and found to comply with the limits for a Class A digital device, pursuant to part 15 of the FCC rules. The Class A limits provide reasonable protection against harmful interference when the equipment is operated in a commercial environment. -
Page 5: Conventions Used In This Guide
Conventions Used in this Guide Notifications The following notifications are used in this guide: WARNING: Potential risk of severe injury or death. AVERTISSEMENT : Risque potentiel de blessure grave ou de mort. CAUTION: Risk of minor personal injury. ATTENTION : Risque de blessure mineure. ATTENTION: •... -
Page 7: Table Of Contents
Contents Introduction ............................. 1 Product Description ..............................1 Inputs ................................1 Outputs ................................2 Control and Configuration ..........................2 Power Save ..............................2 Application Diagram .............................3 Installation ............................... 5 Rear Panel Features ............................5 Inputs ................................5 Outputs ................................6 Control ................................6 Power ................................6 Labeling ................................7 Input Cables ..............................7 PVT Faceplates ..............................7 Final Setup ................................8 Connection Details ...............................9... - Page 8 Product Configuration Software ......................24 Software/Firmware Installation ..........................24 PCS Overview ..............................26 Software Menu .............................26 Connecting to PCS ............................28 Device Discovery Panel ..........................28 TCP/IP Panel ...............................29 Offline Device Preview ..........................30 Device Menu ...............................31 Connect ...............................32 Remote Configuration and Control ....................33 Host Control Ports ..............................33 Simple Instruction Set Control ..........................33 Host-to-Unit Instructions ..........................33...
-
Page 9: Introduction
Introduction This section gives an overview of the PVS 407D and its features. Topics include: • Product Description • Application Diagram Product Description NOTE: Where used, the generic term “12 VDC power supply”, refers to either the 12 VDC, 48 watt, 4 amp power supply, or the 12 VDC, 50 watt, 4.2 amp power supply only, as supplied by Extron. -
Page 10: Inputs
Inputs The PoleVault switcher receives the video and audio signals sent from PVT wallplates, which can be located up to 130 feet away for 4K/30 Hz rate, or 150 feet for 2K rates. The signals are sent over shielded twisted pair (STP) cables. -
Page 11: Application Diagram
Application Diagram The following diagrams shows a typical application for a PVS 407D. Extron FF 120 Flat Field Speakers - 1 Pair TCP/IP Network Extron SPK 18 - 35' Cable Ethernet Extron PCM 340 Projector Drop Ceiling Mount with Adjustable Pole Extron VLR 302... - Page 12 Classroom Extron FF 120 Plenum Flat Field Ceiling Speakers Extron PVS 407D Audio PoleVault Switcher PVS 407D OUTPUT AMPLIFIED AUDIO OUT AUDIO OUT INPUTS PAGING DO NOT SENSOR LAN 1 LAN 3 GROUND OR SHORT SPEAKER OUTPUTS HDMI HDMI CLASS 2 WIRING LINK LINK POWER...
-
Page 13: Installation
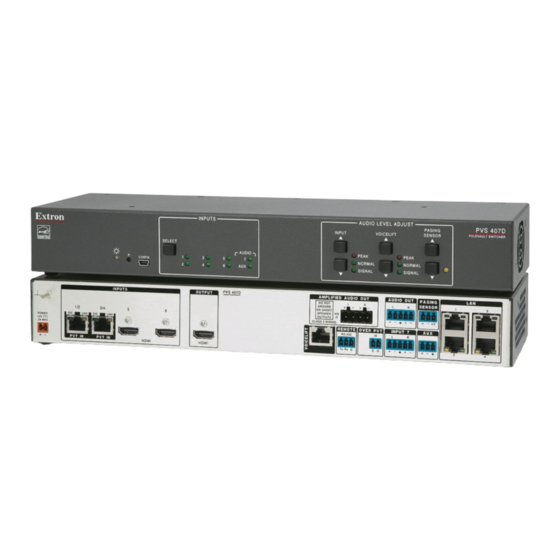
Installation This section details the installation of the PVS 407D. Topics include: • Rear Panel Features • Labeling • Final Setup • Connection Details Rear Panel Features NOTE: Unit is to be connected only to networks without routing to the outside plant. PVS 407D OUTPUT AMPLIFIED AUDIO OUT... -
Page 14: Outputs
VoiceLift port (see figure 3 on page 5) — If desired, connect a VLR 102 or VLR 302 VoiceLift receiver for integration of a VoiceLift Microphone system to this port. NOTE: See the VoiceLift Installation Guide to install the supplied VoiceLift Microphone system. Paging sensor port —... -
Page 15: Labeling
Labeling Input Cables Labeling the input cable, using the sheet of labels supplied with the device, helps with identifying the input signal type routing from the PVT wallplates to the switcher during installation. To label the cables: 1. Peel off the label corresponding to the cable signal type (HDMI or RGB). 2. -
Page 16: Final Setup
Final Setup The PVS 407D switcher complete setup should look similar to figure 6, with an MLC Plus 100 as a standard MLC controller in the PoleVault system package. NOTE: See the Classroom AV System Installation Guide and MLC Plus 50/100/200 Series Setup Guide for full MLC installation, configuration, and operating details. -
Page 17: Connection Details
Connection Details For connectors that require additional wiring details or recommendations, see the following sections pertaining to the type or connection. TP Cable Recommendations for TP Communication Use the following configuration for twisted pair cables used for DTP communication. Pins: TIA/EIA T 1 2 3 4 5 6 7 8 568 B... -
Page 18: Power Supply Wiring
Power Supply Wiring A 12 VDC, 4 A power supply is provided with the PVS 407D. Follow the instructions and figure 9 on page 11 to wire the provided 2-pole captive screw connector to your power supply. WARNING: The two power cord wires must be kept separate while the power supply is plugged in. Remove power before wiring. -
Page 19: Rs-232 Control Wiring
To wire the power supply: 1. Cut the DC output cord to the length needed. 2. Strip the jacket to expose 3/16 inches (5 mm) of the conductors. 3. Slide the leads into the supplied 2-pole captive screw plug, and use a small screwdriver to secure them. 4. -
Page 20: Ir Communication Wiring
From MLC Plus 100 Terminal Wire Color To PVS 407D Terminal Rx on the COM 2 port White Tx on the RS-232 port Tx on the COM 2 port Violet Rx on the RS-232 port COM 2 Ground Drain wire G - Ground Power Ground Black... - Page 21 Connect the MLC to the projector with an RS-232 cable or IR emitter cable, as appropriate. Connecting IR Cable Connecting RS-232 Cable IR Emitter Projector White Projector Black (or striped) MLC IR/RS-232 Comm Cable 9-Pin Female Black NOTE: Red and black not used.
-
Page 22: Input 7 Wiring
Input 7 Wiring Input 7 is a dedicated audio-only input for an auxiliary, stereo, line-level analog audio signal from an output source such as an iPod device or an MP3 player. Connect the cable from the source to this 5-pole captive screw connector. -
Page 23: Lockit Lacing Bracket Installation
NOTE: By default, the amplifier is set for dual mono output. Set the audio output mode to stereo via SIS (see Set audio output mode on page 48) or PCS (see the PVS 407D PCS Help file). LockIt Lacing Bracket Installation HDMI signals run at a very high frequency and are especially prone to errors caused by bad video connections, too many adapters, or excessive cable length. -
Page 24: Operation
Operation This section details the operation and configuration of the PVS 407D. Topics include: • Front Panel Features • Operation • Configuration • Audio Configuration Front Panel Features AUDIO LEVEL ADJUST INPUTS PVS 407D PAGING INPUT VOICELIFT SENSOR POLEVAULT SWITCHER SELECT PEAK PEAK... -
Page 25: Operation
Input 1 to 7 status LEDs (see figure 19 on page 16) — The applicable input LED lights green when that input is selected and active. • Inputs 1 to 4 — Inputs 1 through 4 are HDMI with embedded audio, or high resolution RGB signals input via the PVT wallplates. -
Page 26: Front Panel Lockout (Executive Mode)
Front Panel Lockout (Executive Mode) Front panel lockout mode disables all front panel controls, except the reset button, locking out users from those functions. Putting the switcher in lock mode enhances security by protecting against inappropriate or accidental changes to settings. The front panel lockout mode can be enabled or disabled via SIS [see Front panel lockout (executive mode) on page 41], PCS (see the PVS 407D Help File for details), or the front panel. - Page 27 Reset Modes Mode Activation Result Purpose and Notes Hold in the recessed front panel The device reverts to the factory Use this mode to revert to the factory Reset button while applying default firmware for a single power default firmware for a single power power to the unit.
-
Page 28: Power Save Modes
Power Save Modes The PVS 407D is an ENERGY STAR qualified product designed to automatically shut off, enter standby mode when not in use, reduce operating costs, and extend the life of system components. Four power save modes are available (see the table below for more information on each mode). Mode Type Activation Device and... -
Page 29: Configuration
Configuration MediaLink Controller (MLC) or by an RS-232 device acting through the MLC. Alternatively, the switcher can be set up and controlled via a host computer or other device (such as a control system) attached to the front panel USB connector or direct connection to the Ethernet, or to the rear panel RS-232 remote port of the switcher. -
Page 30: Gain Control
Gain Control Individual channel input sensitivity control Individual channel input gain control adjustments are made by pressing the adjustment buttons for the selected input button. The adjustment range is -18 dB to +24 dB, with the default set at 0 dB. NOTE: Adjusting input sensitivity for all inputs ensures consistent signal to noise ratios across all inputs. -
Page 31: Voicelift Level Adjustment
VoiceLift Level Adjustment To adjust the VoiceLift microphone levels, press the VOICELIFT adjustment buttons (see figure 22). The VoiceLift input gain is adjusted in 1 dB steps from -18 dB to +24 dB. Default is 0 dB. While speaking into the microphone, increase the gain until the NORMAL LED is lit and the PEAK LED only lights occasionally. -
Page 32: Product Configuration Software
Product Configuration Software The PVS 407D can be easily configured using Extron Product Configuration Software (PCS). This section describes the software installation and communication (see the PVS 407D Help File for detailed control information). Topics include: • Software/Firmware Installation • PCS Overview •... - Page 33 4. For software, type the name of the software into the Search Software field (see figure 25), and select the desired software. The selected software page opens below the search. Figure 25. Software Download Center For firmware, type in the name of the device into the Search Firmware field (see figure 26), and select the desired device.
-
Page 34: Pcs Overview
5. Click Download (see figure 25 figure 26 on page 25), and follow the on-screen instructions. An executable (.exe) file is downloaded to the PC. Run the firmware executable file to place the firmware on the PC for future use. Make a note of the folder where the software or firmware file was saved. 6. -
Page 35: Software Settings
Software Settings This option resets all disabled confirmation dialogs to the default settings. 1. From the Software menu, select Software Settings. The Software Settings dialog box opens (see figure 29). Figure 29. Settings Dialog Box 2. Click the Re-enable Confirmation Dialog button ( ). - Page 36 About Extron PCS Display information about the current PCS version. 1. From the Software menu, select About Extron PCS. The About - Extron PCS dialog box opens (see figure 31). Figure 31. About - Extron PCS Dialog Box 2. Click the Details button ( ) for more information.
-
Page 37: Connecting To Pcs
Connecting to PCS The Extron Product Configuration Software window opens with the Device Discovery panel open. Connect to the device using the Device Discovery panel. Device Discovery Panel The Device Discovery panel displays accessible Extron devices connected directly to the PC or to a LAN. Devices are identified and sorted by model, IP address, device name, or connection method. -
Page 38: Tcp/Ip Panel
TCP/IP Panel The TCP/IP panel connects PCS to a specific device where the IP address is known. Figure 35. Comm Port Selection Window 1. Click the TCP/IP tab (see figure 35, 2. In the IP Address/Hostname field ( ), enter the IP address of the PVS 407D. NOTE: The default IP address is 192.168.254.254. -
Page 39: Offline Device Preview
Offline Device Preview Opening a new device tab for an offline device displays the interface and configuration options for the device without connecting to it. However, settings cannot be changed. To open the switcher in offline mode: 1. From the blue configuration file drop-down list, select New Configuration File (see figure 36). Figure 36. -
Page 40: Device Menu
Device Menu The device menu contains options pertaining to device connection, configuration, and information (see figure 38). For more details, see the PVS 407D PCS Help File. • Commissioning Report — Allows the user to create and save a commissioning report to aid with troubleshooting device issues. -
Page 41: Connect
Connect The Connect... option from the device menu allows the user to re-establish connection with the device or connect to the device while in offline mode. When selected, the Connect dialog box opens and three tabs are available for connection: •... -
Page 42: Remote Configuration And Control
No response is required from the host. The following are examples of switcher-initated messages: • ] © Copyright 2019, Extron Electronics PVS 407D, Vx.xx, 60-1466-01 ] Vx.xx is the firmware version number. 60-1455-01 is the part number of the unit. -
Page 43: Copyright Information
The copyright message is displayed upon connecting to a switcher via TCP/IP or Telnet or via RS-232 after a power cycle. ] © Copyright YYYY, Extron Electronics, PVS 407D, Vx.xx, 60-1466-01 ] Ddd, DD MMM YYYY HH:MM:SS ] (day, date, and time as in Fri, 20 Nov 2015 11:27:22) Password Information The ] Password: prompt requires a password (administrator level or user level) followed by a carriage return. -
Page 44: Using The Command And Response Table
Using the Command and Response Table Command and Response Table for SIS Commands starts on page 40. Symbols are used throughout the table to represent variables in the command response fields. Command and response examples are shown throughout the table. The ASCII to HEX conversion table (see figure 40) is for use with the command and response table. - Page 45 KEY (continued): Video input selection — Inputs 1 to 6 only X& Video signal status — 0 = Video/TMDS signal not detected 1 = Video/TMDS signal detected 2 = Unknown Audio format — 0 = Analog 1 = Digital Audio mute to DSP — 0 = Audio unmuted 1 = Audio muted Input HDCP status —...
- Page 46 KEY (continued): Audible chime — 0 = Off/disable 1 = On/enable (default) E25 = Device not present/ detected X3& LINK slot 1 — 0 = LINK slot 1 is not paired to a microphone or pairing fails 1 = LINK slot 1 is paired microphone 9 = Microphone is on/ connected or LINK slots are occupied and cannot pair.
- Page 47 variables for EDID resolution/refresh rate combination (where = 1 through 62) Analog Digital Resolution Refresh Rate Video Audio Resolution Refresh Rate Video Audio (Hz) Type Format Format (Hz) Type Format Format 800x600 800x600 HDMI 2-ch 1024x768 1024x768 HDMI 2-ch 1280x720 1280x768 HDMI 2-ch...
-
Page 48: Command And Response Table For Sis Commands
Command and Response Table for SIS Commands Command ASCII Command Response Additional Description (host to switcher) (switcher to host) Input selection Select an input Select video and audio from input View current input View current input. Verbose mode 2/3 KEY: = Input selection: 1 to 7 Video mute (output) - Page 49 Command ASCII Command Response Additional Description (host to switcher) (switcher to host) Output volume Set specific volume X3%] Set volume to X3%] Increment Increase volume. X3%] Decrement Decrease volume. View volume X3%] View current volume setting. X3%] Verbose mode 2/3 KEY: = Audio output volume: 000 to 100, (-100 db to 0 db), [default = 080]...
- Page 50 Command ASCII Command Response Additional Description (host to switcher) (switcher to host) Device information requests (continue) View VoiceLift receiver Mic input X3$• X3$• X3$] View VoiceLift receiver Mic input Signal, Norm Signal, Normal, and Peak status Normal, and Peak status. X3$•...
- Page 51 Command ASCII Command Response Additional Description (host to switcher) (switcher to host) EDID Minder (VGA and HDMI) (continue) Export EDID file X1*] Export EDID from specified EdidE < > EDID slot filename < >EDID filename Send file from unit to PC file data (128 or 256 bytes) <...
- Page 52 Command ASCII Command Response Additional Description (host to switcher) (switcher to host) Play audio file NOTES: • This command responds with an E28 error (file not found) if the alphanumeric audio file does not exist. • This command responds with an E22 error (busy) if the audio file is not played due to low priority. •...
- Page 53 Command ASCII Command Response Additional Description (host to switcher) (switcher to host) Picture adjustment (PVT HD RGB and PVT HDMI RGB, inputs 2 and 4 only) (continue) View horizontal start value EX2( X3@] HSRT View horizontal start X3@] Verbose mode 2/3 Hsrt Set vertical start value EX2(...
- Page 54 Command ASCII Command Response Additional Description (host to switcher) (switcher to host) VoiceLift Pro Microphone Usage View microphone usage (hours) HHHHH:MM = hours: minutes USAG HHHHH:MM Device is not present. or E25 VLR 102 detected, expected VLR 302. or E14 Verbose mode 2/3 UsagHHHHH:MM or Usag*E25...
- Page 55 Command ASCII Command Response Additional Description (host to switcher) (switcher to host) VoiceLift Pro Microphone Pairing (continue) View pairing X3*X3(] Indicates whether microphones are PAIR paired to each LINK slot. Device is not present. or E25 VLR 102 detected, expected VLR 302. or E14 X3*X3(] Verbose mode 2/3...
- Page 56 Command ASCII Command Response Additional Description (host to switcher) (switcher to host) VoiceLift Pro Reset (continue) Reboot Device • Device reboot v1*9RSTD Rstd v1*9 Device is not present. or Rstd*E25 VLR 102 detected, expected VLR 302. or Rstd*E14 VoiceLift Pro Feedback Suppressor Set feedback suppressor EX4# X4#]...
-
Page 57: Information Request
Command ASCII Command Response Additional Description (host to switcher) (switcher to host) RS-232 Serial port parameters Configure RS-232 seral port EX10# X10# ] Set the baud rate for the RS-232 port. parameters X10#] View RS-232 seral port Query the baud rate for the parameters RS-232 port. - Page 58 Command ASCII Command Response Additional Description (host to switcher) (switcher to host) Information request (continue) Query PVT wallplate 1 part 60-1756-03 = PVT HD RGB 60-1756-03 number 60-1335-13 = PVT HDMI RGB or 60-1335-13 60-1270-13 = PVT HDMI or 60-1270-13 60-2032-03 = PVT HD or 60-2032-03 E25 = device not present...
- Page 59 Command ASCII Command Response Additional Description (host to switcher) (switcher to host) IP Setup Commands (continue) EX10% •X10%] X10% Set unit name Set the device name to Set unit name to factory default E • •X10!] Reset the device name to the factory default.
- Page 60 Command ASCII Command Response Additional Description (host to switcher) (switcher to host) Set IP, Subnet, and Gateway (all at once) NOTE: Setting any values with the CISG command changes DHCP from on to off (default). Settings take place immediately without the need for 2BOOT.
-
Page 61: Internal Web Page
Internal Web Page The PVS 407D features an internal server, displayed as a web page. This page allows you to monitor and adjust certain settings of the device via LAN or WAN connection. This section gives an overview of the internal web page, which is always available and cannot be erased or overwritten. -
Page 62: Web Pages Panel
6. Click SIGN IN. The web page opens. NOTE: After accessing the web page, if there has been no activity for 30 minutes, the default web page displays a dialog box asking if you want to keep the session alive. After a short period, the user is logged off automatically if no action is taken. -
Page 63: Device Info
Device Info The Device Info panel shows the current device, name, part number, and manufacturer (see figure 43). To change the device name: 1. Click EDIT in the Device Info panel. The Device Info Settings dialog box opens (see figure 44) . 2. -
Page 64: Network Settings
Network Settings The Network Settings panel shows the current network settings for the PVS 407D (see figure 47). To change the TCP/IP settings, click EDIT to access the Network Settings dialog box (see figure 48). To configure the settings for use with DHCP: 1. - Page 65 IP Multicast Address — Enter a Multicast address on which to receive an audio stream on the defined UDP Public or Priority port. Default: 239.255.255.250. Server IP Address — Enter the IP address of the Campus Communication Suite server PC. Default is 0.0.0.0.
-
Page 66: Firmware
Firmware The Firmware panel shows the current firmware version and when it was last updated to the PVS 407D (see figure 51). To update the switcher firmware version: 1. Ensure the latest firmware is downloaded (see Software/Firmware Installation on page 24 for details on downloading firmware from the Extron website). -
Page 67: Roles And Permissions
Roles and Permissions The Roles and Permissions panel gives the user access to set the admin and user passwords for the PVS 407D switcher (see figure 54). NOTE: The factory configured password for all accounts on this device have been set to the device serial number. Passwords are case sensitive. -
Page 68: Linklicense
LinkLicense The LinkLicense panel allows the user to add a LinkLicense as well as displays the LinkLicense if one is added (see figure 56). Figure 56. LinkLicense Panel NOTES: • A LinkLicense is obtained directly from Extron, usually by email. When received, download the file to your computer in order to upload it to the device. - Page 69 4. Click ADD. The LinkLicense is uploaded and automatically installs to the connected PVS 407D. The switcher automatically performs a system reboot when complete to apply the LinkLicense. When the license is properly installed, your LinkLicense panel appears as shown in figure 59. Figure 59.
-
Page 70: Equipment Mounting
Equipment Mounting This section provides procedures for mounting the PVS407 D. Mounting the PVS 407D ATTENTION: • Installation and service must be performed by authorized personnel only. • L’installation et l’entretien doivent être effectués par le personnel autorisé uniquement. The switcher can be set on a table, mounted in a rack, or mounted under a desk or table. Tabletop Use Four adhesive rubber feet are included with the PVS 407D. - Page 71 Consignes UL pour le montage en rack Les consignes UL (« Underwriters Laboratories ») suivantes concernent l’installation en rack d’un boîtier PVS 407D: ATTENTION: • Température ambiante élevée — En cas d’installation de l’équipement dans un rack fermé ou composé de plusieurs unités, la température du rack peut être supérieure à la température ambiante. Par conséquent, il est préférable d’installer l’équipement dans un environnement qui respecte la température ambiante maximale (Tma) spécifiée par Extron.
-
Page 72: Extron Warranty
Electronics makes no further warranties either expressed or implied with respect to the product and its quality, performance, merchantability, or fitness for any particular use. In no event will Extron Electronics be liable for direct, indirect, or consequential damages resulting from any defect in this product even if Extron Electronics has been advised of such damage.
Need help?
Do you have a question about the PoleVault PVS 407D and is the answer not in the manual?
Questions and answers