Advertisement
Available languages
Available languages
Quick Links
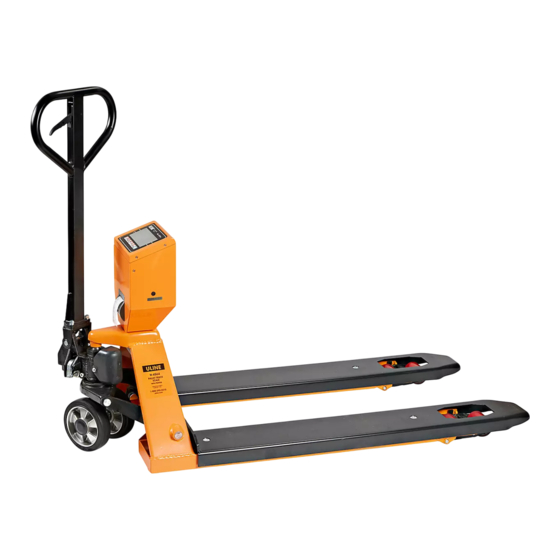
H-4564
PALLET TRUCK SCALE
WITH PRINTER
Avoid conditions that may affect accuracy.
• Temperature extremes: Do not place in direct
sunlight or near air conditioning vents.
• Keep scale dry: Do not place in high humidity,
damp or wet locations.
• Keep away from air movers like fans or open doors
and windows.
• Keep scale clean.
• Do not stack items on the scale when not in use.
WARNING! Scale is not waterproof. Avoid
direct contact with water, high humidity and
condensation. Do not spray or immerse scale
in water. Data may become unstable or scale
may malfunction. Turn power off and allow
scale to dry before reuse.
For safe operation of the truck, read all warnings and
instructions in this guide and on the truck before use.
• Do not operate the pallet truck unless you are
familiar with it and have been trained or authorized
to do so.
• Do not operate the truck unless you have checked
its condition. Pay special attention to wheels,
handle assembly, forks and controller lever.
• Do not use the truck on sloping ground.
• Never place any part of your body in the lifting
mechanism or under the forks or load. Do not carry
passengers.
PAGE 1 OF 35
1-800-295-5510
uline.com
SAFETY
• It is recommended that operator wears gloves and
protective shoes while operating the truck.
• Do not handle unstable or loosely stacked loads.
• Do not overload the truck.
• The capacity of the truck assumes an evenly
distributed load with the center of the load being
at the halfway point of the length of the forks.
• Ensure length of forks matches length of the pallet.
• Lower forks to lowest height when truck is not in use.
Para Español, vea páginas 12-23.
Pour le français, consulter les pages 24-35.
0924 IH-4564
Advertisement

Subscribe to Our Youtube Channel
Related Manuals for U-Line H-4564


Summary of Contents for U-Line H-4564
- Page 1 Para Español, vea páginas 12-23. Pour le français, consulter les pages 24-35. H-4564 1-800-295-5510 uline.com PALLET TRUCK SCALE WITH PRINTER SAFETY Avoid conditions that may affect accuracy. • It is recommended that operator wears gloves and protective shoes while operating the truck.
-
Page 2: Technical Data
TECHNICAL DATA MODEL H-4564 Max. Lifting Weight 5,000 lbs. Min. Fork Height 3⁄" 7½" Max. Fork Height Fork Length 48" Fork Overall Width 27" Individual Fork Width 7" Capacity 5,000 lbs. Division 1 lb. External Resolution 1/5,000 Internal Resolution 1/600,000... -
Page 3: Aperçu Des Commandes
APERÇU DES COMMANDES PANNEAU DE COMMANDE CONTROL PANEL BUTTONS 1-800-295-5510 Max. 5,000 lbs. DESCRIPTION uline.com Unit Button STABLE Gross/Net Weight Button GROSS Accumulate Button Pretare Button Tare Button Zero Button Print ON/OFF Button FONCTIONS DES COMMANDES BUTTON PRIMARY FUNCTION SECONDARY FUNCTION UNIT (U) Selects weighing units: pounds or kilograms. -
Page 4: Attach Control Panel
ASSEMBLY Remove control panel from packing foam. (See Figure 1) 3. Align mounting holes on pallet truck with mounting holes on control panel. (See Figure 4) Figure 1 Figure 4 4. Insert and tighten three hex screws with spring ATTACH CONTROL PANEL washers through base of control panel with hex wrench provided. -
Page 5: Handle Installation
ASSEMBLY CONTINUED HANDLE INSTALLATION 5. Attach handle to base using three hex screws and three spring washers and tighten with hex wrench 1. Remove handle from protective wrapping. provided. (See Figure 9) 2. Loosen set screw on crank link. (See Figure 7) Figure 9 Hex Screw Spring... -
Page 6: Operation
OPERATION RAISING/LOWERING FORKS CHARGING THE BATTERY Control lever is located on pallet truck handle and can Connect AC adapter into the plug on the side of the be set to three positions: lower, neutral and ascent. control panel. Plug cord into 110/120V AC outlet. (See Figures 11-13) (See Figure 14) 1. - Page 7 OPERATION CONTINUED TARING ACCUMULATION Zero the scale by pressing the ZERO key if necessary. NOTE: Before using Accumulation function, The "ZERO" indicator will be on. remove all weight from forks and zero the scale. Place a container on the pallet, display shows weight. 1.
-
Page 8: Thermal Printer
OPERATION CONTINUED PRINTOUT FORMATS SELECT PRETARE 1. Press G/ N key to ensure scale is in net mode. PARAMETERS Ptl 0 2. Press PT key. " " is shown on display. Press TARE Format 1 Format 2 key to select desired stored item (0-9). Press ZERO key to display pretare value. -
Page 9: Battery Operation
FUNCTION SETTING TABLE FUNCTION SUB-FUNCTION DESCRIPTION DEFAULT VALUE F1 u nt ----------- Sets the displayed weight unit. Select kg/lb. kg/lb F3 off Set the backlight. Auto On: Always on. Auto: Press a key and weight is more than 20d, backlight comes on automatically. Off: Always off. -
Page 10: Maintenance
BATTERY OPERATION CONTINUED BATTERY PERFORMANCE • Do not expose batteries to temperatures below 14ºF (-10ºC) or above 113ºF (45ºC). Always use original batteries and AC adapter. Scale is • Fully charge battery before first use. not intended for use with non-original batteries and/or battery chargers. -
Page 11: Error Codes
CALIBRATION CONTINUED 5. After weight is keyed, press ZERO key to enter. NOTE: If the problem persists, contact Uline LoAd Display will show " ". Customer Service at 1-800-295-5510. 6. Add calibration weight onto forks. After "STABLE" indicator is visible, press ZERO key to enter. 7. - Page 12 H-4564 800-295-5510 uline.mx PATÍN HIDRÁULICO CON BÁSCULA E IMPRESORA SEGURIDAD Evite colocar la báscula en ubicaciones que puedan • Se recomienda que el operador lleve guantes y afectar a la precisión. zapatos protectores mientras opera el patín. • Temperaturas extremas: No colocar bajo la •...
-
Page 13: Datos Técnicos
DATOS TÉCNICOS MODEL H-4564 Máx. Peso de Levantamiento 2,267 kg (5,000 lbs.) Altura Mín. de Horquilla 8.5 cm (3⁄") Altura Máx. de Horquilla 19 cm (7½") Longitud de Horquilla 1.2 m (48") Ancho Total de Horquilla 68.6 cm (27") Ancho Individual de Horquilla 17.8 cm (7") -
Page 14: Revisión De Los Controles
REVISIÓN DE LOS CONTROLES PANEL DE CONTROL TECLAS DEL PANEL DE CONTROL 1-800-295-5510 Max. 5,000 lbs. DESCRIPCIÓN uline.com Tecla de Unidad STABLE Tecla de Peso Bruto/Neto GROSS Tecla de Acumulación Tecla de Pretara Tecla Tara Tecla de Cero Print Tecla ON/OFF FUNCIONES DE CONTROL TECLA FUNCIÓN PRIMARIA... - Page 15 ENSAMBLE Saque el panel de control de la espuma para 3. Alinee los orificios de montaje del patín hidráulico empaque. (Vea Diagrama 1) con los orificios de montaje del panel de control. (Vea Diagrama 4) Diagrama 1 Diagrama 4 COLOQUE EL PANEL DE CONTROL 4.
-
Page 16: Instalación Del Asa
CONTINUACIÓN DE ENSAMBLE INSTALACIÓN DEL ASA 5. Fije el asa a la base usando tres tornillos hexagonales y tres rondanas de resorte y apriete 1. Saque el asa de su envoltura protectora. con la llave hexagonal que se suministra. (Vea Diagrama 9) 2. - Page 17 CONTINUACIÓN DE FUNCIONAMIENTO ELEVAR/BAJAR LAS HORQUILLAS Neutro: Diagrama 12 Para mover la carga. La palanca de control está ubicada en el asa del patín hidráulico y se puede colocar en tres posiciones: bajar, neutro y elevar. (Vea Diagramas 11-13) 1. Apriete el tornillo de ajuste sobre el eslabón de la manivela hasta que la posición lower de la palanca de control funcione correctamente.
- Page 18 CONTINUACIÓN DE FUNCIONAMIENTO TARA SELECCIONAR LAS UNIDADES DE PESAJE Lleve a cero la báscula presionando la tecla ZERO en Presione la tecla U para seleccionar las unidades de caso de ser necesario. El indicador de cero se mostrará pesaje deseadas (LBS. o KG). encendido.
- Page 19 CONTINUACIÓN DE FUNCIONAMIENTO PRETARA 1. Abra la cubierta del rollo de papel estirando de la cubierta hacia abajo. (Vea Diagrama 15) 1. Para fijar, presione y mantenga presionada la tecla PT durante tres segundos para mostrar el valor de tara actual. Cubierta del Rollo de Papel 2.
- Page 20 CONTINUACIÓN DE FUNCIONAMIENTO La báscula dispone de parámetros que el usuario 6. Use la tecla U para dejar un parámetro sin cambiar. puede establecer. F1 unit 7. Por ejemplo, cuando la pantalla muestre " " 1. Para establecer parámetros, presione a la vez las presione la tecla ZERO para comenzar.
-
Page 21: Funcionamiento De La Batería
CONTINUACIÓN DE TABLE DE CONFIGURACIÓN DE FINCIONES FUNCIÓN VALOR FUNCIÓN DESCRIPCIÓN SECUNDARIA PREDETERMINADO F4 prt Continúa el modo ----------- Formatos de impresión ----------- FUNCIONAMIENTO DE LA BATERÍA VIDA ÚTIL DE LA BATERÍA RENDIMIENTO DE LA BATERÍA El indicador de pesaje está operado por una batería. Utilice siempre baterías y un adaptador de CA La vida útil de la batería es de aproximadamente 60 originales. - Page 22 MAINTENINIENTO REVISIÓN DIARIA Y MANTENIMIENTO 2. Use aceite de tipo hidráulico de acuerdo con la tabla de temperaturas que se muestra a Las revisiones diarias del patín hidráulico pueden continuación. ayudar a evitar accidentes. Preste especial atención a las llantas, los ejes, el asa, las horquillas y la palanca de TEMPERATURA ACIETE control.
-
Page 23: Códigos De Error
CÓDIGOS DE ERROR CÓDIGOS DE DESCRIPCIÓN RESOLUCIÓN ERROR ----- Sobrecarga Quite el peso de la báscula. Si el problema continúa, llame a la línea de Servicio a Clientes de Uline al 800-295-5510. Err 1 Error en la configuración Ingrese la fecha con el formato correcto. de la fecha Formato: aa:mm:dd Err 2... - Page 24 H-4564 H-4564 1 800 295-5510 uline.ca TRANSPALETTE PESEUR AVEC IMPRIMANTE SÉCURITÉ Évitez de placer la balance dans des endroits où sa • Ne positionnez jamais une partie de votre corps précision peut être compromise. dans le mécanisme de levage ou sous la fourche ou la charge.
-
Page 25: Données Techniques
DONNÉES TECHNIQUES MODELO H-4564 Poids de levage maximal 2 268,0 kg (5 000 lb) Hauteur min. des fourches 8,5 cm (3 ⁄ po) Hauteur max. des fourches 19 cm (7 ½ po) Longueur des fourches 1,2 m (48 po) Largeur totale des fourches 68,6 cm (27 po) Largeur d'une fourche 17,8 cm (7 po) -
Page 26: Panneau De Contrôle
APERÇU DES COMMANDES PANNEAU DE CONTRÔLE BOUTONS DU PANNEAU DE COMMANDE 1-800-295-5510 Max. 5,000 lbs. DESCRIPTION uline.com Bouton d'unité STABLE Bouton de poids brut/poids net GROSS Bouton d'accumulation Bouton de tare prédéfini Bouton de tare Bouton Zéro Print Bouton marche/arrêt FONCTIONS DE CONTRÔLE TOUCHE FONCTION PRINCIPALE... - Page 27 ASSEMBLAGE Déballez soigneusement tous les éléments. (Voir Figure 1) 3. Alignez les trous de montage du transpalette avec ceux du panneau de commande. (Voir Figure 4) Figure 1 Figure 4 4. À l'aide de la clé hexagonale fournie, insérez et FIXER LE PANNEAU DE COMMANDE serrez trois vis hexagonales et des rondelles à...
-
Page 28: Installation De La Poignée
ASSEMBLAGE SUITE INSTALLATION DE LA POIGNÉE 5. À l'aide de trois vis hexagonales et trois rondelles à ressort, fixez la poignée à la base, et serrez à l'aide 1. Retirez la poignée de l'emballage protecteur. de la clé hexagonale fournie. (Voir Figure 9) 2. -
Page 29: Fonctionnement De Base
FONCTIONNEMENT DE BASE FOURCHES ASCENDANTES/DESCENDANTES Neutre : Figure 12 pour déplacer la charge Le levier de commande est situé sur la poignée du transpalette et peut prendre trois positions : descendant, neutre et ascendant. (Voir Figures 11 à 13) 1. Serrez la vis de réglage sur la manivelle jusqu'à ce que la position descendant du levier de commande fonctionne adéquatement. -
Page 30: Rappel De Mémoire
FONCTIONNEMENT SUITE TARAGE ACCUMULATION Réinitialisez la balance en appuyant sur la touche REMARQUE : Avant d'utiliser la fonction ZERO, le cas échéant. L'indicateur « Zero » (Zéro) Accumulation, retirez tout poids des fourches et s'affichera. réinitialisez la balance. Placez un bac sur la palette et le poids s'affichera. 1. - Page 31 FONCTIONNEMENT SUITE TARAGE PRÉDÉFINI IMPRIMANTE THERMIQUE 1. Pour régler, maintenez la touche PT enfoncée REMARQUE : L'imprimante thermique est pendant trois secondes afin d'afficher la valeur de située au bas du panneau de commande. tare actuelle. Commander à nouveau l'article nº de modèle Uline S-16160.
- Page 32 FONCTIONNEMENT SUITE La balance comporte des paramètres qui peuvent être 6. Utilisez la touche U pour laisser le paramètre tel quel. définis par l'utilisateur. F1 unit 7. Par exemple, lorsque l'affichage indique « », 1. Pour définir les paramètres, appuyez sur la touche appuyez sur la touche ZERO pour commencer.
-
Page 33: Entretien
FONCTIONNEMENT DE LA BATTERIE DURÉE UTILE DE LA BATTERIE RENDEMENT DE LA BATTERIE L'indicateur de pesage fonctionne grâce à la pile. La Utilisez toujours des batteries et un adaptateur c.a. durée utile de la pile est d'environ 60 heures. d'origine. La balance n'est pas prévue pour une utilisation avec des batteries et/ou un chargeur non TÉMOIN DE BATTERIE FAIBLE originaux. -
Page 34: Entretien Général
ENTRETIEN SUITE ENTRETIEN GÉNÉRAL PURGER L'AIR DE LA POMPE 1. Veuillez vérifier le niveau d'huile tous les six mois. Le L'air peut pénétrer le système hydraulique en raison volume d’huile est d'environ 298,7 ml (10,1 oz liq.). du transport ou de perturbations de pompe. Il peut empêcher les fourches de se lever pendant que 2. -
Page 35: Codes D'erreur
CODES D'ERREUR CODES D'ERREUR DESCRIPTION RÉSOLUTION ----- Surcharge Retirez du poids de la balance. Si le problème persiste, communiquez avec le service à la clientèle d'Uline à 1 800 295-5510. Err 1 Erreur de définition de la Inscrivez la date dans le bon format. date Format : aa:mm:jj Err 2...
Need help?
Do you have a question about the H-4564 and is the answer not in the manual?
Questions and answers