Table of Contents
Advertisement
Available languages
Available languages
Quick Links
Advertisement
Table of Contents

Related Manuals for TERMOFOL TF-EF-1323-90


Summary of Contents for TERMOFOL TF-EF-1323-90
- Page 1 Termofol TF-EF-1323-90 KOMPAKTOWY KOMINEK Instrukcja instalacji i obsługi Installation and user manual Uwaga: Przed rozpoczęciem instalacji przeczytaj instrukcję! Note: Please read the instructions before starting the installation!
-
Page 2: Opis Symboli
Przed rozpoczęciem wszelkich prac instalacyjnych należy dokładnie przeczytać instrukcję montażu i obsługi i zachować ją do późniejszego wykorzystania. Zastosowanie się do wytycznych zawartych w instrukcji użyt- kowania oraz przestrzeganie zasad w niej zawartych zapewni bezpieczną pracę urządzenia. OPIS SYMBOLI Produkt zgodny z dyrektywami europejskimi OSTRZEŻENIE: Aby uniknąć... -
Page 3: Informacje Dotyczące Bezpieczeństwa
Informacje dotyczące bezpieczeństwa Przed przystąpieniem do instalacji i obsługi produktu należy przeczytać całą instrukcję. Jeśli masz jakiekolwiek pytania dotyczące produktu, zadzwoń do naszego działu obsługi klienta pod numer: +48 12 376 86 00 w godzinach 8:00–17:00, od poniedziałku do piątku. 1. -
Page 4: Połączenie Elektryczne
Połączenie elektryczne Wymagany jest obwód 15 A, 230 V, 50 Hz z prawidłowo uziemionym gniaz- dem. Najlepiej, aby przedmiot podłączony został pod oddzielny obwód elektryczny. Urządzenie jest standardowo wyposażone w trójżyłowy prze- wód o długości 1,8 m, wychodzący z prawej strony urządzenia. Zawsze podłączaj urządzenie do ściennego gniazdka/gniazdka. - Page 5 Główny przycisk zasilania: Ten przycisk włącza/wyłącza wszystkie funkcje urządzenia. Aby funkcje działały, główny przycisk zasila- nia musi znajdować się w pozycji ON, na pilocie lub elementach sterujących na obudowie urządzenia. Przycisk sterowania grzałką: Ten przycisk steruje włączaniem/wyłączaniem grzałki i 5 trybami temperatury od niskiej do wyso- kiej.
- Page 6 Plastikowa zakładka wewnątrz pilota obok Główny przycisk zasilania (1): baterii MUSI zostać usunięta aby pilot zaczął działać. Ten przycisk włącza i wyłącza wszystkie funkcje urządze- nia. Aby efekt płomienia i funkcja grzania były dostępne, (Pociągnij zakładkę) główny przycisk zasilania musi znajdować się w pozycji ON, na pilocie lub elementach sterujących umieszczo- nych na obudowie urządzenia.
- Page 7 Czyszczenie Przed czyszczeniem zawsze wyłączaj grzejnik i odłączaj przewód zasilający od gniazdka. Użyj odku- rzacza lub ściereczki do kurzu, aby usunąć kurz i brud z nagrzewnicy i obszarów wentylacyjnych. Aby utrzymać urządzenie w czystości użyj miękkiej, lekko wilgotnej ściereczki do przetarcia elementów a następnie osusz powierzchnie suchą...
- Page 8 ROZWIĄZYWANIE PROBLEMÓW Jeśli masz jakiekolwiek pytania dotyczące produktu, skontaktuj się z naszym działem wsparcia tech- nicznego: +48 790 290 158 lub na email: support@termofol.pl...
- Page 9 Niniejsza gwaran- cja nie obejmuje wad wynikających z niewłaściwego lub nieprawidłowego użytkowania, czy niedozwo- lonych modyfikacji. Nieprzestrzeganie wszystkich instrukcji zawartych w instrukcji obsługi powoduje również utratę gwarancji. Termofol nie ponosi odpowiedzialności za przypadkowe lub wtórne szkody.
-
Page 10: Karta Gwarancyjna
KARTA GWARANCYJNA MIEJSCE INSTALACJI DANE INSTALATORA Nazwa firmy Imię i Nazwisko Adres (ulica, nr) Miejscowość Telefon Data Podpis instalatora Pieczątka instalatora www.termofol.pl biuro@termofol.pl +48 (12) 376 86 00 Miejsce na tabliczkę znamionową... - Page 11 Termofol TF-EF-1323-90 COMPACT FIREPLACE Installation and user manual Note: Please read the instructions before starting the installation!
-
Page 12: Symbols Description
Before commencing any installation work, carefully read the installation and operating instructions and keep them for future reference. Adherence to the guidelines contained in the user manual and compliance with the rules contained therein will ensure safe operation of the device. SYMBOLS DESCRIPTION The product complies with European directives WARNING: To avoid overheating, do not cover the fireplace. -
Page 13: Safety Information
Safety information Please read the entire manual before installing and operating the product. If you have any questions about the product, please call our customer service at: +48 12 376 86 00 from 8:00 to 17:00, Monday to Friday. 1. Read the entire manual before operating this device. 2. -
Page 14: Control Panel
Electrical connection A 15A, 230V, 50Hz circuit with a properly grounded outlet is required. Ideally, the item should be connected to a separate electrical circuit. The device comes standard with a 1.8 m 3-wire cable coming from the right side of the device. Always connect the device to a wall outlet/socket. - Page 15 Main Power Button: This button turns on/off all device functions. The main power button must be in the ON position, either on the remote control or on the controls for the features to work. Heater control button: This button controls the heater on/off and 5 temperature modes from low to high.
- Page 16 The plastic tab inside the remote control Main Power Button (1): next to the battery MUST be removed for the remote control to work. This button turns all device functions on and off. The main power button must be in the ON position, either (Pull tab) on the remote control or on the controls located on the housing of the device, for the flame effect and heating...
- Page 17 Cleaning Always turn off the heater and disconnect the power cord from the socket before cleaning. Use a va- cuum cleaner or dust cloth to remove dust and dirt from the heater and ventilation areas. To keep the device clean, use a soft, slightly damp cloth to wipe the components and then dry the surfaces with a dry cloth.
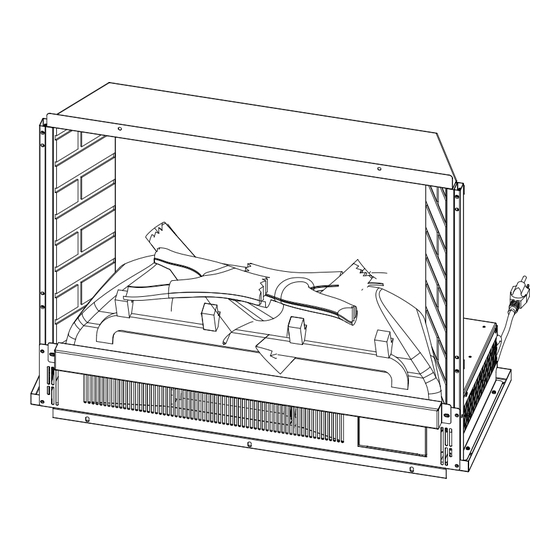
- Page 18 When repairing or replacing any electrical component or wiring, follow the original wiring routing, color coding, and mounting locations. TROUBLESHOOTING If you have any questions about the product, please contact our technical support department: +48 790 290 158 or by email: support@termofol.pl...
- Page 19 This warranty does not cover defects resulting from misuse or misuse, or unauthorized modifications. Failure to follow all instructions in the user manual also voids the warranty. Termofol is not liable for accidental or consequential damages.
-
Page 20: Warranty Card
WARRANTY CARD PLACE OF INSTALLATION FITTER’S DETAILS Name of company Forename and surname Address (street, no.) Postal Locality code Tel. Date Fitter’s signature Fitter’s stamp www.termofol.com biuro@termofol.pl +48 (12) 376 86 00 Place for the nameplate...
Need help?
Do you have a question about the TF-EF-1323-90 and is the answer not in the manual?
Questions and answers