Table of Contents
Advertisement
Advertisement
Table of Contents

Related Manuals for CareCo QS4 MS01096


Summary of Contents for CareCo QS4 MS01096
- Page 1 P R O D U C T C O D E : User Manual M S 0 1 0 9 6...
-
Page 2: Table Of Contents
CONTENTS 1. SAFETY GUIDELINES 2. PRE-RIDE SAFETY CHECK 3. SPECIFICATION 4. COMPONENTS OF THE SCOOTER 5. CONTROL PANEL 6. OPERATION – FOLDING & UNFOLDING 7. OPERATION – BEFORE GETTING ON YOU SCOOTER 8. OPERATING YOUR SCOOTER 9. GETTING OFF YOUR SCOOTER 10. -
Page 3: Safety Guidelines
1. SAFETY GUIDELINES WARNING! An authorized provider or qualified technician must perform the initial setup of this scooter and must perform all of the procedures in this manual. The symbols below are used throughout this owner’s manual and on the scooter to identify warnings and important information. - Page 4 1. SAFETY GUIDELINES Your scooter is a state-of-the-art life-enhancement device designed to increase mobility. We provide an extensive variety of products to best fit the individual needs of the scooter user. Please be aware that the final selection and purchasing decision regarding the type of scooter to be used is the responsibility of the scooter user who is capable of making such a decision and his/her health care professional (i.e., medical doctor, physical therapist, etc.).
-
Page 5: Pre-Ride Safety Check
2. PRE-RIDE SAFETY CHECK Get to know the feel of your scooter and its capabilities. We recommend that you perform a safety check before each use to make sure your scooter operates smoothly and safely. Perform the following inspections prior to using your Travel Scooter: •... -
Page 6: Specification
Battery Box / Tiller MOTOR 120W BRAKE Automatic Electromagnetic Remark: CareCo reserves the right to modify the specification if necessary. The final specification is subject to the individual scooter you purchase from your dealer. * Subject to user weight and terrain... -
Page 7: Components Of The Scooter
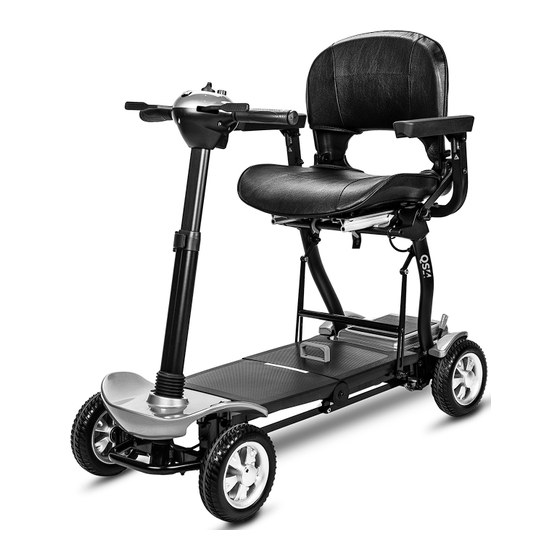
4. COMPONENTS OF THE SCOOTER Seat Rear Wheel Battery Box Seat Arm Pad Control Panel Manual Fold Lever Free wheel Lever Tiller Height Adjuster Front Wheel Your scooter is equipped with a number of elements and parts. You should know these before using the scooter. -
Page 8: Control Panel
5. CONTROL PANEL Throttle Lever Charger Socket – Tiller Horn Button Forward/Back Battery Indicator/Gauge Key Switch Speed Adjustment Dial... - Page 9 5. CONTROL PANEL 5.1 Throttle Control Lever – Forward/Back: (10) This lever allows you to control the forward speed and the reverse speed of your scooter up to the maximum speed you pre-set with the speed adjustment dial. Place your right hand on the right hand tiller handle and your left hand on the left hand tiller handle.
- Page 10 5. CONTROL PANEL WARNING! Chargers are selected precisely for particular applications and are especially matched to the type, size, and chemical formulation of specific batteries. For the safest and most efficient charging of your scooter’s batteries, we recommend use of the charger supplied as original equipment with your product only.
-
Page 11: Operation - Folding & Unfolding
6. OPERATION – FOLDING AND UNFOLDING • The scooter electrically folds and unfolds quickly and easily. • When folding and unfolding your scooter, always make sure you have sufficient room to do so. • You may need assistance to lift the scooter if required. •... - Page 12 6. OPERATION – FOLDING AND UNFOLDING 6.1 REMOTE CONTROL AND ROCKER SWITCH The scooter can be electrically folded and unfolded by either the key-fob remote control (fig 6.1.1) or rocker switch positioned on the rear of the scooter (fig 6.1.2). Key Fob Remote Control Fig 6.1.1 Rocker Switch Fig 6.1.2 6.2 REMOTE CONTROL AND ROCKER SWITCH...
- Page 13 6. OPERATION – FOLDING AND UNFOLDING 6.2 REMOTE CONTROL AND ROCKER SWITCH Fold Button (use for folding the scooter) Unfold Button (use for unfolding the scooter) Fig 6.2.1 Fig 6.2.2 Fig 6.2.3 Scooter is fully unfolded and Scooter is not completely ready to drive with hooks fully unfolded.
- Page 14 6. OPERATION – FOLDING AND UNFOLDING 6.3 FOLDING AND UNFOLDING WITH ROCKER SWITCH The rocker switch can be used to fold and unfold the scooter as an alternative to the remote control fob. 1. To fold the scooter from the unfolded position press the arrow pointing towards the front of the scooter to fold (See Fig 6.3.1) 2.
- Page 15 6. OPERATION – FOLDING AND UNFOLDING 6.4 MANUAL FOLDING & UNFOLDING The scooter can be manually folded and unfolded if required for emergencies. To manually fold and unfold the scooter see as follows: 1. To fold the scooter manually from the unfolded position firstly release the two hooks under the seat by unwinding anti clockwise the plastic knob positioned at the rear of the seat (see Fig 6.4.1) and continue winding until the hooks are fully clear (see Fig 6.4.2).
-
Page 16: Operation - Before Getting On You Scooter
7. OPERATION – BEFORE GETTING ONTO YOUR SCOOTER 7.1 TILLER HEIGHT ADJUSTMENT The tiller height can be quickly adjusted as follows; 1. In the lowered position –pull back the tiller lock clip (see Fig 7.1.1) and with both hands hold the tiller handles and lift to the desired height. 2. - Page 17 7. OPERATION – BEFORE GETTING ONTO YOUR SCOOTER 7.2 FITTING THE BATTERY BOX The removable battery box is fitted and removed as follows: 1. To fit the battery box make sure the box is position with the charger socket at the front.
- Page 18 7. OPERATION – BEFORE GETTING ONTO YOUR SCOOTER 7.3 FREE WHEEL LEVER The Free wheel lever on the scooter is located on the rear section of the scooter. Before driving the scooter needs to be put into the drive position. The two positions are: 1.
- Page 19 7. OPERATION – BEFORE GETTING ONTO YOUR SCOOTER 7.4 ADJUSTING THE ANTI-TIP WHEEL POSITION The anti-tip wheels position at the rear of the scooter have two positions as follows: 1. Storage Position–if required to save space the anti-tip wheel can be pushed forwards to this position.
- Page 20 7. OPERATION – BEFORE GETTING ONTO YOUR SCOOTER 7.5 ADJUSTING THE ARM PAD HEIGHT The arm pads can be quickly adjusted by adjusting the screw length under the arm pad (see Fig 7.5.1) . To lower the arm pad turn the screw clockwise. To raise the arm pad turn the screw anti clockwise.
-
Page 21: Operating Your Scooter
8. OPERATING YOUR SCOOTER • Keep your batteries fully charged and avoid deeply discharging your batteries. • Never leave the manual free wheel lever in the forward position unless you are manually pushing your scooter. WARNING! Never attempt to get on to or off of your scooter without first removing the key from the key switch. - Page 22 8. OPERATING YOUR SCOOTER 8.2 STARTING • Make sure you are seated safely and properly on your scooter. • Turn the speed adjustment dial fully anti-clockwise to the slowest setting. • Insert the key into the key switch. • Turn the key clockwise to the ‘’On’’ position. •...
- Page 23 8. OPERATING YOUR SCOOTER 8.4 DRIVING ON INCLINES, HILLS, SLOPES AND RAMPS • When driving your scooter, never descend or climb a gradient which is greater than recommended – see 3.0 Specifications. Failure to do so could result in serious injury or death. •...
-
Page 24: Getting Off Your Scooter
8. OPERATING YOUR SCOOTER 8.5 DROP CURBS • Always be cautious when descending a drop curb. • Approach the curb so that both back wheels of your scooter go over the curb at the same time. • Never go down curbs by traversing them. Doing this will cause the scooter to tip over resulting in serious injury or death. -
Page 25: Batteries And Charging
WARNING! Risk of explosion and destruction of batteries if the wrong battery charger is used. Only every use the battery charger supplied with your vehicle, or a charger that has been approved by CareCo. Never charge 10 Ah batteries with a 5 Ah battery charger. Always use a 2 Ah... - Page 26 10. BATTERIES AND CHARGING 10.2 CHARGING YOUR BATTERIES - WARNINGS CONT. WARNING! Do not use or store the battery near sources of heat such as a fire or heater. WARNING! Never attempt to open or disassemble the charger. If the battery charger does not appear to be working correctly, contact your authorized provider.
- Page 27 10. BATTERIES AND CHARGING 10.2 CHARGING YOUR BATTERIES - WARNINGS CONT. WARNING! Chargers are selected precisely for particular applications and are especially matched to the type, size, and chemical formulation of specific batteries. For the safest and most efficient charging of your scooter’s batteries, we recommend use of the charger supplied as original equipment with your product only.
- Page 28 10. BATTERIES AND CHARGING 10.3 HOW TO CHARGE YOUR BATTERIES • Make sure you read and understand the battery chargers user manual, if supplied, as well as the safety notes on the charger. • Turn off the scooter power and remove the key •...
-
Page 29: Emi
11. EMI / RFI The rapid development of electronics, especially in the area of communications, has saturated our environment with electromagnetic (radio) waves that are emitted by tel- evision transmitters, cellular phones, citizen’s band radios (CB’s), amateur radios (ham radios), wireless computer left, microwave transmitters, paging transmitters etc. These electromagnetic (EM) waves are invisible and increase in strength the closer one gets to the source of transmission. -
Page 30: Daily Checking
12. DAILY CHECKING Check the following items before driving. If you find anything abnormal, contact your scooter dealer for a further inspection before using it. Item Inspection Content Handle bar Is it tight? Can they be turned left or right smoothly? Throttle Lever Does the scooter move when the lever is... -
Page 31: Maintenance
13. MAINTENANCE 1. Do not use water, oil or other chemical solutions to clean your scooter. Be sure NOT to spray the scooter with the water as this can damage the electronic components. Please clean the scooter by wiping it with either a dry or moist cloth. 2. -
Page 32: Flash Codes
15. FLASH CODES Scooter controller internal diagnostics The diagnostic flash codes for your scooter are designed to help you perform basic troubleshooting quickly and easily. A diagnostic flash code flashes from the Power light in the event one of the conditions listed below develops. FLASH FAULT CONSEQUENCE... - Page 33 15. FLASH CODES FLASH FAULT CONSEQUENCE SOLUTION CODE FOR THE SCOOTER • Ensure the manual free Brake error. Scooter stops wheel lever is in the driving. drive position and re-start the scooter. • There is a fault with the magnetic brake or wiring –...
-
Page 34: Warranty
16. WARRANTY WARRANTY POLICY: LIMITED WARRANTY. IMPORTANT NOTICE –TO ENSURE THIS WARRANTY IS VALIDATED IT HAS TO BE COMPLETED AND RETURNED TO CARECO WITHIN 14 DAYS OF PURCHASE 16.1 TWO-YEAR LIMITED WARRANTY Two years on all structural frame components; fork, seat post, and frame. - Page 35 6. Fuses. 7. Repairs and/or modifications made to any part of the scooter without specific and prior consent from CareCo. 8. Circumstances beyond the control of CareCo. 9. Exclusions also include components with damage caused by: • Contamination (rain, etc).
- Page 36 This warranty only covers failures due to defects in materials or workmanship which occur during normal use and does not cover damage that occurs in shipment or failures which are caused by products not supplied by CareCo or failures resulting from accident, misuse, abuse, neglect, mishandling, misapplication, alteration, modification, commercial use or by anyone other than an authorized dealer, or damage that is attributable to the acts of God.
- Page 37 NOTES...
- Page 38 NOTES...
- Page 39 NOTES...
Need help?
Do you have a question about the QS4 MS01096 and is the answer not in the manual?
Questions and answers
Seems to get stuck when trying to fold up or down
The CareCo QS4 MS01096 scooter could get stuck when folding up or down due to the following reasons:
1. Battery power is low – Recharge the battery.
2. Battery pack not fully inserted – Ensure the battery pack is fully inserted.
3. Hooks under the seat not fully locked or released – During unfolding, continue pressing the switch until both hooks are locked into place. During manual folding, release the hooks by unwinding the plastic knob at the rear of the seat.
Ensure fingers, people, and pets are clear of moving parts before folding or unfolding.
This answer is automatically generated
how to change qs4
To change or adjust something on the CareCo QS4 MS01096 scooter, it depends on what specific part or setting you're trying to change. Based on the context provided from the manual, here is a detailed explanation for adjusting the arm pad height, which is one of the adjustable features of the scooter:
### How to Adjust the Arm Pad Height on the CareCo QS4 MS01096:
1. Locate the Adjustment Screw:
Under each arm pad, there is a screw that controls the height.
2. Use the Correct Rotation:
- To lower the arm pad, turn the screw clockwise.
- To raise the arm pad, turn the screw anti-clockwise.
3. Check Both Sides:
Make sure to adjust both arm pads evenly for comfort and balance.
4. Refer to Diagram (Fig 7.5.1):
The manual references an illustration (Fig 7.5.1) that visually shows how the adjustment works, which may help identify the screw location and turning direction.
---
If by "change" you meant something else—like replacing the battery, folding the scooter, or adjusting another part—please let me know!
This answer is automatically generated
got caught in a heavy downpour of rain and shooter has now stopped working, battery had water around it and some ran out where the wheels are underneath ?