Table of Contents
Advertisement
Advertisement
Table of Contents

Related Manuals for CareCo Marina Luxury Bath Lift


Summary of Contents for CareCo Marina Luxury Bath Lift
- Page 1 U S E R M A N U A L...
-
Page 2: Table Of Contents
CONTENTS Preface The manual control Service life Operation during bathing Identification Plate Taking the lift out of the bathtub Reuse Maintenance and care Warranty Cleaning Parts of the product Care of the covers Product description Assembly of new cushion Indication plugs for the cover Bath lifts Maintenance of the... -
Page 3: Preface
Please read these operating instructions carefully prior to initial use. They contain important safety information and valuable tips for the proper use and care. If you have questions or need additional information, contact your CareCo specialist dealer who supplied your product. -
Page 4: Identification Plate
Accessories are available from your specialist dealer. WARRANTY Your CareCo branded product is warranted to be free of defects in materials and workmanship for one year from the date of purchase. This warranty does not cover device failure due to owner misuse or negligence, or normal wear and tear. -
Page 5: Parts Of The Product
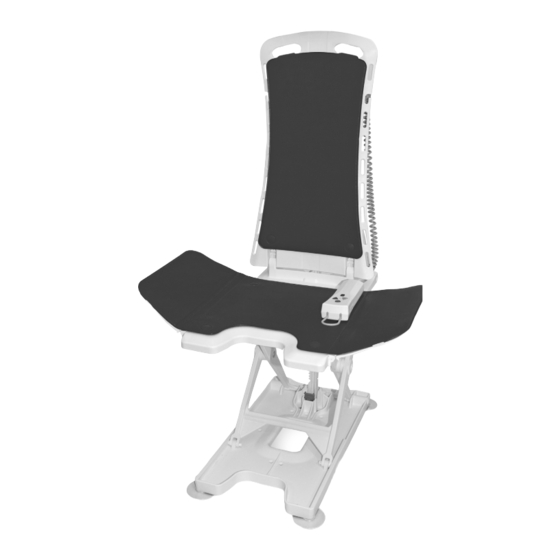
PARTS OF THE PRODUCT 1 - Backrest 4 - Scissor lift mechanism 7 - Locking lever 2 - Seat surface 5 - Base plate 8 - Toothed rack 3 - Side flaps 6 - Suction feet 9 - Manual control... -
Page 6: Product Description
PRODUCT DESCRIPTION Thank you for choosing a product from CareCo. This sturdy and high-quality product will make it easier for you from now on to get into and out of the bathtub for bathing. The Luxury bath lift meets the valid standards DIN EN ISO 10535 : 2006 and DIN EN 60601-1:1996. -
Page 7: Bath Lifts
BATH LIFTS Bath lifts are used for lowering from the height of the edge of the tub towards the bottom of the tub and vice-versa. It is appropriate for users who have significant functional limitations of the upper and/ or lower extremity which make it impossible to independently get into and out of the bathtub or to sit down/sit up and for whom use of the lift once again enables primarily independent bathing. - Page 8 Use the manual control only to operate the bath lift. • The bath lift may be operated only with an original CareCo manual control. • Never throw the manual control into a fire and do not store the manual control near fire or intense heat sources.
-
Page 9: Important Safety Rules
• Always take the plug out of the outlet before cleaning the power supply unit. • Clean the power supply unit only with a dry cloth. • The bath lift, power supply unit and battery feature sturdy construction, however they should not be dropped. If there is any externally visible and/or audible damage, the bath lift should not be used. -
Page 10: Electromagnetic Compatibility (Emc)
ELECTROMAGNETIC COMPATIBILITY (EMC) NOTE This product meets the protection requirements listed in the coun- cil directive on the approximation of the laws of the member states on electromagnetic compatibility (EMC, IEC 60601-1-2) (89/336/EEC). However, mutual interference between electrical devices, particularly when mobile telephones are used, cannot be completely ruled out under certain conditions. -
Page 11: Initial Installation In The Bathtub
INITIAL INSTALLATION IN THE BATHTUB • First insert the rear suction cups with the movable plugs in the underside of the base plate (photo 1). A ) Mushroom head | B ) Plug • Push the mushroom head of the suction cup through the small opening by gently rotating it into its final position. -
Page 12: Secure Bath Lift To The Bottom Of The Tub
• Insert the front suction cup in the same way, however in this case, additionally push the vent tabs into the recesses of the base plate. As a result, the front suction cups are automatically vented during removal (photo 4). SECURE BATH LIFT TO THE BOTTOM OF THE TUB Information which must be observed: The suction cups secure the bath lift to the bottom of the tub. - Page 13 A) Bearing block | B) Locking catch Important! It must be ensured that both locking catches were inserted into the bearing blocks. • Now use your other hand to pivot the backrest upwards at the hand grips (photo 7-8) and move it as far back until the drive unit rests on the stop on the base plate. C) Hand grip...
- Page 14 NOTE If the wall of the bathtub is vertical on the side of the backrest and thus the backrest could hit the wall of the tub, the lift must be set up outside of the tub and brought into the highest position before it is placed in the tub.
-
Page 15: Putting On/Taking Off Covers
PUTTING ON/TAKING OFF COVERS The covers can be easily put on and taken off. To secure the cover, simply place the cover in the correct position on the backrest plate or on the seat surface and press the attachment buttons all the way into the respective holes of the backrest plate or seat surface and side flaps (photo 12 - 15). -
Page 16: The Manual Control
THE MANUAL CONTROL The capacity of the fully charged battery is sufficient for a maximum of 6 baths, depending on the weight of the user. During the bath, the indicator light on the manual control is lit and green. When the charge status of the battery falls to a certain value, the colour of the light changes to yellow and slowly flashes. -
Page 17: Operation During Bathing
OPERATION DURING BATHING • Before initial operation of the bath lift, ensure that the manual control is correctly connected to the bath lift via the plug connection. It is correctly connected when the red ring on the jack is no longer visible (photo 20). •... - Page 18 Important! When the backrest touches the rear wall of the tub, release the blue button immediately. • Seat the person to be bathed on the bath lift. • To lower the bath lift, press the down button (blue). The lift first moves down to the end position.
-
Page 19: Taking The Lift Out Of The Bathtub
TAKING THE LIFT OUT OF THE BATHTUB First use the manual control to lower the bath lift all the way and allow the backrest to pivot all the way back until the power unit stops by itself in its end position (photo 21). In doing so, ensure that the backrest does not hit the wall of the tub. -
Page 20: Maintenance And Care
• Release both rear suction cups on the base plate by pulling the tabs. Then lift the base plate backwards which will cause the front suction cups to automatically vent and release. Now take the seat unit out of the bathtub. MAINTENANCE AND CARE Maintenance of the bath lift The bath lift is equipped with maintenance-free bearings and bearing surfaces. -
Page 21: Cleaning
CLEANING The lift must be cleaned immediately after use (preferably by rinsing with hot water) in order to keep the bath lift in optimum condition. For cleaning, the bath lift must be thoroughly rinsed off after each bath. To clean the bath lift (without covers), use household cleaners without scouring agents, as well as commercially available disinfectants. -
Page 22: Assembly Of New Cushion Plugs For The Cover
ASSEMBLY OF NEW CUSHION PLUGS FOR THE COVER First guide the new plug from above through the hole in the cushion and then press on the underside of the disc for reinforcement (photo 25 - 26). MAINTENANCE OF THE POWER SUPPLY UNIT The power supply unit is maintenance-free. - Page 23 • Insert the jack of the power supply unit into the jack socket on the spiral cable of the manual control until the jack clicks into place. • Plug the power supply unit into an outlet. • The red indicator light on the manual control is lit red until the battery is charged. Then it is lit and green.
-
Page 24: Transport / Mobile Use
TRANSPORT / MOBILE USE In the case of mobile use, the following should additionally be borne in mind: • The manual control on the bath lift must be unplugged and transported separately. • During transport (for example, in a vehicle), always secure the bath lift against slipping. -
Page 25: Technical Data
TECHNICAL DATA Total length 830 mm Total width 700 mm Seat width 380 mm Seat depth 420 mm Total length of seat surface 570 mm Seat height, min. 65 mm Seat height, max. 480 mm Backrest height 640 mm Backrest width 320 - 360 mm Backrest adjustment 10°... -
Page 26: Environmental Conditions For Transport And Storage
ENVIRONMENTAL CONDITIONS FOR TRANSPORT AND STORAGE Temperature –10°C ..+40°C Relative air humidity 10 ....100% Air pressure 700 hPa ..1060 hPa DISPOSAL If you no longer need the product, please contact your specialist dealer or bring the product to your local disposal center. - Page 28 Careco UK Limited , Hubert Road, Brentwood, Essex, CM14 4JE | 0333 015 5000...
Need help?
Do you have a question about the Marina Luxury Bath Lift and is the answer not in the manual?
Questions and answers