Table of Contents
Advertisement
Quick Links
Advertisement
Table of Contents

Related Manuals for ADJ PINSPOT LED QUAD DMX


Summary of Contents for ADJ PINSPOT LED QUAD DMX
- Page 1 PINSPOT LED QUAD DMX User Manual...
- Page 2 ©2023 ADJ Products, LLC all rights reserved. Information, specifications, diagrams, images, and instructions herein are subject to change without notice. ADJ Products, LLC logo and identifying product names and numbers herein are trademarks of ADJ Products, LLC. Copyright protection claimed includes all forms and matters of copyrightable materials and information now allowed by statutory or judicial law or hereinafter granted.
-
Page 3: Table Of Contents
C O N T E N T S Introduction Limited Warranty (USA Only) Warranty Registration | Features Safety Precautions Overview Installation DMX Setup Primary - Secondary Setup / UC IR Remote Operating Modes / DMX Traits DMX Address Quick Reference Chart Maintenance Guidelines Specifications... -
Page 4: Introduction
BOX CONTENTS Omega Brackets 1.83M locking power cable CUSTOMER SUPPORT Contact ADJ Service for any product related service and support needs. Also visit forums.adj.com with questions, comments or suggestions. ADJ SERVICE USA - Monday - Friday 8:00am to 4:30pm PST 323-582-2650 | Fax: 323-832-2941 | support@adj.com... -
Page 5: Limited Warranty (Usa Only)
All shipping charges must be pre-paid. If the requested repairs or service (including parts replacement) are within the terms of this warranty, ADJ Products, LLC will pay return shipping charges only to a designated point within the United States. If the entire instrument is sent, it must be shipped in its original package. No accessories should be shipped with the product. -
Page 6: Warranty Registration | Features
WA R R A N T Y R E G I S T R AT I O N The fixture carries a 2 year limited warranty. Please fill out the enclosed warranty card to validate your purchase. All returned service items, whether under warranty or not, must be freight pre-paid and accompanied by a return authorization (R.A.) number. -
Page 7: Safety Precautions
S A F E T Y P R E C A U T I O N S PROTECTION CLASS 1 - FIXTURE MUST BE PROPERLY GROUNDED. THERE ARE NO USER SERVICEABLE PARTS INSIDE THIS UNIT. DO NOT ATTEMPT ANY REPAIRS YOURSELF, AS DOING SO WILL VOID YOUR MANUFACTURER’S WARRANTY. -
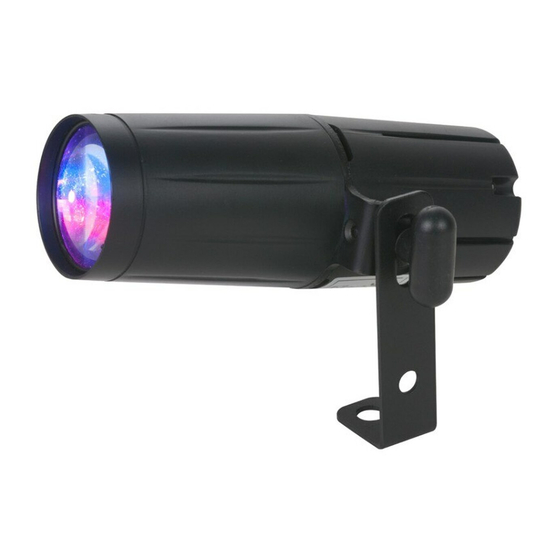
Page 8: Overview
O V E R V I E W Bracket Knob Lens Dip Switch 3-Pin DMX In/Out Power In... -
Page 9: Installation
I N S TA L L AT I O N DO NOT INSTALL THE FIXTURE IF YOU ARE NOT QUALIFIED TO DO SO! Fixture MUST be installed following all local, national, and country commercial electrical and construction codes and regulations. When installing the unit, the trussing or area of installation must be able to support at least 10 times the weight of the unit and any attached accessories without any deformation. -
Page 10: Dmx Setup
DMX-512 protocol. The Pinspot LED Quad DMX has 6 DMX channels. The DMX address is set using the dipswitches located on the rear of the Pinspot LED Quad DMX. Your unit and your DMX controller require a standard 3-pin XLR connector for data input and data output, we recommend Accu-Cable DMX cables. - Page 11 XLR connector of the last unit in your daisy chain to terminate the line. Using a cable terminator (ADJ part number Z-DMX/T) will reduce the risk of erratic behavior. 5-Pin XLR DMX Connectors: Some manufactures use 5-pin DMX- 512 data cables for DATA trans- mission in place of 3-pin.
-
Page 12: Primary - Secondary Setup / Uc Ir Remote
The UC IR infrared remote has many differnet functions, and gives the user complete control of the Pinspot LED Quad DMX. To control the desired fixture, aim the controller at the front of the fixture. Note that the remote has a 30 foot range. Please note that the fixture will only respond to the UC IR remote when the fixture is running in Primary mode. -
Page 13: Operating Modes / Dmx Traits
O P E R AT I N G M O D E S Sound Active Modes: 1. Plug the fixture in and put dipswitch #1 in the ON position. Show Mode: A. Plug the fixture in and put dipswitch #1 in the ON position. Dipswitches 4, 5, 6 will control the show speed. -
Page 14: Dmx Address Quick Reference Chart
D M X A D D R E S S Q U I C K R E F E R E N C E C H A R T This chart lists DMX dip switch settings for DMX address 1 through 511. Follow the instructions below to configure fixture dip siwtches with the desired DMX Address. -
Page 15: Maintenance Guidelines
M A I N T E N A N C E G U I D E L I N E S DISCONNECT POWER BEFORE PERFORMING ANY MAINTENANCE! CLEANING Frequent cleaning is recommended to ensure proper function, optimized light output, and an extended life. -
Page 16: Specifications
DMX Connections: 3-Pin DMX In / Out Dimming: Adjustable via IR remote Shutter / Strobe: Adjustable via IR remote Flicker free ADJ UC IR wireless remote included Power Consumption: 11W Max Input Voltage: AC 100V-240V 50/60Hz Dimensions: 8” x 4” x 2.75” / 205x98x61mm...
Need help?
Do you have a question about the PINSPOT LED QUAD DMX and is the answer not in the manual?
Questions and answers