Table of Contents
Advertisement
Quick Links
INSTALLATION & OPERATION MANUAL
WARNING
Read and understand this entire owner's
manual, including all safety information, before
connecting power or using this product. Failure
to do so could result in fire, electric shock, or
serious personal injury.
As this item contains many parts, please read the installation instruction carefully before installation.
Please use tools properly and carefully.
INSTALLER: Leave this manual with appliance | CONSUMER: Retain this manual for future reference
MODEL: 48E-3S, 60E-3S, 72E-3S
solasfires.com
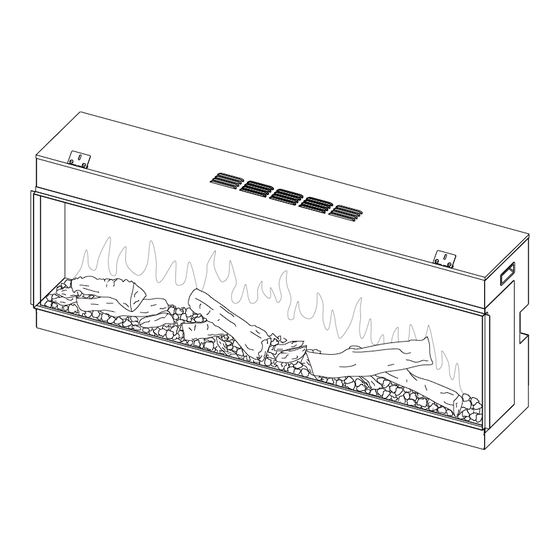
ELECTRIC
SLIM-LINE BUILT-IN
FIREPLACES
WARNING
Keep this owner's manual for future reference.
If you sell or give this product away, make sure
this manual accompanies this product.
1
Advertisement
Table of Contents

Related Manuals for Solas 48E-3S


Summary of Contents for Solas 48E-3S
- Page 1 ELECTRIC SLIM-LINE BUILT-IN FIREPLACES INSTALLATION & OPERATION MANUAL MODEL: 48E-3S, 60E-3S, 72E-3S WARNING WARNING Read and understand this entire owner’s Keep this owner’s manual for future reference. manual, including all safety information, before If you sell or give this product away, make sure connecting power or using this product.
-
Page 2: Installation Record
INSTALLATION RECORD The installer should complete the form below that describes the details of the installation. Having this written record of installation information available will greatly expedite troubleshooting should any problem arise with your fireplace. Date Purchased: _____________________________________________________ Dealer: _____________________________________________________________ Date Installed: _______________________________________________________ Installer: ____________________________________________________________ Fireplace Model: (circle one) -
Page 3: Table Of Contents
CONTENTS Congratulations on your purchase Installation Record .............2 of a SÓLAS Electric Fireplace! Important Safety Information ...........4 Technical Specifications ...........6 We welcome you to the SÓLAS family of fireplaces. Each of our products are skillfully designed in the USA. We take Parts &... -
Page 4: Important Safety Information
IMPORTANT SAFETY INFORMATION When using electrical appliances, basic precautions should always be followed to reduce the risk of fire, electric shock, and injury to persons, including the following: • Read all instructions before installing or using Fireplace this appliance. • THIS APPLIANCE IS HOT WHEN IN USE. - Page 5 IMPORTANT SAFETY INFORMATION • This product is not intended to be a primary radio communications. However, there is heat source. It is for supplemental heat only. no guarantee that interference will not occur in a • Risk of electric shock! DO NOT OPEN! No user- particular installation.
-
Page 6: Technical Specifications
TECHNICAL SPECIFICATIONS Technical Specifications Models: 48E-3S, 60E-3S, 72E-3S AC 120V, 60HZ AC 240V, 60HZ SUPPLY VOLTAGE Maximum Power Consumption 1400 W 2800 W Power for Flame, Fuel/Ember Bed and Down Light Effect: 48E-3S 60E-3S 72E-3S 41 W 47.5 W 53 W These appliances can operate either on 120V or 240V. -
Page 7: Parts & Hardware
PARTS & HARDWARE Parts and Hardware 1. Unpack the fireplace carefully and make sure 2. Keep plastic wrapping away from children. that the appliance is intact with no signs of 3. Save the original packaging as this may be damage caused by transport and no part has required in the event of service complaint been exposed to water. -
Page 8: Dimensions
DIMENSIONS Appliance Dimensions Models: 48E-3S, 60E-3S, 72E-3S Top View Side View ” 314 mm Front View ” 110 mm MODEL 48E-3S 48 1/32" (1220mm) 12 9/16" (320mm) 23" (585mm) 49 3/32" (1247mm) 60E-3S 60" (1524mm) 12 9/16" (320mm) 23" (585mm) 61 1/16"... -
Page 9: Installation Instructions
INSTALLATION INSTRUCTIONS Installation Instructions Minimum Clearance to Combustible Required Tool; Phillips Head Screwdriver Sides 0" Floor 0" Back 0" Top (Mantel / Electronics) 7 7/8" (20cm) minimum Front 36" (91cm) minimum Appliance Location Your new electric fireplace may be installed virtually anywhere in your home. - Page 10 INSTALLATION INSTRUCTIONS Prepare the Electrical Supply Plan the location of the appliance so that it will have adequate electric power. This appliance can operate on 120V 60Hz, 15amp or 240V 60Hz, 15amp circuit. To change voltage from 120V to 240V, press the voltage selecting switch behind the wire entry panel.
- Page 11 INSTALLATION INSTRUCTIONS Installing the Appliance The appliance can be installed in 3 different Configurations This appliance must be installed by an authorized person. The installation must conform to local 1-Sided Front (1 Glass Panel) regulations and must also comply with the 2-Sided Corner (2 Glass Panels) instruction supplied by SÓLAS.
- Page 12 INSTALLATION INSTRUCTIONS 1-Sided Installation Front View (only the front glass is visible) Your appliance will arrive in a single-sided (front only) aspect with metal side panels already fitted. 2-Sided Installation Corner View (front and one of the side glass visible) For a two-sided corner installation, choose which side you want to feature a glass panel and remove the 7 screws that secure the metal side panel to...
- Page 13 INSTALLATION INSTRUCTIONS Removing the Front Glass Panel 1. Remove the 2 countersunk screws and remove the glass retaining strip as shown. Screw Screw 2. Use the suction cup lifters (s) provided to support the middle of the glass panel and lock suction cup lifter.
- Page 14 4 brackets on the upper and lower edges of the appliance; secure it to the framing with screws provided. Install 4 ST4*40 screws on the mounting brackets on the appliance. MODEL 48E-3S 48 1/32" (1220mm) 12 9/16" (320mm) 23" (585mm) 60E-3S 60" (1524mm) 12 9/16"...
- Page 15 INSTALLATION INSTRUCTIONS Logs and Ember/Fuel Bed Installation Every log has a number on it for identification. Place the logs on the ember/fuel bed according to the template printed on the ember/fuel bed panel. AK-1 Ember/Fuel Bed Once the appliance is in its final place, install the ember/fuel bed.
- Page 16 INSTALLATION INSTRUCTIONS Log Configurations 48 E-3S AK-6 AK-8 AA-1 AK-5 AA-1 AK-1 AA-6 AK-4 AK-7 60 E-3S AA-1 AK-3 AK-8 AK-5 AA-1 AK-3 AK-8 AA-1 AK-4 AK-1 72 E-3S AK-3 AA-1 AK-8 AK-5 AA-6 AK-6 AK-5 AA-1 AK-4 AA-1 AK-5 AA-1 AK-4 AK-1...
-
Page 17: Operating Instructions
OPERATING INSTRUCTIONS BEFORE OPERATION 2. Manual Control Panel WARNING! Do not operate the appliance if it is MAIN SWITCH Press “I” to turn on the appliance, and press “O” to damaged or has malfunctioned. If you suspect turn off the appliance. Memorized information will the appliance is damaged or has malfunctioned, be lost if the appliance is turned off by main switch. -
Page 18: Remote Operation
OPERATING INSTRUCTIONS 3. Remote Control Handset SET UP THE COMMUNICATION BETWEEN THE REMOTE AND THE FIREPLACE Below operations should be carried out before programming, when changing to a new remote or in the event the fireplace ELECTRIC REMOTE MAIN cannot be controlled by the remote: DISPLAY OVERVIEW •... - Page 19 OPERATING INSTRUCTIONS Remote Control Functions BUTTON FUNCTION ACTION Stand-By Button. To turn on the flame, After power is on, press to turn on sound, flame, down light down light and fuel bed, or turn off all and fuel bed, or turn off all functions at the same time. functions at the same time.
- Page 20 OPERATING INSTRUCTIONS 4. WiFi Connection Smartphone/Tablet with iOS/Android App Visit your device APP store (iOS or Android) to download the TUYA SMART APP Once installed follow the procedure below to pair the device with your appliance: 1. Start the APP and click “Add Device” on screen.
-
Page 21: Maintenance
MAINTENANCE / CLEANING MAINTENANCE CLEANING Metal: WARNING! Risk of electric shock! DO NOT OPEN! • Buff using a soft cloth, slightly dampened with a No user-serviceable parts inside! citrus oil-based product. Electrical and Moving Parts: • DO NOT use brass polish or household cleaners as these products will damage the metal trim. -
Page 22: Replacement Parts List
REPLACEMENT PARTS LIST REPLACEMENT PARTS REPLACEMENT PARTS DESCRIPTION SÓLAS PART NUMBER Use only replacement parts supplied Power Cord E50124R by SÓLAS. Use of any other parts, or Side Glass Panel E50224R modifying the fireplace in any way, will void all warranties. Side Metal Panel E50324R Top &... -
Page 23: Warranty Information
F.O.B. from the nearest stocking SÓLAS facility. inspected prior to shipment. Subject to the provisions of this warranty, SOLAS, warrants such products to be free from defects LIMITATION ON LIABILITY in material and workmanship for a period of two years from the date of purchase. - Page 24 THANK YOU FOR CHOOSING solasfires.com RECORD YOUR PRODUCT INFORMATION Model #: ________________________ Serial Number: ______________________________ Date Purchased: __________________ Date Installed: _______________________________ Designed in The United States, Made in China V1/8.2024...
Need help?
Do you have a question about the 48E-3S and is the answer not in the manual?
Questions and answers