Table of Contents
Advertisement
Quick Links
Advertisement
Table of Contents

Related Manuals for IFM LR7000


Summary of Contents for IFM LR7000
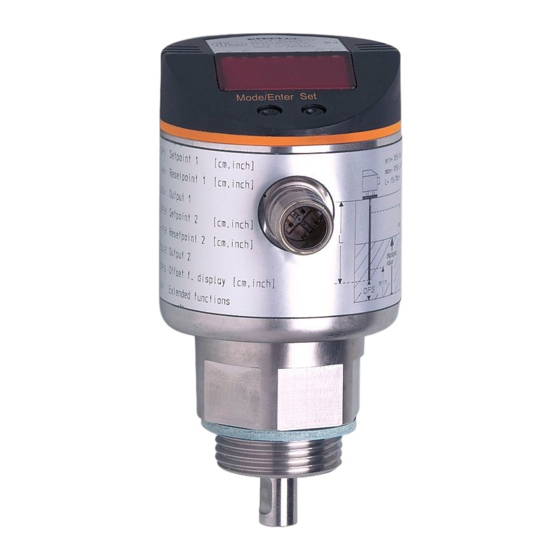
- Page 1 Operating instructions Electronic level sensor LR7000...
-
Page 2: Table Of Contents
Contents 1 Preliminary note ���������������������������������������������������������������������������������������������������4 1�1 Symbols used ������������������������������������������������������������������������������������������������4 2 Safety instructions �����������������������������������������������������������������������������������������������4 3 Items supplied������������������������������������������������������������������������������������������������������5 4 Functions and features ����������������������������������������������������������������������������������������7 4�1 Operation with single probe ���������������������������������������������������������������������������7 4�2 Operation with coaxial probe �������������������������������������������������������������������������7 4�3 Applications ���������������������������������������������������������������������������������������������������8 4�3�1 Restriction of the application area ��������������������������������������������������������8 5 Function ���������������������������������������������������������������������������������������������������������������9 5�1 Measuring principle ���������������������������������������������������������������������������������������9 5�2 Features of the unit ��������������������������������������������������������������������������������������10... - Page 3 6�4�4 Installation in plastic tanks ������������������������������������������������������������������23 6�5 Installation of the unit with coaxial probe in the tank �����������������������������������23 6�6 Alignment of the sensor housing �����������������������������������������������������������������24 7 Electrical connection ������������������������������������������������������������������������������������������24 8 Operating and display elements ������������������������������������������������������������������������25 9 Menu ������������������������������������������������������������������������������������������������������������������26 9�1 Menu structure ���������������������������������������������������������������������������������������������26 9�2 Explanation of the menu ������������������������������������������������������������������������������27 10 Parameter setting ��������������������������������������������������������������������������������������������28 10�1 Parameter setting in general ���������������������������������������������������������������������28...
-
Page 4: Preliminary Note
13 Servicing ����������������������������������������������������������������������������������������������������������36 14 Applications������������������������������������������������������������������������������������������������������37 14�1 Minimum level monitoring with early warning and alarm ���������������������������37 14�2 Pumping station / empty the tank with overflow protection ������������������������38 14�3 Storage tank ����������������������������������������������������������������������������������������������39 15 Factory setting �������������������������������������������������������������������������������������������������40 1 Preliminary note 1.1 Symbols used ►... -
Page 5: Items Supplied
According to the current state of science the operation of the unit can be classified to be harmless to human health� 3 Items supplied • Level sensor LR7000 • Operating instructions In addition, the following is necessary for installation and operation: •... - Page 6 Size / process connection Order number 73 - 90 / G¾ E43201 65 - 80 / G¾ E43202 Only use rods and coaxial pipes from ifm electronic gmbh� The optimum function is not ensured when using components from other manufacturers�...
-
Page 7: Functions And Features
4 Functions and features The unit continuously detects the level in tanks and generates output signals according to the parameter settings� 2 switching outputs are available� They can be set separately� 4.1 Operation with single probe The single probe is made up of one individual rod� Operation with single probe is suited for the detection of aqueous media, in particular of heavily soiled aqueous media�... -
Page 8: 4�3 Applications
4.3 Applications • Water, water-based media • Oils, oil-based media (only for operation with coaxial probe) Application examples: • Detection of coolant emulsion in a machine tool� • Detection of cleaning liquid in a parts cleaning system� • Monitoring of hydraulic oil in a hydraulic power unit (only for operation with coaxial probe)�... -
Page 9: Function
• When operating with a single probe and small tanks (probe lengths shorter than 200 mm and less than 300 mm distance to the tank wall), interference from the tank (resonances) may occur in rare cases� Corrective measures: (→ 6.1.1)� •... -
Page 10: 5�2 Features Of The Unit
5.2 Features of the unit 5.2.1 Easy set-up • When the unit is supplied with operating voltage for the first time, the probe length, the medium to be detected and the type of probe used must be entered� Then the unit is ready for operation (→ 10.2)� •... -
Page 11: 5�2�4 Offset For Indicating The Real Level In The Tank
• Window function / normally open (fig� 5-4): [OUx] = [Fno]� • Window function / normally closed (fig� 5-4): [OUx] = [Fnc]� The width of the window can be set by means of the difference between FHx and FLx� FHx = upper value, FLx = lower value� Fig. -
Page 12: 5�2�6 Safe State
In addition communication is possible via a point-to-point connection with a USB adapter cable� Further information about IO-Link is available at www�ifm�com� Device-specific information You will find the IODDs necessary for the configuration of the IO-Link unit and detailed information about process data structure, diagnostic information and parameter addresses at www�ifm�com�... -
Page 13: Installation
6 Installation 6.1 Installation location / environment • Vertical installation from the top is preferred� 6.1.1 Unit with single probe • For a safe function, the unit requires a launching plate (→ 6.4)� • The following minimum distances between the rod and tank walls, objects in the tank (B), tank bottom and other level sensors must be adhered to: 50mm 100mm... - Page 14 • If the medium is strongly polluted, there is the risk that a bridge forms between the rod and the tank wall or structures in the tank� To avoid incorrect measurements: adhere to increased minimum distances depending on type and intensity of the soiling� •...
- Page 15 Fig. 6-3 Fig. 6-4 50mm To avoid incorrect measurements in case of heavy foam formation and turbulence: ► if possible, install the sensor in a steady area� Example how to create a steady area: - Use of a coaxial probe (only for clean, low-viscosity media) - Installation in bypass or still pipe (see fig�...
-
Page 16: 6�1�2 Unit With Coaxial Probe
Fig.: 6-5 6.1.2 Unit with coaxial probe • No minimum distances to the tank wall and the baffles (B) are required� • Minimum distance to the bottom of the tank: 10 mm� • The vent hole (A) must not be covered by mounting elements or similar�... -
Page 17: 6�2�1 Installation Of The Rod
6.2.1 Installation of the rod Fixing of the rod: ► Screw the rod to the unit and tighten it� Recommended tightening torque: 4 Nm� For ease of installation and removal the rod connection can be rotated without restriction� Even if rotated several times there is no risk of damage to the unit�... -
Page 18: 6�2�2 Installation Of The Coaxial Pipe
6.2.2 Installation of the coaxial pipe This subchapter is only relevant if the unit is to be operated with a coaxial probe� The coaxial pipe and the rod must be of the same end length� The coaxial pipe can be shortened (→ 6.3.2)� ►... -
Page 19: 6�3 Shortening Of The Probe
6.3 Shortening of the probe 6.3.1 How to shorten the rod and determine its length L The rod can be shortened to adapt the probe to different tank heights� Ensure that the probe length is never below the minimum permissible probe length of 10 cm (L )! The unit does not support probe lengths below 10 cm�... -
Page 20: 6�3�3 Determination Of The Rod Length L When Coaxial Probes Are Used
Fig.: 6-6 ► Remove fastening bracket and centring piece (A, B)� ► Shorten the coaxial pipe to the requested length: L = L + 9 mm� ► After shortening, at least one hole (C) for insertion of the fixing bracket has to be left�... -
Page 21: 6�4�1 Installation In Closed Metal Tanks (Without Flange Plate)
6.4.1 Installation in closed metal tanks (without flange plate) Fig.: 6-7 Fig.: 6-8 Fig.: 6-9 ► The lower edge of the process connection should be flush with the installation environment (fig� 6-7)� ► Avoid non-flush installation (fig� 6-8)� ► Use seals or washers (D in fig� 6-9) to reach the required height� ►... -
Page 22: 6�4�3 Installation In Open Tanks
► Install the flange plate with the flat surface showing to the tank and fix it with appropriate screws� A seal (B in fig� 6-11) can be inserted between flange plate and tank� Some flange plates are supplied with a seal� ►... -
Page 23: 6�4�4 Installation In Plastic Tanks
6.4.4 Installation in plastic tanks 150 mm To enable sufficient transfer of the measured signal, note in case of installation in plastic tanks or metal tanks with plastic lid: ► A drill hole with a minimum diameter of 150 mm must be applied to the plastic lid�... -
Page 24: 6�6 Alignment Of The Sensor Housing
Voltage supply according to SELV, PELV� ► Disconnect power� ► Connect the unit as follows: OUT2 OUT1/IO-Link Connection Core colours for ifm sockets brown blue 2 (OUT2) pnp switching signal white • pnp switching signal... -
Page 25: Operating And Display Elements
8 Operating and display elements 3 4 5 6 Mode/Enter 1 to 8: Indicator LEDs - LED 1: green = indication of the level in cm� - LED 2: green = indication of the level in inch� - LED 3: green = indication of the level in % of the final value of the measuring range� - LED 4 - LED 6: not used�... -
Page 26: Menu
9 Menu 9.1 Menu structure cm inch S... -
Page 27: 9�2 Explanation Of The Menu
9.2 Explanation of the menu SP1/rP1 Upper / lower limit value for the level at which OUT1 switches� FH1/FL1 Upper / lower limit for the acceptable range (monitored by OUT1)� SP2/rP2 Upper / lower limit value for the level at which OUT2 switches� FH2/FL2 Upper / lower limit for the acceptable range (monitored by OUT2)�... -
Page 28: Parameter Setting
10 Parameter setting During parameter setting the unit remains in the operating mode internally� It continues to monitor with the existing parameters until the parameter setting has been completed� 10.1 Parameter setting in general 3 steps must be taken for each parameter setting: Select parameter ►... - Page 29 • Change from menu level 1 to menu level 2: ► Press [Mode/Enter] until [EF] is displayed. Mode/Enter Set ► Briefly press [Set]� > The first parameter of the submenu is Mode/Enter Set displayed (here: [res])� • Locking / unlocking The unit can be locked electronically to prevent unintentional settings: ►...
-
Page 30: 10�2 Basic Settings (Unit On Delivery)
10.2 Basic settings (unit on delivery) On delivery of the unit, you must first enter the basic settings� The complete parameter setting menu cannot be accessed before this� Malfunctions may occur if wrong basic settings are entered� 10.2.1 Entering the probe length ►... -
Page 31: 10�3 Configuration Of The Display
10.3 Configuration of the display ► Select [Uni] and set the unit of measurement: [cm], [inch]� Factory setting: cm� ► Select [SELd] and set type of indication: - [L] = The level is indicated in cm or inch� - [L%] = The level is indicated in percent of the final value of the measuring range�... -
Page 32: 10�5�3 Set The Switching Limits (Window Function)
10.5.3 Set the switching limits (window function) ► Make sure that for [OU1] or [OU2] the function [Fno] or [Fnc] is set� ► Select [FH1] / [FH2] and set the upper limit of the acceptable range� ► Select [FL1] / [FL2] and set the lower limit of the acceptable range� FLx is always lower than FHx�... -
Page 33: 10�7 Changing Basic Settings
10.7 Changing basic settings Required after changes to the probe or to the application area� 10.7.1 Re-enter the probe length ► Change to menu level 2 ► Select [LEnG] and set probe length L� Note the set unit of measurement (cm or inch)�... -
Page 34: Operation
11 Operation After power on, the unit is in the Run mode (= normal operating mode)� It carries out its measurement and evaluation functions and generates output signals according to the set parameters� 11.1 Operating indicators [---] continuously Initialisation phase after power on Numerical value + LED 1 Current level in cm�... -
Page 35: 11�4 Error Indications
Normal operation OU1 setting OU2 setting OFF for FOU1 = OFF; OFF for FOU2 = OFF; Fault (E�0xx) ON for FOU1 = on ON for FOU2 = on 12 Technical data and scale drawing Technical data and scale drawing at www�ifm�com�... -
Page 36: 12�1 Setting Ranges
12.1 Setting ranges [LEnG] inch Setting range 10���160 4�0���63 Step increment 0�5 0�2 [OFS] inch Setting range 0���100 0���39�4 Step increment 0�5 0�2 The setting ranges for the switching limits (SPx, rPx, FHx, FLx) depend on the probe length (L)� In general the following applies: inch SPx / FHx 1�5 (3�5) -
Page 37: Applications
14 Applications 14.1 Minimum level monitoring with early warning and alarm Switching output 1: early warning slightly above rP1 (to suppress wave movements) below preset level → early warning, start refilling hysteresis function, normally closed (Hnc) Switching output 2: Alarm min. -
Page 38: 14�2 Pumping Station / Empty The Tank With Overflow Protection
14.2 Pumping station / empty the tank with overflow protection Switching output 1: control to empty tank upper value exceeded → submersible pump ON lower value reached → submersible pump OFF hysteresis function, normally open (Hno) Switching output 2: overflow protection maximum value exceeded →... -
Page 39: 14�3 Storage Tank
14.3 Storage tank Monitoring of the acceptable range (alarm) and level control Switching output 1: refilling upper preset value reached → finish refilling below lower preset value → start refilling hysteresis function, normally closed (Hnc) Switching output 2: safety function min - max max. -
Page 40: Factory Setting
15 Factory setting Factory setting User setting SP1 / FH1 50% SP/FHmax rP1 / FL1 50% rP/FLmax SP2 / FH2 100% SP/FHmax rP2 / FL2 100% rP/FLmax FOU1 FOU2 SELd LEnG nonE MEdI nonE Prob nonE SP/FHmax = LEnG value minus 3� rP/FLmax = LEnG value minus 3�5�... - Page 41 More information at www�ifm�com...
Need help?
Do you have a question about the LR7000 and is the answer not in the manual?
Questions and answers