Table of Contents
Advertisement
Quick Links
Advertisement
Table of Contents

Subscribe to Our Youtube Channel
Related Manuals for Bosch NTI 101


Summary of Contents for Bosch NTI 101
- Page 1 NTI 101 en Original instructions Nitrogen tire inflator...
-
Page 3: Table Of Contents
Opening the NTI 101 Installation 4.2.1 Installing the NTI 101 4.2.2 Installing the vacuum pump (optional) 9 4.2.3 Electrical connections 4.2.4 Pneumatic connections Powering on the NTI 101 4.3.1 Pressure sensor settings Gas selection 4.4.1 Digital input 4.4.2 Direct input Accuracy setting �roubleshooting ��... -
Page 4: Symbols Used
Whatever the event, Intermediate An instruction produces a visible inter- Bosch liability is restricted to the amount for which the result mediate result. customer actually pays for this product. This disclaimer Final result There is a visible final result on com- "... -
Page 5: Obligation Of Contractor
Always switch off the main power supply before per- forming any installation or maintenance work. Do not open the top cover of the NTI 101 or tamper with the pneumatic connections. Do not try to perform any maintenance activity that is not described in this manual. -
Page 6: Product Description
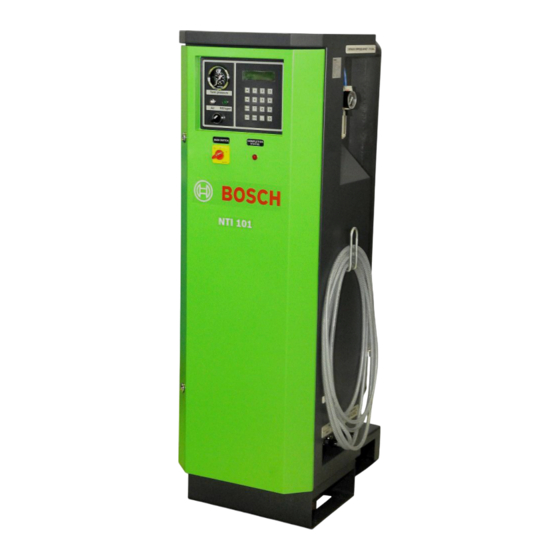
Application �.4.� N�� ��� The NTI 101 can be used for inflating or deflating tires of cars and Light Commercial Vehicles (LCV) with a maximum rim diameter of 15 inches. The highest fill- ing pressure at which the NTI 101 can be operated is 10 bar. -
Page 7: Description Of Function
The NTI 101 is connected to 230 VAC 10%, ing the tires. The nitrogen thus produced has a purity of 50 Hz 1% supply via a power cable. The NTI 101 can about 95 to 99%. The toggle switch (Fig. 1, Pos. 12) can be used to select be powered on by turning the master switch in the air or nitrogen filling. -
Page 8: Commissioning
8 | N�� ��� | Commissioning Commissioning 4. Clean the surface of the NTI 101 cabinet with a weak solution of detergent using a soft cloth. 4.� Removing the transport packaging Dispose of the packaging material in accordance with governmental guidelines. Do not dispose of the packaging material along with household waste. -
Page 9: Installing The Vacuum Pump (Optional)
12 N-m to 14 N-m. execute the following steps. 12. Switch on the NTI 101 and wait till the nitrogen tank pressure reaches 4 bar or above. Do not place the vacuum pump on the cabinet of the 13. -
Page 10: Electrical Connections
FRC unit of the NTI 101 which, in turn, leads to higher longevity of the CMS tanks. However, even if the filter is not installed, the particulate matter and moisture is filtered at the FRC unit of the NTI 101. -
Page 11: Gas Selection
NTI 101. " The NTI 101 is ready for operation. Gas selection ¶ Turn the toggle switch to "Air" or "Nitrogen". 4.4.�... -
Page 12: Based On Error Codes
R Disconnect the filling nozzle from the tire and connect it back to tire. Ensure HOSE IMPROPER that the hose is connected to the digital outlet ports of the NTI 101. R Check if there is leakage at the connector. If there is leakage, the clip should be tightened. -
Page 13: Program Description
Vacuum is selected, the tire is deflated 6.� �nitiating nitrogen generation only till atmospheric pressure. After the NTI 101 is powered on, nitrogen generation starts automatically. 3. Connect the filling nozzle to the tire. ¶ To manually stop the nitrogen generation, press the 4. -
Page 14: Maintenance �4
If the braided twists, repeat 7.2.� Replacing the air filling connector the above procedure and adjust the position of the 1. Switch off the master switch of the NTI 101. air filling connector. 2. Open the front door. 7.2.2 Replacing the braided hose for outlet 1. -
Page 15: Routine Maintenance
Rotate the drain of the FRC till the mist is released. together with the unit. Close the drain when the mist is cleared. The NTI 101 has to be transported in the original or equivalent packaging. Drain the FRC at least once every day. - Page 16 Tank pressure gauge 0 to 16 Permissible ambient temperature ranges Maximum ambient temperature °C Operating range °C 5 to 45 Storage temperature °C 0 to 50 Miscellaneous Length of filling hose Protection IP54 F 002 DG9 A03 2014-07-28 Bosch Limited...
- Page 17 Bosch Limited P.B. No.3000, Hosur Road, Bangalore 560 030 INDIA www.boschindia.com Mailbox.service2@in.bosch.com F 002 DG9 A03 | 2014-07-28...
Need help?
Do you have a question about the NTI 101 and is the answer not in the manual?
Questions and answers