Table of Contents
Advertisement
Quick Links
Advertisement
Table of Contents

Subscribe to Our Youtube Channel
Related Manuals for Centro Bronze 3000RT


Summary of Contents for Centro Bronze 3000RT
- Page 1 This Owner's Manual is provided and hosted by Appliance Factory Parts. Centro G30100 Owner's Manual Shop genuine replacement parts for Centro G30100 Find Your Centro Grill Parts - Select From 150 Models -------- Manual continues below --------...
- Page 2 Bronze 3000RT Barbecue S A F E U S E , C A R E A N D A S S E M B L Y M A N U A L F O R Y O U R S A F E T Y If You Smell Gas 1.
-
Page 3: Table Of Contents
Warranty ....ii 3 Year Limited Warranty This Centro Barbecue carries a three year limited warranty against defects in man- Installation ....1 ufacturing workmanship. -
Page 4: Installation
I N S T A L L A T I O N The installation of this appliance must be in accordance with all local codes, or in the absence of local codes: Canadian installation must conform to the current national standards, which at this time •... -
Page 5: Transportation And
The Cylinder must also be equipped with: A shut-off valve with a correct cylinder valve outlet as specified in current standards. • Canada: CAN / CGA 1.6g-M97 Outdoor Gas Grilles. • a) A safety relief valve with direct connection to the vapour space of the cylinder. b) A collar to protect the tank shut-off valve. -
Page 6: Hose And Regulator
H O S E A N D Propane Gas Models: Your barbecue is designed to operate on L.P. (Propane) gas at a pressure of 2.74 Kpa (11˝ water column). A regulator preset to this pressure is supplied R E G U L A T O R with the barbecue and must be used. - Page 7 The Following Must be Checked The tank valve including the threads into the tank (drawing C). • All tank welds (drawing B). • Regulator fittings and tank connections (drawing C). • All hose connections (drawing D). • With a newly filled and tested propane tank attached to the •...
-
Page 8: Lighting The Grill
L I G H T I N G Make sure you have followed all the checks, procedures and instructions • indicated in the prior sections before attempting to light the grill. T H E G R I L L Always raise the barbecue lid before lighting the burner. •... - Page 9 W A R N I N G If the heat output is too low, the flow control feature may have been activated by a gas leak. If so, turn off the burner valve and cylinder valve, and perform the “Leak Test”. If there aren’t any leaks, re-light the burner.
-
Page 10: Tips On Using
Shutting Down the Barbecue After Use Turn off the gas cylinder valve. • Turn the burner control valve to the “OFF” position. • This sequence is important as it prevents residual gas from being left in the system under pressure and will make the next use easier. Visually Check Burner Flame Take off the grates and heat shield. -
Page 11: Tips On Using
T I P S O N U S I N G Using for the First Time: Before cooking, turn on the grill and operate on “HIGH” for about 10 – 15 minutes with the lid open. Close the lid and continue to run the grill on Y O U R B A R B E C U E “HIGH”... -
Page 12: Cleaning And Maintenance
C L E A N I N G To get many years of service out of your barbecue, perform the following procedures at least once a year, especially at the start of a new season. Purchase a barbecue cover to protect A N D M A I N T E N A N C E your investment. -
Page 13: Storage
S T O R A G E When the outdoor cooking season is over and you’re going to store the unit for the winter, please do the following: After removing and cleaning the burner and grill (lightly oil • the grill after cleaning) wrap them in paper and store indoors. The barbecue, after being covered, can be stored outdoors. -
Page 14: Troubleshooting Guide
T R O U B L E S H O O T I N G G U I D E Problem Possible Causes Corrective Action Burner will not light Blocked Venturi tubes Clean out blockage • • (match or igniter) Cylinder or gas supply valve turned off Open cylinder or gas supply valve •... -
Page 15: Parts List And
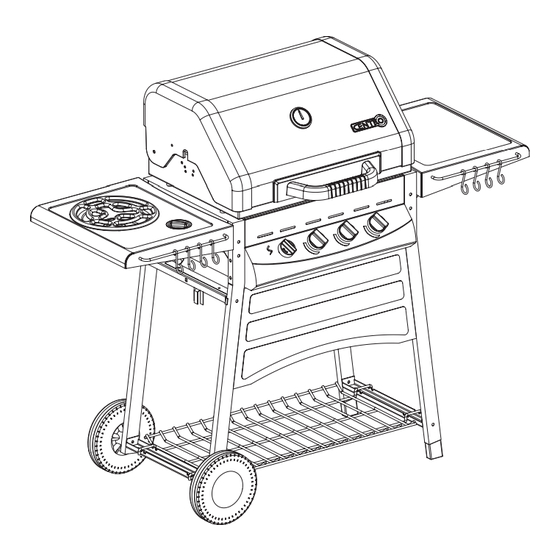
Part No. Top Weldment G301-0100-9016 8 5 - 1 2 0 7 - 2 ( P R O P A N E ) Thermometer G401-0005-9000 Thermometer Bezel G401-0006-0081 CENTRO Logo G402-0005-9000 Handle G301-0001-9031 Handle Backing G301-0014-9031 Screw For Hood G301-0003-9086... - Page 16 32 33...
-
Page 17: Assembly Instructions
A S S E M B L Y I N S T R U C T I O N S Tools Needed for Assembly #2 Phillips ® screwdriver • 1/4˝ slotted screwdriver • Adjustable wrench • Pliers • Rubber mallet •... - Page 18 After removing the unit from carton please make sure that all hard- ware is present. Before starting to assemble the unit, read these instructions carefully. Assemble the unit on a flat, clean surface. Assemble the upper panel (16) to the left & right legs using machine screws (Key I) as shown.
- Page 19 Attach the control panel (20) to the front of the barbecue by using machine screws (Key I) as shown. Attach the control knobs (21) to the valves as shown. Attach the igniter (smaller) knob (22) to the igniter as shown. Very Important! Burner tubes must engage valve openings.
- Page 20 Assemble the heat shield (17) to the side brace (35) using machine screws (Key O) as shown. Assemble the tank clip (34) onto the side brace using carriage bolts and wing nuts (Key M, E ) as shown. Secure the heat shield assembly to the left leg using machine screws and flange nuts (Key K, A) as shown.
- Page 21 Install the side burner valve (18) to the side shelf and attach the control knob to the valve as shown. Connect the electrode wire to the igniter as shown. Assemble the side burner (27) using wing nuts (Key P). Position the side burner cooking grate (26) over the burner. Important! Burner tube must engage valve opening, and the burner tube must be aligned with the valve as shown.
- Page 22 Attach the warming rack (8) to the hood by inserting the supporting rods into the pointed holes as shown. Position the cooking grates (9) on the fire box as shown. Using the tank clip, secure the propane tank to the bottom brace as shown.
- Page 24 D I S T R I B U T O R Trileaf Distribution Trifeuil Toronto, Canada M4S 2B8...
Need help?
Do you have a question about the Bronze 3000RT and is the answer not in the manual?
Questions and answers