Advertisement
READ BEFORE USE!
WARNING
USE PROPANE GAS ONLY!
Do not store or use gasoline or other flammable vapors
in the vicinity of this or any other appliance.
Service must be performed by a qualified installer,
service agency or the gas supplier.
WARNING
For use with cylinders marked PROPANE only. DO NOT
connect to a remote gas supply.
If the fire table is stored indoors, detach and leave
propane cylinder outdoors.
Design certified under ANSI Z21.97 • CSA 2.41-(2014)
Requirements for Outdoor Gas Fireplaces
OWNER'S MANUAL
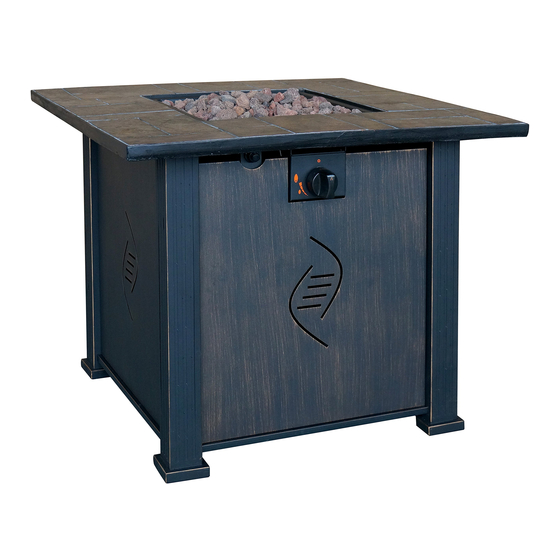
Model No . : HYFP50085-31
WARNING
For Outdoor Use Only! Use Propane Gas Only!
Propane cylinders sold separately.
WARNING
Improper installation,adjustment,alteration,
service or maintenance can cause injury or
property damage. Read the owner's manual
thoroughly before installing or servicing this
equipment. If the information in this manual is
not followed exactly, a fire or explosion may
result causing property damage, personal injury
or loss of life. Save these instructions for future
use. If you are assembling this unit for someone
else, give this manual to him or her to read and
save for the future.
WARNING
The propane cylinder must be
disconnected when this fire table is not
use.
If you smell gas:
1. Shut off gas to the appliance.
2. Extinguish any open flame.
3. If odor continues, keep away from the
appliance and immediately call your gas supplier
or fire department.
WARNING
This fire table must be attended at all
times!
WARNING
An LP-cylinder not connected for use shall not
be stored in the vicinity of this or any other
appliance.
1
I tem No.: 68487A
DANGER
Advertisement
Table of Contents

Related Manuals for BOND MANUFACTURING HYFP50085-31


Summary of Contents for BOND MANUFACTURING HYFP50085-31
- Page 1 OWNER'S MANUAL Model No . : HYFP50085-31 I tem No.: 68487A READ BEFORE USE! WARNING For Outdoor Use Only! Use Propane Gas Only! Propane cylinders sold separately. WARNING Improper installation,adjustment,alteration, service or maintenance can cause injury or property damage. Read the owner's manual thoroughly before installing or servicing this equipment.
- Page 2 SAFETY INFORMATION Please read and understand this entire manual before attempting to assemble, operate or install the product. Failure to follow the dangers, warnings and cautions contained in this owners manual may result in a fire or explosion causing damage to property, serious bodily injury or death. WARNING •...
- Page 3 SAFETY INFORMATION • Never lean over the open fire table or place hands or fingers on the upper portion of an operational unit. • Keep any electrical supply cords and the fuel supply hose away from any heated surfaces. • Combustible materials should never be within 72 inches of the top, 48 inches of the back or sides of the fire table.
- Page 4 Inspect the burner before each use of the appliance. If the burner shows signs of damage of any kind, do not operate the appliance. Fix or replace the burner as required before using the appliance. For assistance with repair or replacement of the burner, call Bond Manufacturing at 1-866-771-2663. Use only replacement parts from the manufacturer.
- Page 5 WARNING ! * Do not light or use gas unit if lava rocks are wet. Ensure lava rocks are completely dry before igniting as intense heat could cause the rock to crack. * Lava Rocks could hit someone's face or eyes during initial start of this unit , so please keep away from the fire table for the first 20 minutes after it has been ignited.
- Page 6 ITEM SPECIFICATION ITEM SPECIFICATION Right Front Leg Burner Right Back Leg Firebowl Metal Stand Guard Front Panel Ignition Pin Door Heat Shield A Side Panel Heat Shield B Wrench Table Top AAA Battery Control Panel Door Knob Pulse Ignition Washer Grounding Wire Gas Valve M4 x 8 Screws...
- Page 7 ASSEMBLY INSTRUCTIONS * Please keep these owner's manual for future reference. * If you have opened the carton and removed all packages, please disregard STEP 1. See STEP 2 directly. STEP 2 STEP 1 M6x10 4pcs Left Leg Right Front Leg Right Back Leg STEP 2.
- Page 8 Door Knob 1pc Washer 1pc STEP 6 STEP 5 M4 x 8 Screw 1pc STEP 6. STEP 5. Attach hose of regulator tightly to the bracket。 Insert the door to right front leg and attach door knob See Figure F to the door using M4 screw and washer。...
- Page 9 See WARNING and Figures : WARNING This screen must be clear and free of obstructions at all times to insure proper operation. WARNING The burner of the firebowl must be covered by lava rocks completely. Oth- erwise the flame may be extinguished. See the Figure CORRECT and INCORRECT for reference.
-
Page 10: Troubleshooting
TO EXTINGUISH • Push the Control Knob and turn clockwise to the "OFF" position. • Turn the cylinder valve on the gas tank clockwise to close the gas supply if not in use for a long time.(See figure below) ROUTINE CARE •... - Page 11 IF YOU HAVE QUESTIONS OR CONCERNS PLEASE CALL BOND TOLL FREE # 1-866-771-BOND(2663) OR TO BETTER EXPEDITE YOUR REQUEST FEEL FREE TO EMAIL US customer.service@bondmfg.com OR VISIT OUR WEBSITE UNDER CUSTOMER SERVICE SUPPORT www.bondmfg.com BOND MANUFACTURING CO. 1700 West 4th Street, Antioch, CA 94509 ...
- Page 12 GUIDE D’UTILISATION HYFP50085-31 No d’article: 68487A LIRE AVANT DE L’UTILISER! No de modèle: MISE EN GARDE MISE EN GARDE Utiliser à l’extérieur uniquement! Utiliser le propane uniquement! Bouteille de propane vendue séparément. MISE EN GARDE MISE EN GARDE Les installations, réglages,modifications, entretiens ou réparations incorrects présentent...
- Page 13 CONSIGNES DE SÉCURITÉ Assurez-vous de lire et de comprendre l’intégralité du présent manuel avant de tenter d’assembler, d’utiliser ou d’installer l’article. Le non-respect des avertissements et des mises en garde contenus dans ce guide d’utilisation peut entraîner un incendie ou une explosion et causer des dommages matériels, des blessures graves ou la mort.
- Page 14 CONSIGNES DE SÉCURITÉ • Les pierres de lave peuvent être projetées lors de l’allumage et heurter le visage ou les yeux de toute personne à proximité de l’appareil; veuillez demeurer à distance du foyer de jardin pendant les 20 minutes suivant l’allumage. •...
- Page 15 Réparez ou remplacez le tuyau au besoin avant d’utiliser.l’appareil. Pour de l’aide avec la réparation ou le remplacement du tuyau, contactez Bond Manufacturing au 1-866-771-2663. Utilisez uniquement des pièces de rechange du fabricant.
- Page 16 Garantie et information sur l’installation : La garantie sera annulée par Bond, et Bond décline toute responsabilité pour les actions suivantes : Modification du foyer d’extérieur et (ou) ses composantes, y compris le système d’alimentation en gaz. Emploi d’une composante non fabriquée ou approuvée par Bond. Utilisation et installation autrement que selon les instructions de ce manuel.
- Page 17 ARTICLE DESCRIPTION QTÉ ARTICLE DESCRIPTION QTÉ Pied avant droit Couvercle Brûleur Pied arrière droit Cuve Support en métal Protecteur Panneau avant Tige d’allumage Porte Protecteur thermique A Panneau latéral Protecteur thermique B Clé Plateau de la table Pile AAA Panneau de commande Bouton de porte Dispositif d’allumage par impulsions 1 Fil de mise à...
- Page 18 INSTRUCTIONS D’ASSEMBLAGE * Conserver ce manuel du propriétaire pour consultation ultérieure。 * Ne pas tenir compte de l’ÉTAPE 1, si la boîte a déjà été ouverte et les matériaux d’emballage retirés. Passer directement à l’ÉTAPE 2。 ÉTAPE 2. ÉTAPE 1. Vis M6x10 (4) Pied gauche Pied avant droit...
- Page 19 Bouton de porte (1) Rondelle (1) ÉTAPE 5. ÉTAPE 6. Vis M4x8 (1) ÉTAPE 5. ÉTAPE 6. Fixer solidement le boyau du régulateur à la Insérer la porte dans le pied droit avant et fixer le Voir la figure F patte de fixation。...
- Page 20 ** Lorsque vous placez les pierres de lave dans la cuve, veillez à ne pas RECOUVRIR L’ÉCRAN D’ALLUMAGE. L’écran d’allumage doit être exempt de toute obstruction en tout temps。 ** Raccorder le régulateur de pression à la bouteille de Voir la figure J Gaz。...
- Page 21 POUR ALLUMER Avant chaque utilisation, inspecter tous le tuyau. Remplacer le tuyau s’il y a une indication de coupure, d’usure ou d’abrasion. (1) Tourner le robinet de la bouteille de gaz dans le sens antihoraire pour ouvrir l’alimentation en gaz. (2) Fermer la porte d’emmagasinage du foyer pour la bouteille de gaz.
-
Page 22: Guide De Dépannage
TACHES CORIACES • Les taches coriaces, la décoloration et possiblement les piqûres de corrosion peuvent se produire avec l’exposition aux conditions sévères extérieures. • Prendre soin de ne permettre aucun contact des composants peints ou en plastique avec toute poudre ou tout solvant, parce que des dommages peuvent se produire. - Page 23 1 866 771-BOND(2663) OU POUR MIEUX ACCÉLÉRER VOTRE DEMANDE N’HÉSITEZ PAS À NOUS ENVOYER UN COURRIEL À customer.service@bondmfg.com OU BRANCHEZ-VOUS SUR NOTRE SITE WEB SOUS LA RUBRIQUE CUSTOMER SERVICE SUPPORT www.bondmfg.com BOND MANUFACTURING CO. 1700 West 4th Street, Antioch, CA 94509...
-
Page 24: Manual Del Usuario
MANUAL DEL USUARIO LEER ANTES DE USAR! Núm. de fábrica:HYFP50085-31 Número de Artículo: 68487A ADVERTENCIA Solamente Para Uso Externo! Usar Solamente Gas Propano! Los cilindros de gas propano se venden por separado. ADVERTENCIA Instalación, ajuste, alteración, servicio o mantenimiento indebido puede causar daño corporal o de propiedad. - Page 25 INFORMACIÓN DE SEGURIDAD Lea y comprenda completamente este manual antes de intentar ensamblar, usar o instalar el producto. No seguir los avisos de peligro, las advertencias y las precauciones de este manual del usuario podría provocar incendios o explosiones que causen daños a la propiedad, lesiones personales graves o la muerte.
- Page 26 minutos después de haberla encendido. • No use la mesa con fogón, a menos que todas las piezas estén correctamente instaladas y en su lugar. • Preste atención cuando haga funcionar la mesa con fogón. Se calienta durante el uso y nunca debe dejarse sin supervisión.
- Page 27 Repare o reemplace la manguera según la necesidad antes de usar el aparato. Para obtener ayuda con la reparación o el reemplazo de la manguera, póngase en contacto con Bond Manufacturing al 1-866-771-2663. Utilice sólo piezas de repuesto del fabricante.
- Page 28 ¡ADVERTENCIA! * Ne pas allumes les gaz ou utilisez ci les pierres en lava sont mouiller. Assurer que les pierres en lava sont complète- ment sec avant d'allumer, parce que la chaleur peu fêler les pierres en lava. * Las piedras de lava podrían golpear la cara o los ojos de alguien durante el arranque inicial de la unidad, luego se ruega mantenerse fuera de la fuente de fuego durante los primeros 20 minutos después del encendido.
- Page 29 ESPECIFICACIÓN ART. CANT. ESPECIFICACIÓN ART. CANT. Tapa Pata delantera derecha Quemador Pata trasera derecha Bolde fuego Pedestal de metal Protección Panel frontal Chavetade encendido Puerta PantallatérmicaA Panel lateral PantallatérmicaB Llave Tapade mesa Batería AAA Panelde control Perilla de puerta Encendidode pulsación Arandela Tornillos M4 x 8 Cablede conexión a tierra...
- Page 30 INSTRUCCIONES DE ENSAMBLAJE * Conserve este manual del propietario para referencia futura。 * Si ha abierto la caja y retirado todos los paquetes, no tenga en cuenta el PASO 1. Vea directamente el PASO 2。 PASO1 PASO 2 M6x10 4pzas Pata izquierda Pata trasera derecha Pata delantera derecha...
- Page 31 PASO 5 PASO 6 Perilla de puerta 1pza Arandela 1pza Tornillo M4 x 8 1pza PASO 6. PASO 5. Inserte la puerta en la pata delantera derecha y adose la Adose la manguera del regulador firmemente en el perillade puerta a la puerta con el tornillo M4 y la arandela。 soporte。...
- Page 32 ** Cuando esté colocando las rocas volcánicas en el interior del bol de fuego NO CUBRA LA PANTALLA DE ENCENDIDO。Siempre mantenga la Pantalla de Encendido visible。 ** Conecte la Válvula Reguladora de Presión al tanque de gas。 Ver Figura J 1) Gire la válvula del cilindro de gas en sentido horario para cerrar el suministro de gas al tanque de gas。...
- Page 33 PARA ENCENDER Antes de cada uso, revise la manguera. Reemplaze cualquier manguera que tenga señales de haber sido cortada, desgastada, o abrasión. (1) Gire la válvula del cilindro en el cilindro de gas en sentido contrario a las agujas del reloj para abrir el suministro de gas. (2) Cierre la puerta del almacenamiento para el tanque de gas en la fogata a gas .
-
Page 34: Resolución De Problemas
CUIDADO USUAL Mantenga su fogata a gas libre y limpia de materiales combustibles. • • Visualmente revise el quemador de obstrucciones, mantenga la hoguera libre y limpia de escombros. • Cuando el quemador y las piedras de lava se hayan enfriados to talmente, use un cepillo suave para deshacerse de manchas pequeñas, suciedad y polvo. - Page 35 SE RUEGA LLAMAR A BOND SIN CARGOS al 1-866-771-BOND(2663) O PARA ACELERAR SU PEDIDO NO DEJE DE MANDARNOS UN CORREO ELECTRÓNICO AL customer.service@bondmfg.com O VISITE NUESTRA PÁGINA WEB BAJO ATENCIÓN AL CLIENTE CUSTOMER SERVICE SUPPORT www.bondmfg.com BOND MANUFACTURING CO. 1700 West 4th Street, Antioch, CA 94509...
Need help?
Do you have a question about the HYFP50085-31 and is the answer not in the manual?
Questions and answers