Advertisement
Quick Links
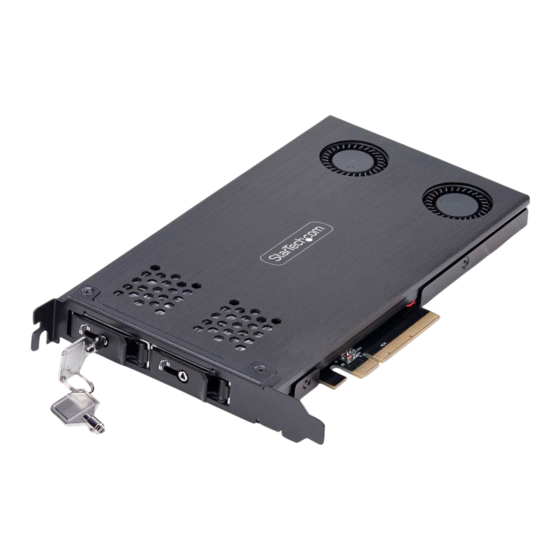
Dual-Bay M.2 NVMe SSD Backplane for PCIe x8 Slot with Bifurcation
Product ID
2M2-REMOVABLE-PCIE
1
2
2
5
Component
1
Full-Profile Bracket
2
M.2 Drive Trays
3
Active Cooling Fans
4
PCIe x8 Connector
5
Key Lock for Drive Tray
6
Drive LED Indicator
To view manuals, FAQs, videos, drivers, downloads, technical drawings, and more, visit www.startech.com/support.
4
6
5
6
Function
Secure the M.2 NVMe SSD Backplane to the
•
Computer Case
Hosts the M.2 Drives for the M.2 NVMe SSD
•
Backplane
Vents air away from the M.2 NVMe Drives
•
Connect the M.2 NVMe SSD Backplane to a PCIe
•
Slot in the Computer
Use the included Key to Lock or Unlock the M.2
•
Drive Trays from the M.2 NVMe SSD Backplane
Red: Connected Drive is Not Supported
•
Green: Connected Drive is Supported
•
Yellow: Flashes to indicate Drive Activity
•
Product Information
For the latest drivers/software, technical specifications, and declarations of
conformance, please visit:
Package Contents
Dual-Bay M.2 NVMe SSD Backplane x 1
•
Removable M.2 Drive Tray x 2
•
M.2 Drive Mounting Screw x 2
•
Set of Keys x 1
•
3
Quick-Start Guide x 1
•
Requirements
Computer x 1
•
PCIe x8 or x16 Slot with Bifurcation support
•
PCI Express M.2 SSD x 2
•
Phillips Head Screwdriver x 1
•
Installation
Warning: PCIe Cards can be damaged by static electricity. Ensure that the Installer
is properly grounded before they open the Computer Case or touch the M.2 NVMe
SSD Backplane. The Installer should wear an Anti-Static Strap when installing any
computer component. If an Anti-Static Strap is not available, discharge any built-up
static electricity by touching a large Grounded Metal Surface for several seconds.
Only handle the M.2 NVMe SSD Backplane by its edges and do not touch the gold
connectors.
Note: Consult the documentation that came with the Computer/Motherboard for
details regarding how to enable and configure PCIe Bifurcation.
Install the M.2 Storage Drives
Remove the Drive Tray from the M.2 NVMe SSD Backplane
1.
Remove the Heat Sink Cover from the Removable Drive Tray by pressing the two
2.
Plastic Heat Sink Latching Locks, located near the back of the tray, towards each
other.
Place the Drive next to the Drive Tray and note the Adjustable Standoff Holes that
3.
match the length of the Drive.
Remove the Adjustable Standoff by pressing the side of the Adjustable Standoff and
4.
sliding it towards the front of the tray.
Install the Standoff in the Adjustable Standoff Holes that matches the length of the
5.
Drive.
Insert the Drive into the Removable Drive Tray's M.2 Connector
6.
Note: The M.2 Connector on the Drive is M-Keyed so that it only fits M-Keyed NVMe
M.2 Storage Devices
Gently slide the M.2 Drive Connector into the M.2 Connector of the Drive Tray, and
7.
press the Drive down toward the adapter until the Drive is properly seated.
www.StarTech.com/2M2-REMOVABLE-PCIE
Quick-Start Guide
Manual Revision: April 3, 2024
Advertisement

Related Manuals for StarTech.com 2M2-REMOVABLE-PCIE


Summary of Contents for StarTech.com 2M2-REMOVABLE-PCIE
- Page 1 Gently slide the M.2 Drive Connector into the M.2 Connector of the Drive Tray, and Yellow: Flashes to indicate Drive Activity • press the Drive down toward the adapter until the Drive is properly seated. To view manuals, FAQs, videos, drivers, downloads, technical drawings, and more, visit www.startech.com/support. Manual Revision: April 3, 2024...
- Page 2 (1) This device may not cause harmful interference, and (2) this device must accept any interference received, including and do not represent an endorsement of a product or service by StarTech.com, or an endorsement of the product(s) to which this manual applies by the third-party company in question. StarTech.com hereby acknowledges that all trademarks, registered interference that may cause undesired operation.
Need help?
Do you have a question about the 2M2-REMOVABLE-PCIE and is the answer not in the manual?
Questions and answers