
Related Manuals for HY-CLOR i1


Summary of Contents for HY-CLOR i1
- Page 1 CORDLESS ROBOTIC POOL CLEANER INSTALLATION & OPERATION MANUAL Suits: HYCROBOTi1 Version 1.0...
-
Page 2: Table Of Contents
At Hy-Clor we are dedicated to making pool Contents care easier and more affordable. The i1 cleaner has been designed to be very easy to WARNINGS / CAUTION use and lightweight. It is one of, if not the lightest... -
Page 3: Warnings / Caution
Read the manual carefully before you use the cleaner. Your safety is the most important thing. Please read through and operate the device as per instructions, HY-CLOR is not held liable for any loss or injury caused by improper use. Warning... -
Page 4: Hy-Clor I1 At A Glance
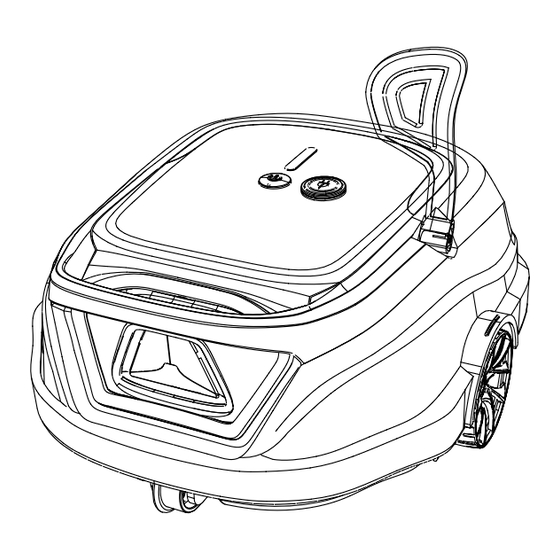
Hy-Clor i1 at a glance Product External Overview Charging Port On/Off Button Connect the charger Handle Flipper LED Indicator Different coloured LEDS to indicate device status, battery level and cleaning mode Assembly Outlet Fastener Adjustable Wheel Able to be adjusted for different pool shapes / cleaning patterns. -
Page 5: Product Internal Overview
Do not use the device if the lid is damaged. Cease charging or operating the device if there is any liquid leaking from the sealed motor assembly. Contact Hy-clor for assistance. Carton contents Item Description Device Flipper &... -
Page 6: Get Started
You need to insert the included flipper into the cleaner with the notch and groove being aligned. It will click into place. Once the flipper is securely inserted, add the rubber end cap. Charge your new Hy-Clor i1 The device has a lithium-ion rechargeable battery, and you need to charge the battery before first use and when the battery is low. -
Page 7: Setup Your New Hy-Clor I1
Charge your new Hy-Clor i1 (Continued) The cleaner can indicate battery level by showing LED lights on the front. Quantity Battery Level 0 - 25 25 - 50 50 - 75 75 - 100 Setup your new Hy-Clor i1 To activate the device, press and hold the on/off button for 1 second. When the device is turned on, the LED indicator on the top will show a solid blue light. -
Page 8: Select Your Cleaning Cycle
If you do not wish to set up a cleaning cycle, simply place the cleaner into the pool while it is on to initiate floor cleaning. The Hyclor i1 is designed for a user-friendly interaction, and the different LED lights indicate different cleaner status. Please refer to below. -
Page 9: Run Your New Hy-Clor I1
Run your new Hy-Clor i1 After cleaning cycle selection, hold the handle of the i1 and place it into the pool vertically (do not throw into pool) After cleaning cycle selection, hold the handle of the Let it sink down to the floor to empty trapped air... - Page 10 The i1 will automatically move to the edge of the pool You can insert the included retrieval hook into a pool when it has finished its cycle or has low battery. It will pole and lift the cleaner out of the pool.
-
Page 11: How To Clean The Hy-Clor I1
2. Clean debris tray and sponge inserts before the cleaner is completely dry - this will assist in the longevity of the cleaner. 3. Give the i1 a wash with fresh water as-well. Take out the filter trays. Shake off all debris, and rinse the filter tray with hose water, hand wash the add sponge filter. -
Page 12: Device Specification
Device Specification Model Hy-Clor i1 Model - HYCROBOTi1 Pool Size 80m2 ~100m2 (floor cleaning) Depth (max) Max 2.7m & Min: 60cm Device Dimension 345 (L) * 315 (W) * 170 (H) mm Weight 3.5Kg Runtime Up to 120 min (2 hours) Charging Time 150min (2.5 hours) -
Page 13: How To Adjust The Cleaning Pattern
How to Adjust the Cleaning Pattern If your pool has an irregular shape or if you are not satisfied with the default cleaning pattern, you can adjust the direction of the wheels for better cleaning performance. Detach the adjustable wheels You will find two wheel kits marked with A, B, and C on the front and rear sides of the chassis. -
Page 14: Faq & Troubleshooting
Remove the cleaner from the pool The flipper is stuck and try to manually rotate the The buzzer still sounds or the flipper or contact Hy-clor impeller does not rotate after the The flipper is not straight or does cleaner is fully immersed in water. -
Page 15: Warranty Terms & Conditions
Damage to a Vinyl liner is not covered under warranty. It is up to the user to make sure the liner quality is of good quality and will not be damaged using the ‘i1’ Pool cleaner. Warranty is only for the Goods included in the box. Shipping fees may apply.
Need help?
Do you have a question about the i1 and is the answer not in the manual?
Questions and answers