
Related Manuals for Omron BP5000


Summary of Contents for Omron BP5000
- Page 1 ® INSTRUCTION MANUAL Iron Upper Arm Blood Pressure Monitor Model BP5000 3145996-0B...
-
Page 2: Table Of Contents
Table of Contents Introduction ....................3 Important Safety Information ................4 1. Know Your Monitor ................9 2. Preparation ..................14 3. Using Your Monitor ................18 4. Using Memory Function ...............20 5. Other Settings ..................21 6. Error Messages and Troubleshooting..........22 7. Maintenance ..................25 8. Optional Medical Accessories..............27 9. -
Page 3: Introduction
Safety Instructions This instruction manual provides you with important information about the OMRON BP5000 Upper Arm Blood Pressure Monitor. To ensure the safe and proper use of this monitor, READ and UNDERSTAND all of these instructions. If you do not understand these instructions or have any questions, contact 1-800-634-4350 before attempting to use this monitor. -
Page 4: Important Safety Information
Important Safety Information Read the Important Safety Information in this instruction manual before using this monitor. Follow this instruction manual thoroughly for your safety. Keep for future reference. For specific information about your own blood pressure, CONSULT WITH YOUR PHYSICIAN. Indicates a potentially hazardous situation which, if not Warning avoided, could result in death or serious injury. - Page 5 • Consult with your physician before using this monitor if you have common arrhythmias such as atrial or ventricular premature beats or atrial fibrillation; arterial sclerosis; poor perfusion; diabetes; pregnancy; pre- eclampsia or renal disease. NOTE that any of these conditions in addition to patient motion, trembling, or shivering may affect the measurement reading.
- Page 6 • Remove the arm cuff if it does not start deflating during a measurement. • DO NOT use this monitor for any purpose other than measuring blood pressure. • During measurement, make sure that no mobile device or any other electrical device that emits electromagnetic fields is within 12 inches (30 cm) of this monitor.
- Page 7 • Ensure that this monitor has acclimated to room temperature before taking a measurement. Taking a measurement after an extreme temperature change could lead to an inaccurate reading. It is recommended that you wait for approximately 2 hours for the monitor to warm up or cool down when the monitor is used in an environment within the temperature specified as operating conditions after it is stored either at the maximum or at the minimum storage temperature.
- Page 8 Battery Handling and Usage • DO NOT insert batteries with their polarities incorrectly aligned. • ONLY use 4 “AA” batteries with this monitor. DO NOT use other types of batteries. DO NOT use new and used batteries together. DO NOT use different brands of batteries together. •...
-
Page 9: Know Your Monitor
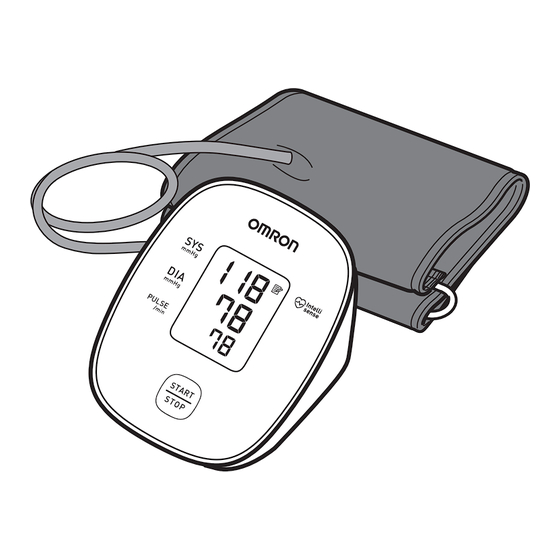
1. Know Your Monitor Contents Monitor, arm cuff, instruction manual, quick start guide Monitor Display Battery compartment AC adapter jack [START/STOP] button Air jack... - Page 10 Arm cuff (Upper arm circumference: 9" - 17" (22 - 42 cm)) Air plug Air tube...
- Page 11 Display and Symbols A Systolic blood pressure reading B Diastolic blood pressure reading Deflation symbol Appears during cuff deflation. Heartbeat symbol Flashes during measurement. Memory symbol Appears when viewing readings stored in the memory.
- Page 12 Low battery symbol Flashes when batteries are low. Depleted battery symbol Appears when batteries are depleted. Irregular heartbeat symbol • Appears when irregular rhythm is detected 2 or more times during a measurement. • This symbol may be displayed when the monitor detects arm movements while taking a measurement.
- Page 13 Classification of BP (Blood Pressure) ACC/AHA 2017 Hypertension guidelines define categories of BP in adults as below. Categories of BP in Adults* BP Category Systolic BP Diastolic BP < 120 mmHg and < 80 mmHg Normal 120 - 129 mmHg and < 80 mmHg Elevated Hypertension Stage 1 130 - 139 mmHg or 80 - 89 mmHg...
-
Page 14: Preparation
2. Preparation Installing Batteries Batteries are not included in this unit. You will need to supply your own 4 “AA” batteries before using your monitor. Remove the battery cover. Insert 4 “AA” batteries as indicated in the battery compartment. Close the battery cover. Note •... - Page 15 Blood Pressure Measurement Tips To help ensure an accurate reading, follow these directions: • Stress raises blood pressure. Avoid taking measurements during stressful times. • Measurements should be taken in a quiet place. • It is important to take measurements at same times each day. Taking measurements in the morning and in the evening is recommended.
- Page 16 Plug the arm cuff into your monitor by inserting the air plug into the air jack securely until it clicks. Click Place your hand through the cuff loop. Pull the cuff until it reaches your upper left arm. Note • The bottom edge of the arm cuff should be 0.5 inch (1 to 2 cm) above the inside elbow.
- Page 17 Make sure that the air tube is positioned on the inside of your arm and wrap the cuff securely, so it cannot move around your arm. To take a measurement on your right arm When you take a measurement on your right arm, the air tube should run along the side of your elbow, along the bottom of your arm.
-
Page 18: Using Your Monitor
3. Using Your Monitor This monitor tracks readings for 1 user. If you are sharing with another, manually track your readings separately. Taking a Measurement Note • To stop the measurement, press the [START/STOP] button once to deflate the arm cuff. Caution •... - Page 19 Remain still and do not talk until the entire measurement process is complete. The “ ” symbol flashes at every heartbeat. Your blood pressure and pulse rate are displayed. START INFLATING DEFLATING COMPLETED Press the [START/STOP] button to turn your monitor off. Note •...
-
Page 20: Using Memory Function
4. Using Memory Function Your monitor will only store your last reading in the memory. This monitor tracks readings for 1 user. If you are sharing with another, manually track your readings separately. Viewing the Readings Stored in Memory Press and hold the [START/STOP] button for more than 5 seconds. -
Page 21: Other Settings
5. Other Settings Deleting the Reading Stored in Memory Press and hold the [START/STOP] button for more than 15 seconds. The screen to the right is displayed and the reading is deleted. -
Page 22: Error Messages And Troubleshooting
6. Error Messages and Troubleshooting If any of the below problems occur during measurement, check to make sure that no other electrical device is within 12 inches (30 cm) of the monitor. If the problem persists, refer to the table below. Display/Problem Possible Cause Solution... - Page 23 Display/Problem Possible Cause Solution Do not touch the arm cuff and/or bend the air tube The arm cuff is inflated while taking a measurement. exceeding the maximum If inflating the arm cuff allowable pressure. appears manually, refer to sub- section 3.1. Moving or talking during a measurement results in Remain still and do not talk...
- Page 24 Display/Problem Possible Cause Solution Immediately replace all appears, or the monitor Batteries are depleted. 4 batteries with new ones. is turned off Refer to sub-section 2.1. unexpectedly during a measurement. Check the battery Nothing appears on the Battery polarities are not installation for proper display of the monitor.
-
Page 25: Maintenance
7. Maintenance Maintenance To protect your monitor from damage, please follow the directions below: • Changes or modifications not approved by the manufacturer will void the user warranty. Caution • DO NOT disassemble or attempt to repair this monitor or other components. This may cause an inaccurate reading. - Page 26 Gently fold the air tube into the arm cuff. Note • Do not bend or crease the air tube excessively. Do not store your monitor and other components: • If your monitor and other components are wet. • In locations exposed to extreme temperatures, humidity, direct sunlight, dust or corrosive vapors such as bleach.
-
Page 27: Optional Medical Accessories
8. Optional Medical Accessories Small D-Ring Cuff Wide-Range D-Ring Cuff Arm circumference Arm circumference 7" - 9" (17 - 22 cm) 9" - 17" (22 - 42 cm) Model: Model: HEM-CS24-B HEM-CS24-BZ HEM-RML31-B HEM-RML31-BZ •Same as the arm cuff provided with the product. - Page 28 Using the AC Adapter (optional accessory) Note • Make sure not to place your monitor in a location where it is difficult to plug and unplug the AC adapter. • It is recommended that you keep the batteries in your monitor at all times, even if you choose to use the AC adapter.
-
Page 29: Specifications
9. Specifications Model BP5000 HEM-7121J-ZAZ Display LCD digital display Cuff pressure range 0 to 299 mmHg Blood pressure SYS: 60 to 260 mmHg measurement range DIA: 40 to 215 mmHg Pulse measurement range 40 to 180 beats / min. Pressure: ±3 mmHg Accuracy Pulse: ±5% of display reading... - Page 30 Storage / Transport -4 °F to +140 °F (-20 °C to +60 °C) / 10 to 90 % RH conditions (non-condensing) Monitor: Approximately 8.8 oz. (250 g) not including Weight batteries Arm cuff: Approximately 6 oz. (170 g) Monitor: Approximately 4.3" (w) × 3.3" (h) 5.5" (l) (108 mm ×...
- Page 31 Note • These specifications are subject to change without notice. • This monitor is clinically investigated according to the requirements of ISO 81060- 2:2013 and complies with ISO 81060-2:2013 and ISO 81060-2:2018+A1:2020. In the clinical validation study, K5 was used on 85 subjects for determination of diastolic blood pressure.
-
Page 32: Fcc/Ised Statement
10. FCC/ISED Statement FCC CAUTION Changes or modifications not expressly approved by the party responsible for compliance could void the user’s authority to operate the equipment. This device complies with part 15 of FCC Rules and Innovation, Science and Economic Development Canada’s licence-exempt RSS(s). Operation is subject to the following two conditions: (1) this device may not cause harmful interference, and (2) this device must accept any interference received, including interference that may cause undesired operation. -
Page 33: Limited Warranty
11. Limited Warranty Your BP5000 Blood Pressure Monitor, excluding the arm cuff is warranted to be free from defects in materials and workmanship appearing within 2 years from the date of purchase, when used in accordance with the instructions provided with the monitor. - Page 34 This warranty provides you with specific legal rights, and you may have other rights that vary by jurisdiction. Because of special local requirements, some of the above limitations and exclusions may not apply to you. FOR CUSTOMER SERVICE For USA - OmronHealthcare.com Visit our web site at: For Canada - OmronHealthcare.ca Call toll free:...
-
Page 35: Guidance And Manufacturer's Declaration
Information for Accompanying Documents in the Scope of IEC 60601-1-2 Important information regarding Electromagnetic Compatibility (EMC) BP5000 conforms to IEC 60601-1-2 Electromagnetic Compatibility (EMC) standard. Further documentation in accordance with this EMC standard is available at https://healthcare.omron.com/electro-magnetic-compatibility. Refer to the EMC information for BP5000 on the website. - Page 36 ® GUIDE DE L’UTILISATEUR Iron partie supérieure du bras tensiomètre Modèle BP5000 3145997-9B...
- Page 37 Table des matières Introduction ....................F3 Renseignements importants sur la sécurité ..........F4 1. Familiarisez-vous avec l’appareil ............F9 2. Préparation ..................F14 3. Utilisation du tensiomètre..............F18 4. Utilisation de la fonction mémoire ............. F20 5. Autres réglages................. F21 6.
-
Page 38: Introduction
Directives de sécurité Ce mode d’emploi vous fournit des renseignements importants concernant le tensiomètre pour la partie supérieure du bras OMRON BP5000. Pour assurer une utilisation sécuritaire et appropriée de cet appareil, veuillez LIRE et COMPRENDRE toutes ces instructions. Si vous avez du mal à comprendre ces instructions ou si vous avez des questions, composez le 1 800 634-4350 avant d’utiliser ce... -
Page 39: Renseignements Importants Sur La Sécurité
Renseignements importants sur la sécurité Lire la section Renseignements importants sur la sécurité dans le présent mode d’emploi avant d’utiliser cet appareil. Pour votre sécurité, lisez attentivement tout le mode d’emploi. Conserver ce guide pour consultation ultérieure. Pour obtenir des renseignements précis sur votre tension artérielle, CONSULTER VOTRE MÉDECIN. - Page 40 • Consulter un médecin avant d’utiliser l’appareil si vous êtes enceinte ou si vous souffrez : d’arythmies courantes, telles que des extrasystoles auriculaires ou ventriculaires ou une fibrillation auriculaire; de sclérose artérielle; d’une irrigation sanguine insuffisante; de diabète; de prééclampsie ou d’une néphropathie. Remarque : n’importe laquelle de ces affections, en plus de tout mouvement, tremblement ou frisson du patient peut affecter le résultat de la mesure.
- Page 41 • Consulter votre médecin avant d’utiliser cet appareil si vous avez subi une mastectomie ou un évidement ganglionnaire. • Consulter votre médecin avant d’utiliser cet appareil si vous avez des problèmes de débit sanguin sévères un trouble du sang ou des problèmes, puisque le gonflement du brassard peut causer des ecchymoses.
- Page 42 • Enlever les vêtements serrés ou épais de votre bras lors d’une prise de mesure. • Demeurer immobile et NE PAS parler pendant la prise de mesure. • Utilisez le brassard SEULEMENT sur les personnes dont la circonférence du bras se situe dans la plage spécifiée. •...
- Page 43 • Débrancher l’adaptateur c.a. de la prise, en s’assurant de tirer sur la fiche de l’adaptateur et non PAS sur le cordon d’alimentation. • Lors de la manipulation du cordon d’alimentation de l’adaptateur c.a. : Ne pas endommager le cordon. / Ne pas le couper. / Ne pas le modifier. NE PAS le pincer.
-
Page 44: Familiarisez-Vous Avec L'appareil
1. Familiarisez-vous avec l’appareil Contenu Tensiomètre, brassard, mode d’emploi, guide de démarrage rapide Tensiomètre Affichage Compartiment des piles Touche marche/arrêt [START/ Prise de l’adaptateur c.a. STOP] Prise d’air... - Page 45 Brassard (Circonférence de bras : 22 à 42 cm [9 à 17 po]) Raccord d’air Tube à air Affichage et symboles...
- Page 46 Lecture de tension artérielle systolique Lecture de tension artérielle diastolique Symbole de dégonflement Apparaît durant le dégonflement du brassard. Symbole du rythme cardiaque Clignote lors de la prise de mesure. Symbole de la mémoire Apparaît lorsque les données enregistrées en mémoire sont consultées.
- Page 47 Symbole de rythme cardiaque irrégulier • Apparaît lorsqu’un rythme cardiaque irrégulier est détecté plus d’une fois durant une prise de mesure. • Ce symbole peut s’afficher lorsque l’appareil détecte le mouvement du bras pendant la prise de mesure. Consulter la section 6 pour de plus amples renseignements.
- Page 48 Classification de la TA (tension artérielle) Les lignes directrices sur l’hypertension de l’ACC/AHA 2017 définissent les catégories de TA comme suit. Catégories de TA chez les adultes* Catégorie de TA TA systolique TA diastolique < 120 mmHg et < 80 mmHg Tension artérielle normale 120 à...
-
Page 49: Préparation
2. Préparation Installation des piles Les piles ne sont pas fournies avec cette unité. Vous devrez vous procurer des piles « AA » (4) avant d’utiliser votre appareil. Retirer le couvercle des piles. Insérer 4 piles « AA », comme indiqué dans le compartiment des piles. - Page 50 Conseils pour la mesure de la tension artérielle Afin d’assurer la précision des relevés, suivre les instructions suivantes : • Le stress augmente la tension artérielle. Éviter de prendre des mesures durant des périodes de stress. • Prendre des mesures dans un endroit calme. •...
- Page 51 Branchez le brassard à votre tensiomètre en insérant le raccord d’air dans la prise d’air fermement jusqu’au déclic. Déclic Glissez votre main dans le brassard. Faites monter le brassard jusqu’à ce qu’il se trouve sur la partie supérieure de votre bras gauche. Remarque •...
- Page 52 Vérifier que le tube à air est positionné à l’intérieur du bras et bien enrouler le brassard autour du bras pour qu’il reste en place. Pour prendre une mesure sur le bras droit Lors de la prise de mesure sur le bras droit, le tube à...
-
Page 53: Utilisation Du Tensiomètre
3. Utilisation du tensiomètre Cet appareil fait le suivi des relevés d’un seul utilisateur. En cas de partage de l’appareil, faire le suivi des relevés manuellement. Prise de mesure Remarque • Pour arrêter la prise de mesure, appuyer une fois sur la touche marche/arrêt [START/STOP] pour dégonfler le brassard. - Page 54 Appuyer sur la touche marche/arrêt [START/STOP] pour éteindre l’appareil. Remarque • Attendre de 2 à 3 minutes entre les prises de mesure. La période d’attente permet aux artères de retourner à leur état initial. Une période d’attente plus longue peut être nécessaire selon les caractéristiques physiologiques individuelles.
-
Page 55: Utilisation De La Fonction Mémoire
4. Utilisation de la fonction mémoire L’appareil ne garde en mémoire que la dernière lecture. Cet appareil fait le suivi des lectures d’un seul utilisateur. En cas de partage de l’appareil, faire le suivi des lectures manuellement. Consultation des relevés enregistrés dans la mémoire Appuyer sur la touche marche/arrêt [START/ STOP] et la maintenir enfoncée pendant plus de 5 secondes. -
Page 56: Autres Réglages
5. Autres réglages Suppression des relevés enregistrés dans la mémoire Appuyer sur la touche marche/arrêt [START/STOP] et la maintenir enfoncée pendant plus de 15 secondes. L’écran de droite s’affiche et la lecture est effacée. -
Page 57: Messages D'erreur Et Dépannage
6. Messages d’erreur et dépannage Si l’un des problèmes suivants survient durant la prise d’une mesure, s’assurer qu’aucun autre appareil électrique ne se trouve à moins de 30 cm (12 po) du tensiomètre. Si le problème persiste, voir le tableau ci-dessous. Affichage/problème Cause possible Solution... - Page 58 Affichage/problème Cause possible Solution Demeurer immobile et ne pas parler durant la prise de la mesure. Si « E2 » s’affiche de manière Le fait de bouger ou de répétée, gonfler le brassard parler pendant la mesure manuellement jusqu’à ce empêche le brassard de se que la tension systolique gonfler suffisamment.
- Page 59 Affichage/problème Cause possible Solution Appliquer le brassard correctement, puis prendre une autre mesure. s’affiche Consulter la sous- section 2.3. Demeurer immobile et Le pouls n’est pas bien s’affiche s’asseoir correctement détecté. durant la prise de la mesure. Si l’affichage du symbole « ...
- Page 60 Affichage/problème Cause possible Solution Remplacer immédiatement les 4 piles par des neuves. s’affiche, ou l’appareil Les piles sont épuisées. Consulter la sous- s’éteint inopinément section 2.1. durant la prise de mesure. Les polarités des piles ne Vérifier que les piles sont Rien ne s’affiche sur sont pas correctement bien installées.
-
Page 61: Entretien
7. Entretien Entretien Pour protéger votre appareil et éviter de l’endommager, veuillez suivre les directives ci-dessous : • Tout changement ou altération non approuvés par le fabricant entraînera l’annulation de la garantie de l’utilisateur. Mise en garde • NE PAS démonter ni tenter de réparer l’appareil ou d’autres composants. Cela pourrait fausser le relevé. - Page 62 Ranger le tube à air à l’intérieur du brassard. Remarque • Ne pas plier ou froisser le tube à air de façon excessive. Ne pas entreposer l’appareil et ses composants : • Si l’appareil et ses composants sont mouillés. • Dans des endroits qui sont exposés aux températures extrêmes, à l’humidité, à l’ensoleillement direct, à...
-
Page 63: Accessoires Médicaux En Option
8. Accessoires médicaux en option Petit brassard à anneau en D Grand brassard à anneau en D Circonférence du bras Circonférence du bras 17 à 22 cm (7 à 9 po) 22 à 42 cm (9 à 17 po) Modèle : Modèle : HEM-CS24-B HEM-CS24-BZ... - Page 64 Utilisation de l’adaptateur c.a. (accessoire facultatif) Remarque • Ne pas placer le tensiomètre à un endroit où il est difficile de brancher et de débrancher l’adaptateur c.a. • Il est recommandé de garder les piles dans l’appareil en tout temps, même si l’on choisit d’utiliser l’adaptateur c.a.
-
Page 65: Spécifications
9. Spécifications Modèle BP5000 HEM-7121J-ZAZ Affichage Affichage numérique à cristaux liquides Plage de pression du 0 à 299 mmHg brassard Plage de mesure de la SYS : 60 à 260 mmHg tension artérielle DIA : 40 à 215 mmHg Plage de mesure du pouls 40 à 180 battements/min Tension : ±... - Page 66 Conditions d’entreposage/ -20 °C à +60 °C (-4 °F à +140 °F)/HR de 10 à 90 % transport (sans condensation) Tensiomètre : Environ 250 g (8,8 onces) excluant les Poids piles Brassard : Environ 170 g (6 onces) Tensiomètre : Env. 108 mm (l) × 83 mm (h) × 140 mm (L) (4,3 po ×...
- Page 67 Remarque • Ces spécifications peuvent être modifiées sans préavis. • Cet appareil a fait l’objet d’une investigation clinique conformément aux exigences de la norme ISO 81060-2:2013 et est conforme aux normes ISO 81060-2:2013 et ISO 81060-2:2018+A1:2020. Dans l’étude de validation clinique, les bruits de Korotkoff en phase 5 (K5) ont été...
-
Page 68: Conformité Fcc/Ised
10. Conformité FCC/ISED MISE EN GARDE DE LA FCC Les modifications ou changements non approuvés expressément par l’autorité responsable de la conformité peuvent annuler l’autorité de l’utilisateur à faire fonctionner cet équipement. Cet appareil est conforme à la section 15 du règlement FCC et au CNR pour l’équipement exempt de licence d’Innovation, Sciences et Développement économique Canada. -
Page 69: Garantie Limitée
La garantie ci-dessus n’est accordée qu’à l’acheteur au détail original et aux produits achetés auprès d’un détaillant autorisé Omron assujetti aux normes de contrôle de la qualité d’Omron et les respectant, à moins d’interdiction par la loi. À notre discrétion, nous remplacerons sans frais tout tensiomètre ou brassard du tensiomètre couvert par la garantie ci-dessus. - Page 70 OMRON NE SERA PAS TENUE RESPONSABLE DES PERTES DÉCOULANT DE L’UTILISATION OU D’AUTRES DOMMAGES PARTICULIERS, INDIRECTS OU ACCESSOIRES OU DE COÛTS INDIRECTS, DE DÉPENSES OU DE DOMMAGES. CERTAINES PROVINCES INTERDISENT LES EXCLUSIONS OU LIMITES DE DOMMAGES ACCESSOIRES OU IMMATÉRIELS; IL SE PEUT DONC QUE LES EXCLUSIONS OU LIMITES CI-DESSUS NE S’APPLIQUENT PAS À...
-
Page 71: Consignes Et Déclaration Du Fabricant
IEC 60601-1-2 Renseignements importants concernant la Compatibilité électromagnétique (CEM) BP5000 est conforme à la norme IEC 60601-1-2 relative à la compatibilité électromagnétique (CEM). Une documentation complémentaire en conformité avec cette norme liée à la CEM est disponible sur https://healthcare.omron.com/electro-magnetic-compatibility.
Need help?
Do you have a question about the BP5000 and is the answer not in the manual?
Questions and answers