Table of Contents
Advertisement
A
1
2
7161355002
GT1355 BENETCH唛 英文说 明 书
材质:105G双铜
规格:95*130mm
3
公差:±1.0mm
20P
印刷处理:双面单色印刷,骑马订
4
客 户 定 制 注 意页码10软 件下载地址是 否 用 中 性网址
Enter the website "www.downloadsupport.tech" in the browser, press
enter and enter the page to find the menu "Product Catalog>>".Click into
5
the page to find the software installation package "SoundLab 1356.zip".
Click the download button to directly extract the "zip package" after
downloading. Double click on "SoundLabSetup.exe" to install.
6
A
DOCUMENT NO.: QR-208/A
B
C
3.
2.
1.
次号
更
改
内
更
改
记
B
C
D
APPROVALS
NAME
DATE
DRAWN BY
WDJ
2024-01-04
CHECKED BY
APP.
BY
容
日期
CUSTOMTER
录
D
E
SHENZHEN JUMAOYUAN SCIENCE AND TECHNOLOGY CO., LTD.
GT1355 BENETCH唛英文说明书示意图
SIZE
7161355002
A4
PART Number: X-XXX-XXX-XX
SCALE
1:1
SHEET
E
1
2
3
4
5
6
VER.A0
1
OF
1
Advertisement
Table of Contents

Subscribe to Our Youtube Channel
Related Manuals for Benetech GT1355


Summary of Contents for Benetech GT1355
- Page 1 7161355002 GT1355 BENETCH唛 英文说 明 书 材质:105G双铜 规格:95*130mm 公差:±1.0mm 印刷处理:双面单色印刷,骑马订 客 户 定 制 注 意页码10软 件下载地址是 否 用 中 性网址 Enter the website "www.downloadsupport.tech" in the browser, press enter and enter the page to find the menu "Product Catalog>>".Click into the page to find the software installation package "SoundLab 1356.zip".
- Page 2 MODEL: GT1355 Sound Level Meter Instruction Manual GT1355 OVER FULL FAST SLOW Digital Sound Level Meter HOLD Version:GT1355-EN-00...
-
Page 3: Table Of Contents
Contents I. Product introduction A. Introduce..............B. Features..............1 C. Component names...........2 D. Specifications............3 E. Calibration...............4 II. Operation instructions A. Power on/off.............5 B. Data HOLD..............5 C. DATE/TIME..............6 D. Maximum mode............6 E. High/low alarm value..........7 F. A/C Frequency weighting selection......8 G. F/S Time weighting selection........8 H. -
Page 4: Product Introduction
I. Product introduction A. Introduce This Sound Level Meter has been designed to meet the measurement requirement of noise engineers, noise quality control and health prevention in various environments, such as noise measurement in factory, office, traffic road, family and all other noise measurement applications. -
Page 5: Component Names
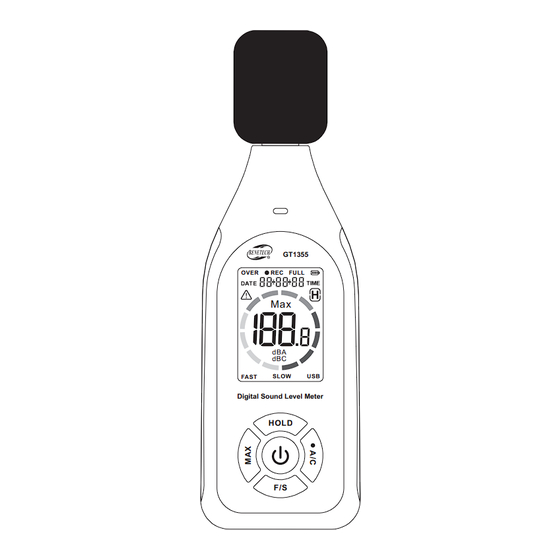
C. Component name Digital Sound Level Meter HOLD 1. Sponge ball (when outdoor use 6. F/S button please put on, prevent wind 7. A/C button blowing noise disturbing the unit 8. Power button reading) 9. Capacitance microphone 2. Alarm light 10. -
Page 6: Specifications
D. Specifications 94dB@1KHz Calibration sound source Measurement range 30~130 dB(A), 35~130dB(C) ±1.5dB(Reference sound pressure Accuracy standard,94dB@1KHz) Resolution 0.1dB Frequency weighting Frequency response 31.5Hz~8500Hz Time weighting FAST/SLOW FAST: 8 times/second Sampling rate SLOW: 1 times/second Rated current 70mA Standby current Power supply 3.7V lithium battery /1000mAh Charging time 1.5h... -
Page 7: Calibration
E. Calibration 1. Please use 94dB@1KHZ standard calibration instrument 2. Setting on sound level meter: Frequency weighting is A,Time weighting is FAST 3. Insert the microphone carefully into a 1/2-inch hole in the standard audio source (94dB@1KHz). 4. Turn on the power switch of the standard sound source, adjust the potentiometer at the circular hole in the battery door with slotted screwdriver, and make the LCD display 94.0 Calibration knob... -
Page 8: Operation Instructions
II. Operation instructions A. Power on/off 1. Power on: When shutting down, short press the power button to turn on the device. After about 1~2 second of full screen display, the real-time measurement interface will be displayed; 2. Shutdown: Power on status, long press or short press the power button to shutdown;... -
Page 9: Date/Time
C. DATE/TIME 1. Date/Time setting: Long press the Hold button to enter the DATE/TIME setting mode. Short press the A/C button to switch between year - month - day - hour - minute - second - exit setting mode successively (short press the MAX button to switch in reverse order between second - minute -... -
Page 10: High/Low Alarm Value
E. High/low alarm value 1.High/low alarm value setting: Long press MAX button to enter alarm value setting, then the screen will display [ ]. Short press MAX button to switch high/low alarm value setting. Short press HOLD button or F/S button to increase or decrease alarm value. -
Page 11: A/C Frequency Weighting Selection
F. A/C Frequency weighting selection On the measurement interface, short press the A/C button to switch between A (dBA)/C (dBC) weighting A-Weighting for general sound level measurements. C-Weighting for checking the low-frequency content of sounds. G. F/S Time weighting selection On the measurement interface, short press the F/S button to switch between FAST/ SLOW FAST is to pick up the current reading;... -
Page 12: Data Record
H. Data record 1. Enter the recording mode: After startup, long press the A/C button to enter the recording mode setting, and the screen will display [REC]; 2. Record interval setting: After entering this mode, press the HOLD button or F/S button to set the record interval time (unit: second), and long press the button to fast increase or decrease;... -
Page 13: Pc Software
III. PC software A. Requirements of computer configuration 1. CPU: Pentium III 600MHZ or above 2. One free available USB connecting interface 3. The lowest screen resolution of monitor is 800*600 (or much higher), true color 4. At least 8MB available memory 5. -
Page 14: Connection Status
C. Connection status 1. Connected to device: "Connected" appears in the bottom left corner of the PC; "USB" appears on the lower right corner of the product screen. 2. Disconnected to device: "Disconnected" is displayed in the bottom left corner of the PC; “USB"... - Page 15 2. Menu bar: Command Function Real-time data measurement, the measurement Real Time data will be displayed in real time on the PC Measure software screen Open Open measuring data file in Lab format Save Save the measurement data Import the measurement data saved by the product Import into PC software Export...
- Page 16 3. Toolbar Button Function Real-time data measurement, the measured data in real time will be displayed on computer screen Import the measurement data saved by the product into PC software Open measuring data file that is saved as Lab format Save the measurement data Save the measurement data as Excel document Print data sheet...
- Page 17 4. System setup (Config) (1) SPL Unit Setting: Measurement Range,Sample Speed,A/C Weight, MAX Work Mode. (2) PC Software Setting: Low/High dB Alarm, Alarm Sound switch. 3) Miscellaneous Option: Company's Name (i.e. exported data header), Number decimal and thousand. Note: The system settings on the PC do not affect product settings. The two are independent from each other.
- Page 18 5. Real Time Measure Button Function Click to start Real Time Measure Click to stop Real Time Measure Click to store real-time measuring data, input file name in popup window, click to save the document format of Lab. Click to clear all the measuring data Click to print curve diagram Zoom in curve diagram Zoom out curve diagram...
- Page 19 6. Import -16-...
-
Page 20: Other
IV. Other A. Attentions 1. Environment conditions on operation: (1) 2000 meters high below; (2) Temperature:0~40℃; (3) Relative humidity: ≤80%RH 2. Do not store or use the unit in following conditions: (1) Splashes of water or high levels of dust. (2) Air with high salt or sulphur content. - Page 21 Specific Declarations a. We reserve the rights of the update and amendment of the product design and the manual which are subject to change without further notification. b. Dispose of battery should in accordance with local laws and regulations. c. Our company shall hold no any responisibility resulting from using output from this product as an direct or indirect evidence.
Need help?
Do you have a question about the GT1355 and is the answer not in the manual?
Questions and answers