
Subscribe to Our Youtube Channel
Related Manuals for Hoefer SE600


Summary of Contents for Hoefer SE600
- Page 1 Hoefer SE600/SE660 Standard Dual Cooled Gel Electrophoresis Units SE600-IM...
-
Page 2: Table Of Contents
Contents Important Information ......... ii Waste Electrical and Electronic Equipment (WEEE) ......vii Gel Electrophoresis Unit Function and Description ........... 1 Specifications ............. 2 Unpacking and Inventory ........4 Operating Instructions .......... 7 Prepare the gel sandwich ........7 Acrylamide Gels ..........11 Gradient Gels .......... -
Page 3: Important Information
Important Information – English před odběrem energie vede bezpečnostní víko. • Rozeslat pouze voda nebo 50/50 voda/ • If this equipment is used in a manner not specified ethylenglykolu prostřednictvím výměník tepla je by Hoefer, Inc. the protection provided by the li to vybavena. Nemají připojení výměník tepla s equipment may be impaired. vodními setřepná nebo jakékoli chladicí kapaliny • This instrument is designed for indoor laboratory zdroje, kde tlak vody je neregulo. use only. • Nikdy zavést prostředek proti zamrznutí nebo • Only accessories and parts approved or supplied jakákoli organická rozpouštědla do jakékoli by Hoefer, Inc. may be used for operating, části z tohoto nástroje. Rozpustidlům způsobí maintaining, and servicing this product. nenapravitelné poškození jednotka! • Only use a power supply that is CE marked or • Nejsou provozována s pufru teplotách nad safety certified by a nationally recognized testing maximální stanovenou technickými specifikacemi. laboratory. Přehřátí způsobí nenapravitelné poškození jednotka! • The safety lid must be in place before connecting the power supply leads to a power supply. Vigtig Information – Danish • Turn all power supply controls off and disconnect the power leads before removing the safety lid. - Page 4 Belangrijke Informatie – Dutch joka on kansallisesti tunnustettnut testaaminen laboratoriota. • Indien deze uitrusting in een manier wordt • Turvallisuuskansi täytyy olla paikallaan gebruikt die niet door Hoefer, Inc. is gespecificeerd ennen yhdistäminen käyttöjännitelyijyjä de bescherming die door de uitrusting is verzorgd käyttöjännitteeseen. kan worden geschaad. • Kiertää kaikki käyttöjännitevalvonnat ja irrottaa • Dit instrument is voor binnenlaboratoriumgebruik valtalyijyt ennen poistaminen turvallisuuskantta. enkel ontworpen. • Kiertää vain vesi tai 50/50 vesi/ethyleneä glycol • Enkel onderdelen en delen keurden goed of siinä tapauksessa varustetun lämmönvaihtimen leverden door Hoefer, Inc. kan voor het bedienen läpi. Älä yhdistä lämmönvaihdinta worden gebruikt, handhavend en onderhouden vesinapautukseen eikä jäähdytysnestelähteeseen, van dit product. missä vesipaine on unregulated. • gebruik Enkel een netvoeding die CE is markeerde • Pakkasneste eikä orgaaninen liuotin välineen of veiligheid die door een is gecertificeerd die osassa ei esitele Koskaan. Orgaaniset liuottimet nationaal is herkend testene laboratorium. aiheuttavat korvaamattoman vahingon yksikköön! • Het veiligheidsdeksel moet in plaats voor het • Ei käytä puskuria yllä olevia lämpötiloja verbinden van de netvoeding leidt tot een enintään määritetyillä teknisillä täsmennyksillä.
- Page 5 Informazioni Importanti – Italian l’instrument. Les dissolvants organiques causeront des dommages irréparables à l’unité! • Se quest’apparecchiatura è usata in un modo • Ne pas fonctionner avec les températures de specificato da Hoefer, Inc. la protezione fornito tampon au-dessus du maximum a spécifié des dall’apparecchiatura potrebbe essere indebolita. spécifications techniques. La surchauffe causera • Questo strumento è disegnato per l’uso di des dommages irréparables à l’unité ! laboratorio interno solo. Wichtige Informationen – German • Solo gli accessori e le parti hanno approvato o hanno fornito da Hoefer, Inc. potrebbe essere • Wenn diese Ausrüstung gewissermaßen nicht usato per operare, per mantenere, e per revisionare angegeben durch Hoefer, Inc. verwendet wird, questo prodotto. kann der durch die Ausrüstung zur Verfügung • usa Solo un alimentatore che è CE ha marcato gestellte Schutz verschlechtert werden. o la sicurezza certificato da un nazionalmente • Dieses Instrument wird für den riconosciuto testando il laboratorio. Innenlaborgebrauch nur dafür entworfen. • Il coperchio di sicurezza deve essere nel luogo • Nur Zusätze und Teile genehmigten oder lieferten prima di collegare i piombi di alimentatore a un durch Hoefer, Inc. kann für das Funktionieren, alimentatore.
- Page 6 • Nie działają w buforze temperatury powyżej • Sirkulerer bare vann eller 50/50 vann/ethylene maksymalnego określone specyfikacje techniczne. glykol gjennom oppvarmingen veksleren i så fall Przegrzania spowoduje nieodwracalne szkody dla utstyrer. Ikke forbind oppvarmingen veksleren jednostki! til en vanntapp eller noe kjølemiddelkilde hvor vannet trykket er unregulated. Informações Importantes – • Introduserer Aldri antifreeze eller noe organisk Portuguese løsemiddel inn i noe del av instrumentet. Organiske løsemiddler vil forårsake irreparabel • Se este equipamento é usado numa maneira skade på enheten ! não especificada por Hoefer, Inc. que a • Driver med buffertemperaturer over maksimum protecção fornecida pelo equipamento pode ser ikke spesifiserte teknisk spesifikasjoner. Å comprometida. overoppheting vil forårsake irreparabel skade på • Este instrumento é projectado para uso de interior enheten ! de laboratório só. • Só acessórios e partes aprovaram ou forneceu por Wazne Informacje – Polish Hoefer, Inc. pode ser usada para operar, manter, e servicing este produto. • Jeżeli ten sprzęt jest wykorzystywany w sposób nie określone przez Hoefer, Inc. do ochrony • Só usa um estoque de poder que é CE marcou przewidzianej przez urządzenie może zostać...
- Page 7 Información Importante – • Säkerheten locket måste vara på platsen före koppla kraften tillgången blyen till en kraft tillgång. Spanish • Vänder sig alla kraft tillgång kontroller av och kopplar bort kraften blyen före flytta säkerheten • Si este equipo es utilizado en una manera no locket. especificado por Hoefer, Inc. la protección proporcionado por el equipo puede ser dañada. • Cirkulerar bara vatten eller 50/50 vatten/ethylene glycol genom värmen exchanger i så utrustad fall. • Este instrumento es diseñado para el uso interior Inte kopplar värmen exchanger till en vatten kran del laboratorio sólo. eller något kylmedel källa där vattnet trycket är • Sólo accesorios y partes aprobaron o suministraron unregulated. por Hoefer, Inc. puede ser utilizado para operar, • Inför aldrig kylvätska eller något organiska para mantener, y para atender a este producto. lösningsmedel in i någon del av instrumentet. • Sólo utiliza una alimentación que es CE marcó o Organiskt lösningsmedel ska orsaka irreparable la seguridad certificada por un nacionalmente skada till enheten! reconocido probando el laboratorio. • Använd inte med buffert temperaturer över • La tapa de la seguridad debe estar en el lugar det högsta angivna tekniska specifikationerna.
-
Page 8: Waste Electrical And Electronic Equipment (Weee)
Waste Electrical and Electronic Equipment (WEEE) English This symbol indicates that the waste of electrical and electronic equipment must not be disposed as unsorted municipal waste and must be collected separately. Please contact an authorized representative of the manufacturer for information concerning the decommissioning of your equipment. -
Page 9: Gel Electrophoresis Unit Function And Description
Gel Electrophoresis Unit Function and Description The Hoefer ® SE600 series vertical slab gel electrophoresis units are intended for protein and nucleic acid electrophoresis under commonly used denaturing and non-denaturing conditions. Up to 28 samples can be compared on a single slab gel. Applications include protein separations, nucleic acid fractionation, and the second- dimension separation of 2-D electrophoresis. -
Page 10: Specifications
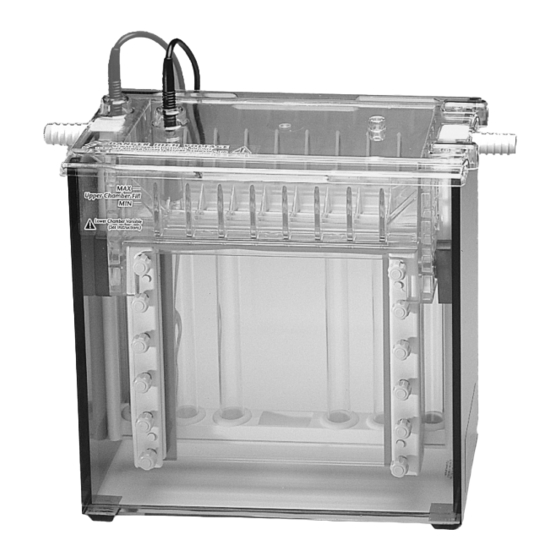
Gel plate size (w × h) SE600: 18 × 16 cm SE660: 18 × 24 cm Gel size SE600: 14 or 16 × 16 cm 16 cm with 1 cm wide spacers 14 cm with 2 cm wide spacers Gel size SE660: 14 or 16 × 24 cm... - Page 11 Fig 1. Main components of the leads (2) SE600 series (see Fig 5 for caster components). safety lid Included but not shown: • Gel Seal compound, 1/4 oz. upper buffer • Spacer-Mate spacer chamber with positioning guide upper electrode • Glass plates (6) •...
-
Page 12: Unpacking And Inventory
Unpacking and Inventory Unwrap all packages carefully and compare Note: Before using the first contents with the packing list, making sure all time, disassemble the unit and wash with a dilute solution of a items arrived. If any part is missing, contact laboratory detergent and rinse your local sales office. - Page 13 Glass plates All plates are 18 cm wide, but each model accommodates a specific plate length: The SE600 takes 16-cm plates, and the SE660 takes 24-cm plates. Three sets of glass plates are included with each unit. Notched divider plates, ordered separately, pair two gel sandwiches to form a “club sandwich”...
- Page 14 Rubber gaskets There are two sets of two gaskets: The solid laminated gaskets fit into the bottom of the casting stand and form the seal for casting the gel. The slotted gaskets fit under the upper buffer chamber and form the seal between the upper and lower chambers.
-
Page 15: Operating Instructions
For best results, take extra care to align all components when assembling sandwiches. Table 1 summarizes gel casting options. SE600 Both precast gels and self-cast gels can be used. To self-cast multiple gels, kits can be ordered separately: the SE615 Multiple Gel Caster Kit holds up to 10 sandwiches, and the SE675 Gel Caster Kit holds up to four sandwiches. - Page 16 Table1: Gel casting options model no. of gel plate available gels gels size (cm) and casters SE600 1–4* 18 × 16 Dual Gel Caster Gel Caster Kit § Multiple Gel Caster Kit † Commercially available gels SE660 1–4* 18 × 24 Dual Gel Caster * Two accessory notched divider plates are required to run 2 extra gels.
- Page 17 Finger tighten one screw on each clamp, set the 8 cm 16 cm sandwich upright on a flat surface, and loosen the SE600 — screw to align the stack. Take great care in aligning to SE660 ensure a seal. Finger tighten all screws. Remove the Spacer-Mate.
- Page 18 Place the laminated gasket into the casting cradle (See Fig 5) with the foam side down. Place the clamp assembly in the casting cradle, screw side facing out. For 24-cm plates, place the sandwich so that the longer clamp is at the top. Note: When turning the cams, Insert a cam into the hole on each side of the casting it is easier to keep the caster...
-
Page 19: Acrylamide Gels
Acrylamide Gels Prepare the monomer solution and pour the gel Prepare the required amount of monomer solution. Deaerate and add the initiator and catalyst just prior to pouring the gel. Pipette the solution into one corner of the sandwich, taking care not to introduce any air bubbles. See below for the appropriate solution level according to the application. - Page 20 Overlay each gel with a thin layer of water-saturated butanol, water, or diluted gel buffer to prevent gel exposure to oxygen. Slowly deliver the overlay solution from a glass syringe fitted with a 22-gauge needle. Apply the solution near the spacer at one side of the sandwich and allow it to flow across the surface unaided.
-
Page 21: Gradient Gels
Gradient Gels Both linear and exponential gradient gels can be poured in the dual-gel caster. We recommend using a Hoefer SG Series Gradient Maker. Gradient gels are poured from the top of the caster with a cannula if using the provided... - Page 22 Prepare the monomer solution Optional: Adjust the higher- Calculate the volume of monomer solution needed. percentage acrylamide solution Divide the total volume in half and prepare this to 15% (w/v) sucrose or 25% volume of both the higher- and lower-percentage (v/v) glycerol to improve acrylamide solutions.
-
Page 23: Sample Preparation And Loading
Sample Preparation and Loading The sample can be loaded either while the Note: With Coomassie Blue ™ it is possible to detect 1 µg sandwich is in the caster or after the upper of protein in a single band. buffer chamber is attached. When loading With the more sensitive silver samples while using divider plates, the samples stains, it is possible to detect... - Page 24 Note: Once the samples are Heat the tube in boiling water for 90 seconds, then in the wells, take care to not allow to cool to room temperature. Treated samples jar the sandwiches so that can be stored at -40 to -80 °C for future runs. the samples are not spilled or mixed.
-
Page 25: Final Assembly
Final Assembly Fig 7. Attaching gel sandwiches Upper buffer chamber to the upper buffer chamber. If the assembly leaks, take it to a sink and partially release Rinse both buffer chambers with water and distilled the cams to allow buffer to water thoroughly before each use. drain out of the upper chamber. Disassemble, check alignment Clean away any gel adhering to the exterior of the of all sandwich components,... - Page 26 Use a pipette to carefully fill each slot above the sample wells with buffer to minimize disturbing the samples. Then pour 100 ml of buffer into the chamber, directing the buffer stream toward the side wall. Check that no buffer leaks around the gasket. Lower buffer chamber Place a magnetic spin bar into the lower buffer chamber (LBC) and place the unit on a magnetic...
- Page 27 Fig 8. Approximate circulator bath temperature setting. Set the circulator bath temperature setting lower than the desired run temperature by the amount indicated on the graph. This should be checked at three points. power supply setting, W Example: Run parameters: 200 V, 0.05 A (50 mA) 1.
- Page 28 Use a steady hand to avoid disturbing Approximate volumes required: the samples: Grasp the assembly in the casting stand SE600 4.5 liters by the upper buffer chamber and carefully lower it SE660 7.0 liters into the lower chamber.
- Page 29 Important assembly notes: • IEF Runs: The buffer level in the lower buffer chamber must never reach the upper buffer chamber; maintain at least 2 cm of clearance. • Do not fill the upper or lower chamber above the recommended levels illustrated in Fig 9. Remove buffer in contact with the electrode posts.
-
Page 30: Separating The Sample
The starting voltage for a 1.5 mm slab gel connected to a power supply set to 25 mA is usually 80 to 90 V (using the SE600 with a Laemmli discontinuous buffer system for SDS gels). The final voltage is typically 250 to 400 V, depending on the length of the gel. - Page 31 Time A run is complete when the tracking dye reaches the bottom of the gel. In a 16-cm gel (SE600), a 1.5-mm thick Laemmli SDS gel, run at 25 mA/gel without cooling, usually requires 5 hours. Longer gels require proportionally more time; separations in 24-cm gels (SE660) require 8 hours.
- Page 32 Unscrew the clamps from the sandwiches and remove. Gently loosen and then slide away both spacers. Use the Hoefer Wonder Wedge Gel Plate Separation tool to separate the plates. Note: Use only flexible plastic Carefully lift the glass plate with the gel attached.
-
Page 33: Care And Maintenance
Care and Maintenance Cleaning Immediately after each use, rinse the upper and • Do not autoclave or heat any part above 45 °C. lower buffer chambers with water and then • Do not use organic solvents, rinse thoroughly with distilled water. Handle abrasives, strong cleaning the upper buffer chamber with care to prevent solutions, or strong acids or... -
Page 34: Troubleshooting
Troubleshooting problem possible cause remedy Gel sandwich Dirty or damaged Plates, spacers, and the gasket must be completely clean. leaks while components Wash if necessary. casting Replace chipped plates (especially if chipped near the spacers). Check the caster gasket for cuts or cracks and replace if necessary. - Page 35 problem possible cause remedy Upper buffer Mis-aligned parts Check that the glass plates, spacers, and clamps are aligned chamber leaks and fit snugly into the upper chamber gasket. Check that both gaskets are centered and that the positioning ridges fit inside the grooves. Dirty or damaged Check that the gasket is not damaged or pinched.
- Page 36 problem possible cause remedy Bands are Incomplete gel Degas the stacking-gel solution and avoid trapping air skewed or preparation and bubbles under the comb teeth. distorted polymerization Irregular interface Overlay the running gel with water-saturated butanol before between stacking polymerization begins, to avoid forming an uneven gel and running gels surface.
- Page 37 problem possible cause remedy Poor band Running Begin electrophoresis as soon as the sample is loaded to resolution conditions prevent low molecular weight species from diffusing. Conduct the separation at a lower current or voltage setting to reduce Joule heating. Reagent quality Use only the highest-quality reagents.
-
Page 38: Bibliography
Protocols in Molecular Biology. (Ausubel, F. A., et al., eds.), OSC 10.6.1–10.6.8 (1991). SDS Polyacrylamide Gel Electrophoresis and Isoelectric Focusing Handbook (80-6013-88), Hoefer, Inc. (2001). Non-denaturing gel systems Reisfeld, R. A., et al., Acidic buffer system for resolution of cationic proteins. Nature. 195, 281 (1962). - Page 39 Shapiro, A. L., and Maizel J. V. Jr., Molecular weight estimation of polypeptides by SDS-polyacrylamide gel electrophoresis: further data concerning resolving power and general considerations. Anal. Biochem. Jun; 29(3):505–514 (1969). Schaegger, H. and Von Jagow, G., Tricine-sodium dodecyl sulfate-polyacrylamide gel electrophoresis for the separation of proteins in the range from 1 to 100 kDa.
- Page 40 O’Farrell, P. H., High resolution two-dimensional electrophoresis of proteins. J. Biol. Chem. May 25; 250(10):4007–4021 (1975). Bjellqvist, B., et al., Isoelectric focusing in immobilized pH gradients: principle, methodology and some applications. J. Biochem. Biophys. Methods 6, 317–339 (1982). Görg, A, et al., The current state of two-dimensional electrophoresis with immobilized pH gradients.
-
Page 41: Ordering Information
Laminated silicone rubber gaskets for casting stand SE6009 Buffer dam SE6032 Upper buffer chamber for SE600, SE660 SE6054 Lid with high voltage leads for SE600, SE660 SE6056 High-voltage safety lead set SE6056-HV Lower buffer chamber for SE600 SE6150 Heat exchanger for SE600 and SE660 SE6160 •... - Page 42 Glass tube with 2 grommets SE6160-5 for heat exchanger/lower electrode assembly Spirit level SER11 Gel Seal, 1/4 oz. tube SE6070 safety lid with cables SE6056 upper buffer chamber SE6054 heat exchanger SE6160 model reorder # SE600 SE6150 SE660 SE6650 •...
- Page 43 Gel casters For 1 or 2 gels: Dual Gel Caster, basic, 2 gels, 18 cm wide SE6015 I ncludes: 2 blank gaskets for 1 or 2 gels. (One included with each SE600 unit.) For up to 4 gels: Gel Caster Kit, 4 gels, 18 × 16 cm or 18 × 8 cm SE675 I ncludes: 8 glass plates, 3 space-saver plates, 5 filler sheets, 100 sheets of wax paper, Spacer-Mate alignment template, and filler plugs.
- Page 44 product quantity code number Clamps and cams Clamp and Cam Kit, four 16 cm clamps and 8 black cams SE6003UK Replacement thumbscrews for clamps SE6003U-2 Cams, black, for clamps with cam holes SE6005L Clamp assemblies, 16 cm SE6003U Clamp assemblies, 8 cm SE6403U Glass plates 18 × 16 cm Glass plates...
- Page 45 Combs number thickness width of wells (mm) (mm) quantity code number 0.75 SE511-10-.75 1.00 SE511-10-1.0 1.50 SE511-10-1.5 0.75 SE511-12-.75 1.00 SE511-12-1.0 1.50 SE511-12-1.5 0.75 SE511-15-.75 1.00 SE511-15-1.0 1.50 SE511-15-1.5 0.75 SE511-20-.75 1.00 SE511-20-1.0 1.50 SE511-20-1.5 0.75 SE511-28-.75 1.00 SE511-28-1.0 1.50 SE511-28-1.5 Comb depth 15 mm;...
- Page 46 1.00 SE6118-2-1.0 1.50 SE6118-2-1.5 0.75 SE6119-2-.75 1.00 SE6119-2-1.0 1.50 SE6119-2-1.5 0.75 SE6619-2-.75 1.00 SE6619-2-1.0 1.50 SE6619-2-1.5 Companion products Hoefer SE100 Plate Mate washing and storage unit SE100 QuickFit connectors, female 3/8" QF3/8 QuickFit connectors, male 3/8" QFX3/8 •...
- Page 47 Hoefer, Inc. 32 Scotland Blvd, Ste. 9, Bridgewater, MA02324, USA Toll Free: 1-800-813-0488 Phone:1-508-807-4665 E-mail: support@hoeferinc.com Web: www.hoeferinc.com Hoefer is a registered trademark of Hoefer, Inc. © 2023 Hoefer, Inc. — All rights reserved.
Need help?
Do you have a question about the SE600 and is the answer not in the manual?
Questions and answers