Table of Contents
Advertisement
Quick Links
Advertisement
Table of Contents

Related Manuals for FRENCH FITNESS FF-T900


Summary of Contents for FRENCH FITNESS FF-T900
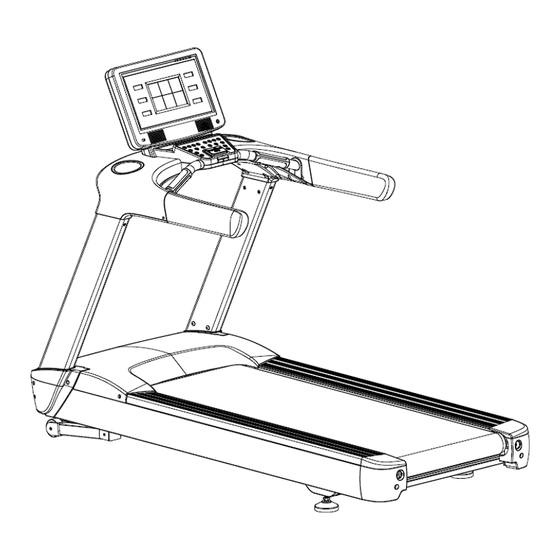
- Page 1 FF-T900 FRENCH FITNESS T900 TREADMILL W/18.5" TOUCHSCREEN ASSEMBLY MANUAL...
-
Page 2: Table Of Contents
T ABL E OF CONT E NT S TREADMILL COMPONENTS SCHEMATIC ........ 4 WARNINGS AND SAFETY INSTRUCTIONS ......5 TREADMILL INSTALLATION PROCEDURE ......6 SCHEMATIC DIAGRAM OF THE ELECTRONIC SURFACE PLATE ..............7 HARDWARE SPECIFICATIONS ........... 8 DISPLAY INTERFACE FEATURES ........8 CAMPAIGN PAGE ACCESS &... -
Page 3: Treadmill Components Schematic
T RE AD MI L L COMPONE NT S SCHE MAT I C Treadmill Parts Details... -
Page 4: Warnings And Safety Instructions
WARNI NG AND SAFE T Y I NST RUCT I ONS WARNING HAZARD Follow these instructions to prevent potential harm to you and others. Please be sure to read the entire contents of this User's Manual before operating and using the machine. Do not use the heart rate device together with other wireless heart rate devices. -
Page 5: Treadmill Installation Procedure
T RE AD MI L L I NST AL L AT I ON PROCE D U RE Step 1:Installation of left and right columns and threading of sensor wires As shown in the diagram, after taking out the running platform, install the left and right columns on top of the running platform according to the tips shown in the diagram, and when installing the right column, pass the sensor wire through the center of the column. -
Page 6: Schematic Diagram Of The Electronic Surface Plate
SCHEMATIC DIAGRAM OF THE ELECTRONIC SURFACE PLATE Step 3:Small Electronic Meter Installation Place the small electronic device with the large electronic platform as shown in the diagram. Pay attention to the wire of the small electronic device and plug it properly with the large electronic platform. -
Page 7: Hardware Specifications
1. Hardware Specifications 1. 18.5” TFT Colored Screen 2. TFT Display Screen, with capacitive touch screen 3. With 1 USB interface and 1 audio headphone port 4. Supports online music, video, and wireless internet access. 5. It is advised to put the wireless router and treadmill in the same room to ensure a strong WIFI signal connection. - Page 8 2.2 User Login Page...
- Page 10 Operation instructions: 1. SMS Login - Enter your cell phone number, click the “Get” button, enter the received SMS verification code, and click the login button below to complete the login process, as in Figure-2; 2. WeChat Login - Click the “WeChat Login” icon button on the right side, scan the QR code on the screen with the WeChat Scan function of your cell phone, and complete the following steps on your cell phone to complete the login process, as shown in Figure-3;...
-
Page 11: Campaign Page Access & Operating Instructions
2. There are 7 settings: Application Setting, Backlight, Machine Specs, Install Apps, Uninstall Apps, Language, System Settings, as shown in Figure-9. Language option includes: Simplified Chinese, English, Spanish, Portuguese, Thai, as shown in Figure- 3. Campaign Page Access & Operating Instructions 3.1 Quick Start Mode... - Page 14 Operation instructions: In the standby page, tap the home button on the leftmost side of the bottom navigation bar to enter the quick start page, and then tap the card in the middle of the screen to open the sport page.
- Page 15 Operation instructions: Click the "Target Mode" button in the navigation bar at the bottom of the standby page to enter the target mode selection page. The target mode includes three modes of operation, namely time target mode, distance target mode and calorie target mode. As shown in Figure-20. 3.2.1 Time Operation instructions: 1.
- Page 16 Operation instructions: 1. The movement started in distance mode will end automatically when the movement distance reaches the target value, or you can also press the stop button to terminate the exercise beforehand; 2. The initial value of time target is 31 Km, and the setting range is 1~99.9 Km; 3.
- Page 17 3.3 Program Mode...
- Page 19 Operation instructions: 1. The program mode is to set the speed and slope segment values and set the target time of the movement before the start of the movement, and the system will automatically adjust the movement speed and slope according to the pre-set speed and slope segment values at the right time after the movement starts.
- Page 20 3.4.1 Reality Mode...
- Page 21 Operation instructions: 1. Click the "Reality Mode" button on the map mode page to enter the reality mode selection page; 2. The system provides 4 preset program categories, which are Island Mode, Grassland Mode, Wilderness Mode and Mountain Mode; 3. The default time is 60 minutes, and the range of exercise time is 5~99 minutes; 4.
- Page 22 3.4.3 Creating a Tournament...
- Page 23 Operation instructions: To create an event, you need to complete the following steps: 1. Input event name and password; 2. Set Starting Point - search for the location you want to locate, then long press any point on the map, when the green start icon appears, finish setting up starting point; 3.
- Page 24 3.5 Entertainment Page Operation instructions: 1. Select the "Entertainment" button in the navigation bar at the bottom of the homepage to enter the entertainment mode. 2. Entertainment mode will show the third-party apps pre-installed in the current device (the app icons here will be different according to the system pre-installed, there is no mandatory restriction);...
- Page 25 Operation instructions: 1. Select "Sports Data Record" in the navigation bar of the home page to enter the Sports Data Center page. The chart on the right shows the comparison between the current month and the previous month's data by day, which will be switched according to the month selected by the user;...
-
Page 26: Functional Use Of Treadmills
FU NCT I ONAL U SE OF T RE AD MI L L S Running Exercise 1. It enhances physical fitness, reduces fat, and strengthens the function of heart, lungs and circulatory system. 2. Running exercise can increase the secretion of hormones, which can eliminate the feeling of stress in people. -
Page 27: Routine Maintenance
ROUT I NE MAI NT E NANCE Heart Rate Comparison Chart (Table I) (Safe heart rate zones for different age groups) Heart Rate Counts 实际年龄(周岁) Quantity and quality of exercise The following is the amount of exercise recommended by the American College of Sports Medicine for healthy adults aimed at improving and maintaining cardiorespiratory fitness: -Perform large muscle group, sustained, rhythmic aerobic activity;... - Page 28 Maintenance of Running Boards and Belts a. Under normal use (2 hours of daily use), maintenance should be performed again 1 month after the last lubrication; b. Pull up the running belt and lubricate between the belt and the running surface, do not overdo it to avoid excess lubricant spillage when the belt is running.
-
Page 29: Maintenance Terms & Conditions
MAI NT E NANCE T E RMS & COND I T I ONS Other Instructions: The running belt adjustment screw is located on the end cap at the back of the running belt, both sides of the screw must be evenly tensioned, usually encountered running belt slippage, must be clockwise tensioned 1/8 turn, and then observe whether it slips, if it still slips and then tighten 1/8 turn until no longer slippage. -
Page 30: Common Systems Problems & Troubleshooting
COMMON SYSTEMS PROBL EMS & TROUBL ESHOOTI NG Parts and Services ● Please contact the dealer or the Company. ● The Company is not responsible for extended service arranged by the merchant. Common Systems Problems & Troubleshooting Problem Possible Cause Troubleshooting - The power plug is not - Re-plug... -
Page 31: Questionnaire
QU E ST I ONNAI RE Customer Name: Date of Purchase: Age: Sex: Customer Address: Contact Phone No.: Cell Phone: Dealer Name: Contact Person: Dealer Address: Dealer Contact Phone No.: Machine Model No.: Factory No.: Body No.: Marital Status: Single Married with Children Other... -
Page 32: Warranty Card
WARRANT Y CARD Advertisement Other Warranty Card Serial Maintenance Repair Reason User Remarks Date/Time... -
Page 33: Machine Specifications
MACHI NE SPE CI FI CAT I ONS ▪ Maximum load: 400 lbs (180kg); ▪ Power supply: 110V AC, 50Hz; ▪ Rated power: AC3.0KW; ▪ Line control: PWM drive control contains built-in safety protection device; ▪ Electronic meter: LED display screen ▪...
Need help?
Do you have a question about the FF-T900 and is the answer not in the manual?
Questions and answers