Advertisement
Quick Links
Quick-Start Instructions - Undercounter Models
• Check electrical specifications
—115 V, 60 Hz, 1 phase
—Minimum circuit ampacity: 15A
—Maximum size of branch circuit overcurrent device: 15A
• Installation Specifications- ambient temp must not exceed 39 C (100 F)
• The front panel must be kept free of any cabinet trim or obstructions to ensure proper ventilation of the
refrigeration system
• Installation instructions:
—Carefully tip the unit back to expose the foot pad holes. Screw leveling legs in all the way to stop.
Adjust as needed
—Install shelves by placing top notch of shelf bracket into pilaster, then bottom notch
• Set up product simulation bottle
—Remove bottle and its top and fill bottle with:
- 50/50 solution of glycerine and water for refrigerators
- 60/40 solution of glycerine and water for freezers
—Let bottle chill in refrigerator or freezer before inserting probe
• Press power switch on to turn unit on
• Set high and low temperature alarms
—For LED control units, press SET and UP arrows simultaneously until L1 is displayed
- Use the UP and DOWN arrows to display AIL (low temperature alarm)
1. Press SET to display low alarm temperature and use UP and DOWN arrows to set the alarm
temperature.
2. Press SET to accept
- Use the UP and DOWN arrows to display AIH (high temperature alarm)
1. Press SET to display high alarm temperature and use UP and DOWN arrows to set the alarm
temperature.
2. Press SET to accept
—For Touchscreen control units, touch the
- Change the high alarm by touching the number displayed in the box to the right of the HIGH label
1. Type your desired value in the keypad displayed to the right of the display box or use the up
and down arrows to scroll to the desired temperature; press
- Change the low alarm by touching the number displayed in the box to the right of the LOW label
1. Type your desired value in the keypad displayed to the right of the display box or use the UP
and DOWN arrows to scroll to the desired temperature; press
• If this is a keypad unit
—You must connect the battery prior to placing the unit into service (see Operation Manual)
—The default access code is 1-2-3-4-5-6 (ENTER) (see Operation Manual for instructions to change access
code)
• If desired, change Celsius/Fahrenheit display (see Operation Manual)
icon in the lower left corner of the screen
to store new value
to store new value
01099886R01
Advertisement

Related Manuals for Follett Performance Plus


Summary of Contents for Follett Performance Plus
- Page 1 Quick-Start Instructions - Undercounter Models • Check electrical specifications —115 V, 60 Hz, 1 phase —Minimum circuit ampacity: 15A —Maximum size of branch circuit overcurrent device: 15A • Installation Specifications- ambient temp must not exceed 39 C (100 F) • The front panel must be kept free of any cabinet trim or obstructions to ensure proper ventilation of the refrigeration system •...
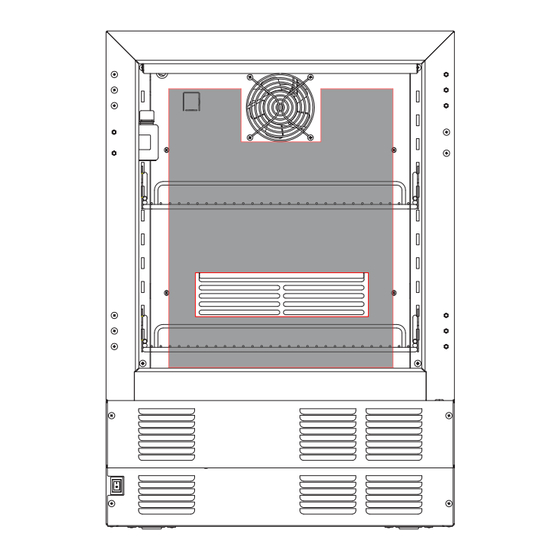
- Page 2 Product Loading Guidelines for Optimal Temperature Performance Maintaining optimal temperature relies on good air circulation, which can be achieved by ensuring that the fan grill and return vent are visible and by loading your refrigerator or freezer with 2” of clearance on the top and each side. SAFE ZONE - STORE PRODUCT WITHIN THIS AREA KEEP CLEAR 2”...
Need help?
Do you have a question about the Performance Plus and is the answer not in the manual?
Questions and answers