Advertisement
Quick Links
Advertisement

Related Manuals for Knight Haven Team+


Summary of Contents for Knight Haven Team+
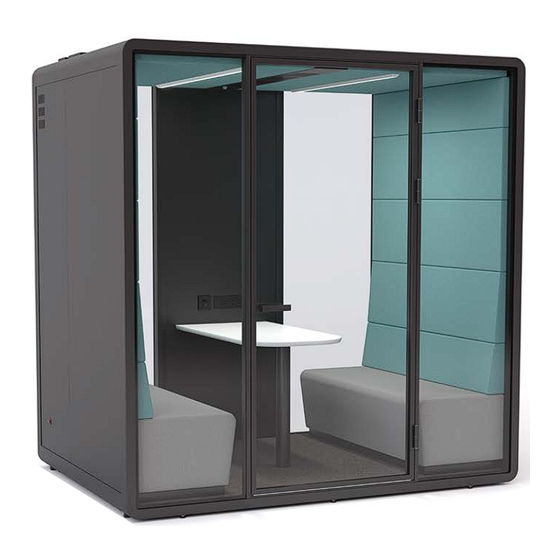
- Page 1 Haven Team+ INSTRUCTION MANUAL...
- Page 2 • If your assembled pod needs relocating to an off-site location, please contact Knight and we will put you in touch with our certified installers. TRANSPORTATION • For the safe transportation of pod crates, an enclosed transport vehicle must be SAFETY used to shield the packaging from the elements.
-
Page 3: Cleaning And Maintenance
CLEANING & MAINTENANCE To preserve the appearance of your pod, regular cleaning and maintenance are essential. • Use a damp cloth to dust laminate surfaces. • For fabric and PET panels, vacuum regularly with low suction using an upholstery attachment to remove dust and maintain the pod’s aesthetic appeal. •... - Page 4 Parts Panels 1. 1 x Top Panel 1 2. 1 x Top Panel 2 3. 1 x Top Upholstered Panel LEFT (L - 1 - R) (L - 1 - R) 4. 1 x Bottom Panel 1 5. 1 x Bottom Panel 2 6.
- Page 5 Parts 8. 8 x Arc Rail 9. 2 x Top Arc Rail 10. 2 x Bottom Arc Rail with (L-U & R-U) Castors and Feet (L-D & R-D) 7. 1 x Carpet 11. 2 x Top Rail 12. 2 x Bottom Rail with Feet Haven Team+ INSTRUCTION MANUAL officepods.co.nz...
- Page 6 Parts 13. 1 x Door Frame 14. 1 x Door 15. 4 x Glass Panel 16. 1 x Back Panel Frame 17. 1 x Back Panel Haven Team+ INSTRUCTION MANUAL officepods.co.nz...
- Page 7 Parts 18. 1 x Left Panel 1 19. 1 x Left Panel 2 20. 1 x Right Panel 1 21. 1 x Right Panel 2 22. 8 x Upholstered Panels (L1) (L1) (R1) (R1) & 2x Bench Haven Team+ INSTRUCTION MANUAL officepods.co.nz...
- Page 8 Parts Rails 23. 2 x Back Tall Rail 24. 2 x Front Tall Rail 25. 4 x Window Rail 26. 4 x Window Edge 27. 4 x Back Panel Edges 28. 4 x Window Seal Haven Team+ INSTRUCTION MANUAL officepods.co.nz...
- Page 9 Parts Other Components 29. 1 x Light Sensor 30. 1 x Light 31. 1 x Door Handle 32. 1 x Door Handle Silicon 33. 1 x Desk Leg Sealing Strip 34. 1 x Desk Bracket 35. 1 x Desk 36. 1 x Door Edge 37.
- Page 10 Parts Screws & Tools - Supplied 39. 48 x M5x15 40. 7 x M5x20 41. 5 x M5x32 42. 3 x Washer (spares) (Hexagon Screw) (Self Tapping Screw) (Self Tapping Screw) 43. 1 x 17mm Wrench 44. 1 x M3 Allen Key 45.
- Page 11 Parts Screws & Tools - Recommended Soft Mallet 17mm Combination Wrench 14mm Combination Wrench 13mm Combination Wrench M5 Allen key Drill Bit Square Crowbar Power Drill Glass Suction Haven Team+ INSTRUCTION MANUAL officepods.co.nz...
- Page 12 NOTE: Remove protective tape on ALL metal components. Haven Team+ INSTRUCTION MANUAL officepods.co.nz...
- Page 13 Haven Team+ INSTRUCTION MANUAL officepods.co.nz...
- Page 14 BACK VIEW NOTE: Use Wrench and semi-tighten. Make sure the rails are on 90°. Repeat on all steps that include tightening. 90° 90° Haven Team+ INSTRUCTION MANUAL officepods.co.nz...
- Page 15 Haven Team+ INSTRUCTION MANUAL officepods.co.nz...
- Page 16 NOTE: Arc Rail (9. & 10.) edges need to align with the groove of Top (11.), Bottom (12.) and Tall Rails (23. & 24.). 90° 90° Haven Team+ INSTRUCTION MANUAL officepods.co.nz...
- Page 17 Haven Team+ INSTRUCTION MANUAL officepods.co.nz...
- Page 18 Haven Team+ INSTRUCTION MANUAL officepods.co.nz...
- Page 19 BACK VIEW 90° Haven Team+ INSTRUCTION MANUAL officepods.co.nz...
- Page 20 Haven Team+ INSTRUCTION MANUAL officepods.co.nz...
- Page 21 NOTE: Repeat Steps 7-10 on left side. Haven Team+ INSTRUCTION MANUAL officepods.co.nz...
- Page 22 Haven Team+ INSTRUCTION MANUAL officepods.co.nz...
- Page 23 BACK VIEW Haven Team+ INSTRUCTION MANUAL officepods.co.nz...
- Page 24 Haven Team+ INSTRUCTION MANUAL officepods.co.nz...
- Page 25 Haven Team+ INSTRUCTION MANUAL officepods.co.nz...
- Page 26 Haven Team+ INSTRUCTION MANUAL officepods.co.nz...
- Page 27 Haven Team+ INSTRUCTION MANUAL officepods.co.nz...
- Page 28 Haven Team+ INSTRUCTION MANUAL officepods.co.nz...
- Page 29 BACK VIEW NOTE: Glass suction tool required. Haven Team+ INSTRUCTION MANUAL officepods.co.nz...
- Page 30 BACK VIEW NOTE: Using glass suction tool, move glass panels all the way to the edge along the rail, to enable space for middle panel in the next step. Haven Team+ INSTRUCTION MANUAL officepods.co.nz...
- Page 31 BACK VIEW Haven Team+ INSTRUCTION MANUAL officepods.co.nz...
- Page 32 BACK VIEW Haven Team+ INSTRUCTION MANUAL officepods.co.nz...
- Page 33 NOTE: While puting the panel in place, make sure you put cables through the hole in the Top rail. Haven Team+ INSTRUCTION MANUAL officepods.co.nz...
- Page 34 NOTE: Connect all the cables on the top of the pod. Haven Team+ INSTRUCTION MANUAL officepods.co.nz...
- Page 35 BACK VIEW NOTE: Use glass suction tool to move the left and right glass panel towards back panel frame. Haven Team+ INSTRUCTION MANUAL officepods.co.nz...
- Page 36 NOTE: Use wooden block to knock the back pandel side edges in. Haven Team+ INSTRUCTION MANUAL officepods.co.nz...
- Page 37 NOTE: Use wooden block to knock the back panel top and bottom edges in. Haven Team+ INSTRUCTION MANUAL officepods.co.nz...
- Page 38 BACK VIEW Haven Team+ INSTRUCTION MANUAL officepods.co.nz...
- Page 39 BACK VIEW Haven Team+ INSTRUCTION MANUAL officepods.co.nz...
- Page 40 BACK VIEW NOTE: Use wooden block to knock the window edges in. Haven Team+ INSTRUCTION MANUAL officepods.co.nz...
- Page 41 NOTE: Make sure the light and sensor cables protrude through the ceiling panels. Haven Team+ INSTRUCTION MANUAL officepods.co.nz...
- Page 42 NOTE: Move pod to final location and wind down the feet, to make pod stable. Haven Team+ INSTRUCTION MANUAL officepods.co.nz...
- Page 43 NOTE: Wind the feet down enough to lift the castors off the floor. Haven Team+ INSTRUCTION MANUAL officepods.co.nz...
- Page 44 NOTE: Make sure that brackets clip onto the ceiling. Haven Team+ INSTRUCTION MANUAL officepods.co.nz...
- Page 45 NOTE: Place sensor through ceiling cover and secure it on the other side. Haven Team+ INSTRUCTION MANUAL officepods.co.nz...
- Page 46 NOTE: Slide ceiling cover under upholstered panel on left side and screw it on the ceiling on the right side. Haven Team+ INSTRUCTION MANUAL officepods.co.nz...
- Page 47 Haven Team+ INSTRUCTION MANUAL officepods.co.nz...
- Page 48 NOTE: See following step to insert light. Connect wiring before inserting lights into Top PET Panel. Haven Team+ INSTRUCTION MANUAL officepods.co.nz...
- Page 49 Haven Team+ INSTRUCTION MANUAL officepods.co.nz...
- Page 50 NOTE: Repeat step 17. and 18. for the front glass panels. Haven Team+ INSTRUCTION MANUAL officepods.co.nz...
- Page 51 Haven Team+ INSTRUCTION MANUAL officepods.co.nz...
- Page 52 Haven Team+ INSTRUCTION MANUAL officepods.co.nz...
- Page 53 NOTE: Use glass suction tool to move the left and right glass panel towards back panel frame. Haven Team+ INSTRUCTION MANUAL officepods.co.nz...
- Page 54 Haven Team+ INSTRUCTION MANUAL officepods.co.nz...
- Page 55 Haven Team+ INSTRUCTION MANUAL officepods.co.nz...
- Page 56 NOTE: Use wooden block to knock the window edges in. Haven Team+ INSTRUCTION MANUAL officepods.co.nz...
- Page 57 Haven Team+ INSTRUCTION MANUAL officepods.co.nz...
- Page 58 NOTE: Make sure that brackets clip onto the side panel. Haven Team+ INSTRUCTION MANUAL officepods.co.nz...
- Page 59 Haven Team+ INSTRUCTION MANUAL officepods.co.nz...
- Page 60 NOTE: Repeat Step 46 and Step 47 on all other panels. Haven Team+ INSTRUCTION MANUAL officepods.co.nz...
- Page 61 Haven Team+ INSTRUCTION MANUAL officepods.co.nz...
- Page 62 Haven Team+ INSTRUCTION MANUAL officepods.co.nz...
- Page 63 Haven Team+ INSTRUCTION MANUAL officepods.co.nz...
- Page 64 NOTE: Cut the silicon strip to fit in. Haven Team+ INSTRUCTION MANUAL officepods.co.nz...
- Page 65 Haven Team+ INSTRUCTION MANUAL officepods.co.nz...
- Page 66 Haven Team+ INSTRUCTION MANUAL officepods.co.nz...
- Page 67 Haven Team+ INSTRUCTION MANUAL officepods.co.nz...
- Page 68 Completed Haven Team+ INSTRUCTION MANUAL officepods.co.nz...
- Page 69 Your pod experience starts here... info@officepods.co.nz info@knightgroup.co.nz officepods.co.nz knightgroup.co.nz...
Need help?
Do you have a question about the Haven Team+ and is the answer not in the manual?
Questions and answers