Table of Contents
Advertisement
Available languages
Available languages
Quick Links
Advertisement
Table of Contents

Subscribe to Our Youtube Channel
Related Manuals for PNI PoC 1700


Summary of Contents for PNI PoC 1700
- Page 1 PNI PoC 1700 GSM/LTE Radio...
-
Page 2: Table Of Contents
Contents English ..... Български ..... Deutsch ..... Español ..... Français ..... Magyar ..... Italiano ..... Nederlands ..... Polski ..... Romana ..... -
Page 3: English
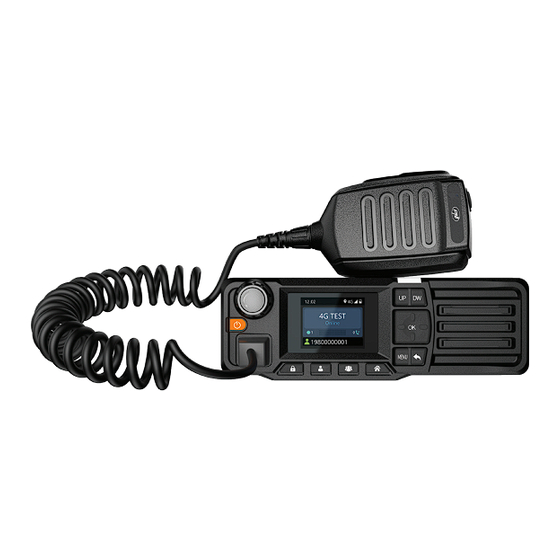
SIM card installation Open the SIM card slot located at the top of the radio. Insert the SIM card into the slot in the correct position. Close the SIM slot in place. Notes: Install the SIM card only with the radio turned off. Avoid touching the metal part of the SIM card to avoid losing information. - Page 4 Radio overview 1. Volume control button 2. On/Off button. Press and hold the button for 3 seconds to turn on the radio. When the radio is on, press the button for 3 seconds, two options will be displayed on the screen, select “Shut down” or “Restart”. Briefly press this button to confirm an option while in the menu.
- Page 5 8. Loudspeaker 9. OK key 10. Short press the key to turn on/off the screen. 11. Member list 12. Group list 13. Main group. Quick return to the main interface 14. Menu key. System settings 15. Back key. Short press to return to the previous interface. Long press to send an SOS signal.
- Page 6 If the account Yesta is incorrect, you can manually set the account information using the management platform. For details, please contact the producer: suport@pni.ro After successfully logging into the account, you can use the PTT function and the other functions of the radio.
- Page 7 Account settings When the radio screen is on and the radio is in standby, press the Up or Down key to select the account settings option. Press the OK key or short press the power key to access the account settings interface. Settings menu When the radio’s screen is on, long press the MENU key to access the settings menu: network settings, wireless network settings, Bluetooth, location,...
- Page 8 SOS signal Long press the MENU key to send an SOS signal. Connecting to the WLAN network Access the Wireless network menu and make the settings for the wireless connection: The options “Connected network/Available network nearby/Configure network” will be displayed on the screen. Select “Available network nearby”. The list of nearby wireless networks will appear on the screen.
- Page 9 LCD screen 1.77 inch Screen resolution 160 x 128 px Supply voltage 13.8V ROM memory RAM memory 4GB LPDDR2 Loudspeaker 8 Ohm 3W Bluetooth Wi-Fi 802.11b/g/n WiFi frequency 2.4GHz WiFi transmission power 100mW GPS/Glonass/Beidou Protection grade IP54 Bluetooth Operating system Android Dimensions 170x 54 x 39 mm...
-
Page 10: Български
Инсталиране на SIM карта Отворете слота за SIM карта, който се намира в горната част на радиото. Поставете SIM картата в слота в правилната позиция. Затворете SIM слота на място. Бележки: Инсталирайте SIM картата само при изключено радио. Избягвайте да докосвате металната част на SIM картата, за да избегнете загуба на... - Page 11 Преглед на радиото 1. Бутон за контрол на звука 2. Бутон ВКЛ / ИЗКЛ. Натиснете и задръжте бутона за 3 секунди, за да включите радиото. Когато радиото е включено, натиснете бутона за 3 секунди, на екрана ще се покажат две опции, изберете „Изключване“...
- Page 12 7. Клавиш надолу 8. Високоговорител 9. Клавиш OK 10. Натиснете кратко бутона, за да включите/изключите екрана. 11. Списък с членове 12. Групов списък 13. Основна група. Бързо връщане към основния интерфейс 14. Клавиш за меню. Системни настройки 15. Ключ за връщане назад. Натиснете кратко, за да се върнете към предишния...
- Page 13 Ако данните за акаунта са неправилни, можете ръчно да зададете информацията за акаунта, като използвате платформата за управление. За подробности, моля, свържете се с производителя: suport@pni.ro След успешно влизане в акаунта можете да използвате функцията РТТ и другите функции на радиото.
- Page 14 „катинар“, за да изключите екрана. Когато екранът е изключен, натиснете за кратко същия клавиш, за да включите екрана. Настройки на акаунта Когато екранът на радиото е включен и радиото е в режим на готовност, натиснете клавиша Нагоре или Надолу, за да изберете опцията за настройки...
- Page 15 с членове. Натиснете клавиша Нагоре или Надолу, за да потърсите член в тази група, след което натиснете клавиша OK или натиснете кратко бутона за захранване, за да изберете член. След като изберете член, натиснете клавиша РТТ на микрофона, за да влезете в режим на...
- Page 16 Технически спецификации GSM: Band 2/3/5/8 WCDMA: Band 1/2/5/8 мрежа TDD-LTE: Band 38/40 FDD-LTE: band 1/2/3/5/7/8/20/28 Приносител TDD CAT4, FDD CAT4 LCD екран 1.77 inch Резолюция на екрана 160 x 128 px Захранващо напрежение 13.8V ROM памет RAM памет 4GB LPDDR2 Високоговорител...
-
Page 17: Deutsch
SIM-Karteninstallation Öffnen Sie den SIM-Kartensteckplatz oben am Radio. Stecken Sie die SIM-Karte in der richtigen Position in den Steckplatz. Schließen Sie den SIM-Steckplatz an Ort und Stelle. Hinweise: Installieren Sie die SIM-Karte nur bei ausgeschaltetem Radio. Berühren Sie nicht den Metallteil der SIM-Karte, um Yestenverlust zu vermeiden. Schützen Sie die SIM-Karte vor elektromagnetischen Feldern. - Page 18 Radioübersicht 1. Lautstärkeregler 2. Ein-/Aus-Taste. Halten Sie die Taste 3 Sekunden lang gedrückt, um Yess Radio einzuschalten. Wenn Yess Radio eingeschaltet ist, drücken Sie die Taste 3 Sekunden lang. Auf dem Bildschirm werden zwei Optionen angezeigt. Wählen Sie „Herunterfahren“ oder „Neustart“. Drücken Sie diese Taste kurz, um eine Option im Menü...
- Page 19 7. Abwärtstaste 8. Lautsprecher 9. OK-Taste 10. Drücken Sie die Taste kurz, um den Bildschirm ein-/auszuschalten. 11. Mitgliederliste 12. Gruppenliste 13. Hauptgruppe. Schnelle Rückkehr zur Hauptoberfläche 14. Menütaste. Systemeinstellungen 15. Zurück-Taste. Kurz drücken, um zur vorherigen Oberfläche zurückzukehren. Lang drücken, um ein SOS-Signal zu senden. Im Anrufmodus kurz drücken, um zur Mitgliederliste oder zur anfänglichen Gruppenliste zurückzukehren.
- Page 20 Wenn die KontoYesten falsch sind, können Sie die Kontoinformationen manuell über die Verwaltungsplattform festlegen. Für Einzelheiten wenden Sie sich bitte an den Hersteller: suport@pni.ro Nach erfolgreicher Anmeldung beim Konto können Sie die PTT-Funktion und die anderen Funktionen des Radios verwenden.
- Page 21 Kontoeinstellungen Wenn der Radiobildschirm eingeschaltet und Yess Radio im Standby-Modus ist, drücken Sie die Auf- oder Ab-Taste, um die Option „Kontoeinstellungen“ auszuwählen. Drücken Sie die OK-Taste oder drücken Sie kurz die Ein-/ Aus-Taste, um auf die Benutzeroberfläche der Kontoeinstellungen zuzugreifen. Einstellungsmenü...
- Page 22 Taste oder drücken Sie kurz die Einschalttaste, um ein Mitglied auszuwählen. Drücken Sie nach der Auswahl eines Mitglieds die PTT-Taste am Mikrofon, um in den Anrufmodus zu wechseln. Drücken Sie die PTT-Taste erneut, um einen Anruf mit dem ausgewählten Mitglied einzuleiten. Drücken Sie nach dem Gespräch die Zurück-Taste, um zur Hauptgruppe zurückzukehren.
- Page 23 Technische Daten GSM: Band 2/3/5/8 WCDMA: Band 1/2/5/8 Netzwerk TDD-LTE: Band 38/40 FDD-LTE: band 1/2/3/5/7/8/20/28 Träger TDD CAT4, FDD CAT4 LCD-Bildschirm 1.77 inch Bildschirmauflösung 160 x 128 px Versorgungsspannung 13.8V ROM-Speicher RAM-Speicher 4GB LPDDR2 Lautsprecher 8 Ohm 3W Bluetooth Wi-Fi 802.11b/g/n Wi-Fi-Frequenz 2.4GHz...
-
Page 24: Español
Instalación de tarjeta SIM Abra la ranura para tarjeta SIM ubicaYes en la parte superior de la radio. Inserte la tarjeta SIM en la ranura en la posición correcta. Cierre la ranura SIM en su lugar. Notas: Instale la tarjeta SIM sólo con la radio apagaYes. Evite tocar la parte metálica de la tarjeta SIM para evitar perder información. - Page 25 Descripción general de la radio 1. Botón de control de volumen 2. Boton de encendido / apagado. Mantenga presionado el botón durante 3 segundos para encender la radio. Cuando la radio esté encendiYes, presione el botón durante 3 segundos, se mostrarán dos opciones en la pantalla, seleccione “Apagar”...
- Page 26 7. Tecla abajo 8. Altoparlante 9. Tecla Aceptar 10. Presione brevemente la tecla para encender/apagar la pantalla. 11. Lista de miembros 12. lista de grupos 13. Grupo principal. Regreso rápido a la interfaz principal 14. Tecla de menu. Ajustes del sistema 15.
- Page 27 Para obtener más información, comuníquese con el productor: suport@ pni.ro Después de iniciar sesión correctamente en la cuenta, podrá utilizar la función PTT y las demás funciones de la radio.
- Page 28 Configuraciones de la cuenta Cuando la pantalla de la radio esté encendiYes y la radio esté en espera, presione la tecla Arriba o Abajo para seleccionar la opción de configuración de la cuenta. Presione la tecla OK o presione brevemente la tecla de encendido para acceder a la interfaz de configuración de la cuenta.
- Page 29 nuevamente para iniciar una llamaYes con el miembro seleccionado. Una vez que haya terminado de hablar, presione la tecla Atrás para regresar al grupo principal. Señal de emergencia Mantenga presionaYes la tecla MENÚ para enviar una señal de SOS. Conexión a la red WLAN AcceYes al menú...
- Page 30 Especificaciones técnicas GSM: Band 2/3/5/8 WCDMA: Band 1/2/5/8 TDD-LTE: Band 38/40 FDD-LTE: band 1/2/3/5/7/8/20/28 Portador TDD CAT4, FDD CAT4 pantalla LCD 1.77 inch Resolución de la pantalla 160 x 128 px Tensión de alimentación 13.8V memoria ROM memoria RAM 4GB LPDDR2 Altoparlante 8 Ohm 3W Bluetooth...
-
Page 31: Français
Mise en place de la carte SIM Ouvrez l’emplacement pour carte SIM situé en haut de la radio. Insérez la carte SIM Yesns la fente Yesns la bonne position. Fermez l’emplacement SIM en place. Remarques: Installez la carte SIM uniquement avec la radio éteinte. Évitez de toucher la partie métallique de la carte SIM pour éviter de perdre des informations. - Page 32 Aperçu des radios 1. Bouton de contrôle du volume 2. Bouton marche/arrêt. Appuyez et maintenez le bouton penYesnt 3 secondes pour allumer la radio. Lorsque la radio est allumée, appuyez sur le bouton penYesnt 3 secondes, deux options s’afficheront à l’écran, sélectionnez «...
- Page 33 7. Touche vers le bas 8. Haut-parleur 9. Touche OK 10. Appuyez brièvement sur la touche pour allumer/éteindre l’écran. 11. Liste des membres 12. Liste de groupe 13. Groupe principal. Retour rapide à l’interface principale 14. Touche menu. Les paramètres du système 15.
- Page 34 Si les données du compte sont incorrectes, vous pouvez définir manuellement les informations du compte à l’aide de la plateforme de gestion. Pour plus de détails, veuillez contacter le producteur : suport@pni.ro Après vous être connecté avec succès au compte, vous pouvez utiliser la fonction PTT et les autres fonctions de la radio.
- Page 35 Paramètres du compte Lorsque l’écran de la radio est allumé et que la radio est en veille, appuyez sur la touche Haut ou Bas pour sélectionner l’option des paramètres de compte. Appuyez sur la touche OK ou appuyez brièvement sur la touche marche/arrêt pour accéder à...
- Page 36 passer en mode appel. Appuyez à nouveau sur la touche PTT pour lancer un appel avec le membre sélectionné. Après avoir fini de parler, appuyez sur la touche Retour pour revenir au groupe principal. Signal SOS Appuyez longuement sur la touche MENU pour envoyer un signal SOS. Connexion au réseau WLAN Accédez au menu Réseau sans fil et effectuez les réglages de la connexion sans fil :...
- Page 37 Spécifications techniques GSM: Band 2/3/5/8 WCDMA: Band 1/2/5/8 Réseau TDD-LTE: Band 38/40 FDD-LTE: band 1/2/3/5/7/8/20/28 Porteur TDD CAT4, FDD CAT4 écran LCD 1.77 inch Résolution d'écran 160 x 128 px Tension d'alimentation 13.8V Mémoire ROM Mémoire RAM 4GB LPDDR2 Haut-parleur 8 Ohm 3W Bluetooth Wifi...
-
Page 38: Magyar
SIM kártya beszerelése Nyissa ki a rádió tetején található SIM-kártyanyílást. Helyezze be a SIM-kártyát a nyílásba a megfelelő helyzetben. Csukja be a SIM-nyílást a helyére. Megjegyzések: Csak kikapcsolt rádió mellett helyezze be a SIM-kártyát. Az információvesztés elkerülése érdekében ne érintse meg a SIM-kártya fém részét. - Page 39 Rádió áttekintése 1. Hangerőszabályzó gomb 2. Be/Ki gomb. Nyomja meg és tartsa lenyomva a gombot 3 másodpercig a rádió bekapcsolásához. Ha a rádió be van kapcsolva, nyomja meg a gombot 3 másodpercig, két lehetőség jelenik meg a képernyőn, válassza a „Kikapcsolás” vagy „Újraindítás” lehetőséget. Nyomja meg röviden ezt a gombot egy opció...
- Page 40 7. Le gomb 8. Hangszóró 9. OK gomb 10. Nyomja meg röviden a gombot a képernyő be- és kikapcsolásához. 11. Taglista 12. Csoportlista 13. Főcsoport. Gyors visszatérés a fő felületre 14. Menü gomb. Rendszerbeállítások 15. Vissza gomb. Rövid megnyomásával visszatérhet az előző felületre. SOS jel küldéséhez nyomja meg hosszan.
- Page 41 SIM-kártya megfelelően lett-e behelyezve, vagy be van-e helyezve. Ha a számlaaYestok hely telenek, manuálisan beállíthatja a számlainformációkat a kezelési platform segítségével. A részletekért forduljon a gyártóhoz: support@pni.ro A fiókba való sikeres bejelentkezés után használhatja a PTT funkciót és a rádió egyéb funkcióit. Hangerőszabályozó...
- Page 42 Fiók beállítások Ha a rádió képernyője be van kapcsolva, és a rádió készenléti állapotban van, nyomja meg a fel vagy a le gombot a fiókbeállítások kiválasztásához. Nyomja meg az OK gombot vagy röviden nyomja meg a bekapcsológombot a fiókbeállítási felület eléréséhez. Beállítások menü...
- Page 43 kezdeményezéséhez nyomja meg ismét az adó-vevő gombot. Miután befejezte a beszélgetést, nyomja meg a Vissza gombot a főcsoporthoz való visszatéréshez. SOS jel SOS jel küldéséhez nyomja meg hosszan a MENU gombot. Csatlakozás a WLAN hálózathoz Nyissa meg a Vezeték nélküli hálózat menüt, és adja meg a vezeték nélküli kapcsolat beállításait: A képernyőn megjelennek a „Csatlakozó...
- Page 44 Műszaki adatok GSM: Band 2/3/5/8 WCDMA: Band 1/2/5/8 Hálózat TDD-LTE: Band 38/40 FDD-LTE: band 1/2/3/5/7/8/20/28 Vivő TDD CAT4, FDD CAT4 LCD képernyő 1.77 inch Képernyőfelbontás 160 x 128 px Tápfeszültség 13.8V ROM memória RAM memória 4GB LPDDR2 Hangszóró 8 Ohm 3W Bluetooth Igen Wi-Fi...
-
Page 45: Italiano
Installazione della carta SIM Aprire lo slot della scheYes SIM situato nella parte superiore della radio. Inserire la scheYes SIM nello slot nella posizione corretta. Chiudere lo slot della SIM in posizione. Appunti: Installare la scheYes SIM solo con la radio spenta. Evitare di toccare la parte metallica della scheYes SIM per evitare di perdere informazioni. - Page 46 Panoramica della radio 1. Pulsante di controllo del volume 2. Pulsante di accensione/spegnimento. Tenere premuto il pulsante per 3 secondi per accendere la radio. Quando la radio è accesa, premere il pulsante per 3 secondi, sullo schermo verranno visualizzate due opzioni, selezionare “Spegni”...
- Page 47 7. Tasto Giù 8. Altoparlante 9. Tasto OK 10. Premere brevemente il tasto per accendere/spegnere lo schermo. 11. Lista dei membri 12. Elenco dei gruppi 13. Gruppo principale. Ritorno rapido all’interfaccia principale 14. Tasto menù. Impostazioni di sistema 15. Tasto Indietro. Premere brevemente per tornare all’interfaccia precedente.
- Page 48 Se i Yesti dell’account non sono corretti, puoi impostare manualmente le informazioni dell’account utilizzando la piattaforma di gestione. Per dettagli, contattare il produttore: suport@pni.ro Dopo aver effettuato con successo l’accesso all’account, è possibile utilizzare la funzione PTT e le altre funzioni della radio.
- Page 49 Impostazioni dell’account Quando lo schermo della radio è acceso e la radio è in standby, premere il tasto Su o Giù per selezionare l’opzione delle impostazioni dell’account. Premere il tasto OK o premere brevemente il tasto di accensione per accedere all’interfaccia delle impostazioni dell’account. Menù...
- Page 50 tasto PTT per avviare una chiamata con il membro selezionato. Dopo aver finito di parlare, premere il tasto Indietro per tornare al gruppo principale. Segnale SOS Premere a lungo il tasto MENU per inviare un segnale SOS. Connessione alla rete Wi-Fi Accedere al menu Rete Wireless ed effettuare le impostazioni per la connessione wireless: Sullo schermo verranno visualizzate le opzioni “Rete connessa/Rete...
- Page 51 Specifiche tecniche GSM: Band 2/3/5/8 WCDMA: Band 1/2/5/8 Rete TDD-LTE: Band 38/40 FDD-LTE: band 1/2/3/5/7/8/20/28 Portatore TDD CAT4, FDD CAT4 Schermo a cristalli liquidi 1.77 inch Risoluzione dello schermo 160 x 128 px Tensione di alimentazione 13.8V Memoria ROM Memoria RAM 4GB LPDDR2 Altoparlante 8 Ohm 3W...
-
Page 52: Nederlands
Installatie van simkaart Open de SIM-kaartsleuf aan de bovenkant van de radio. Plaats de SIM-kaart in de juiste positie in de sleuf. Sluit de SIM-sleuf op zijn plaats. Opmerkingen: Installeer de SIM-kaart alleen als de radio uitgeschakeld is. Raak het metalen deel van de SIM-kaart niet aan om te voorkomen Yest er informatie verloren gaat. - Page 53 Radio-overzicht 1. Volumeknop 2. Aan / uit knop. Houd de knop 3 seconden ingedrukt om de radio in te schakelen. Wanneer de radio is ingeschakeld, drukt u gedurende 3 seconden op de knop. Er worden twee opties op het scherm weergegeven: selecteer “Afsluiten”...
- Page 54 7. Omlaag-toets 8. Luidspreker 9. OK-toets 10. Druk kort op de toets om het scherm in of uit te schakelen. 11. Ledenlijst 12. Groepslijst 13. Hoofdgroep. Snelle terugkeer naar de hoofdinterface 14. Menutoets. Systeem instellingen 15. Achtersleutel. Kort indrukken om terug te keren naar de vorige interface. Lang indrukken om een SOS-signaal te verzenden.
- Page 55 Als de accountgegevens onjuist zijn, kunt u de accountinformatie handmatig instellen via het beheerplatform. Neem voor meer informatie contact op met de producent: suport@pni.ro NaYest u succesvol bent ingelogd op het account, kunt u gebruik maken van de PTT-functie en de overige functies van de radio.
- Page 56 Account instellingen Wanneer het radioscherm is ingeschakeld en de radio in stand-by staat, drukt u op de toets Omhoog of Omlaag om de optie voor accountinstellingen te selecteren. Druk op de OK-toets of druk kort op de aan/uit-toets om toegang te krijgen tot de interface met accountinstellingen. Instellingenmenu Wanneer het scherm van de radio is ingeschakeld, drukt u lang op de MENU-toets om toegang te krijgen tot het instellingenmenu:...
- Page 57 toets op de microfoon om naar de belmodus te gaan. Druk nogmaals op de PTT-toets om een gesprek met het geselecteerde lid te starten. NaYest u klaar bent met praten, drukt u op de Terug-toets om terug te keren naar de hoofdgroep.
- Page 58 Technische specificaties GSM: Band 2/3/5/8 WCDMA: Band 1/2/5/8 Netwerk TDD-LTE: Band 38/40 FDD-LTE: band 1/2/3/5/7/8/20/28 Toonder TDD CAT4, FDD CAT4 LCD scherm 1.77 inch Schermresolutie 160 x 128 px Voedingsspanning 13.8V ROM-geheugen RAM-geheugen 4GB LPDDR2 Luidspreker 8 Ohm 3W Bluetooth Wifi 802.11b/g/n WiFi-frequentie...
-
Page 59: Polski
Instalacja karty SIM Otwórz gniazdo karty SIM znajdujące się w górnej części radia. Włóż kartę SIM do gniazYes we właściwej pozycji. Zamknij gniazdo karty SIM na miejscu. Uwagi: Instaluj kartę SIM tylko przy wyłączonym radiu. Unikaj dotykania metalowej części karty SIM, aby uniknąć utraty informacji. Chroń... - Page 60 Przegląd radia 1. Przycisk regulacji głośności 2. Włącznik / wyłącznik. Naciśnij i przytrzymaj przycisk przez 3 sekundy, aby włączyć radio. Gdy radio jest włączone, naciśnij przycisk na 3 sekundy, na ekranie pojawią się dwie opcje, wybierz „Wyłącz” lub „Uruchom ponownie”. Krótko naciśnij ten przycisk, aby potwierdzić opcję...
- Page 61 7. Klawisz w dół 8. Głośnik 9. OK, klucz 10. Krótko naciśnij klawisz, aby włączyć/wyłączyć ekran. 11. Lista członków 12. Lista grup 13. Główna grupa. Szybki powrót do głównego interfejsu 14. Klawisz menu. Ustawienia systemowe 15. Klawisz wstecz. Krótkie naciśnięcie powoduje powrót do poprzedniego interfejsu.
- Page 62 Jeśli Yesne konta są nieprawidłowe, możesz ręcznie ustawić informacje o koncie za pomocą platformy zarządzania. W celu uzyskania szczegółowych informacji prosimy o kontakt z producentem: suport@pni.ro Po pomyślnym zalogowaniu się do konta można korzystać z funkcji PTT oraz pozostałych funkcji radia.
- Page 63 powoduje wyłączenie ekranu. Gdy ekran jest wyłączony, naciśnij krótko ten sam klawisz, aby włączyć ekran. Ustawienia konta Gdy ekran radia jest włączony, a radio znajduje się w trybie gotowości, naciśnij klawisz w górę lub w dół, aby wybrać opcję ustawień konta. Naciśnij klawisz OK lub naciśnij krótko klawisz zasilania, aby uzyskać...
- Page 64 lub krótko naciśnij klawisz wyłącznika, aby wybrać członka. Po wybraniu członka naciśnij klawisz PTT na mikrofonie, aby przejść do trybu połączenia. Naciśnij ponownie klawisz PTT, aby rozpocząć połączenie z wybranym członkiem. Po zakończeniu rozmowy naciśnij klawisz Wstecz, aby powrócić do grupy głównej. Sygnał...
- Page 65 Specyfikacja techniczna GSM: Band 2/3/5/8 WCDMA: Band 1/2/5/8 Sieć TDD-LTE: Band 38/40 FDD-LTE: band 1/2/3/5/7/8/20/28 Okaziciel TDD CAT4, FDD CAT4 Ekran LCD 1.77 inch Rozdzielczość ekranu 160 x 128 px Napięcie zasilania 13.8V Pamięć ROM Pamięć RAM 4GB LPDDR2 Głośnik 8 Ohm 3W Bluetooth Wi-Fi...
-
Page 66: Romana
Instalare cartela SIM • Deschideti slotul pentru cartela SIM situat in partea superioara a statiei. • Introduceti in slot cartela SIM in pozitia corecta. • Inchideti slotul pentru SIM la loc. Note: • Instalati cartela SIM doar cu statia radio inchisa. •... - Page 67 Prezentare statie radio 1. Buton reglare volum 2. Buton pornire/oprire statie. Tineti apasat butonul timp de 3 secunde pentru a porni statia. Cand statia este pornita, apasati timp de 3 secunde butonul, pe ecran vor aparea doua optiuni, selectati “Shut down” (oprire statie) sau “Restart“...
- Page 68 7. LED indicator status 8. Difuzor 9. Tasta OK (confirmare) 10. Apasati scurt tasta pentru a aprinde/stinge ecranul. 11. Tasta acces lista membri 12. Tasta acces lista grupuri 13. Tasta grup principal. Tasta revenire rapiYes la interfata principala 14. Tasta meniu setari de sistem 15.
- Page 69 Yesca a fost introdusa. Yesca Yestele contului sunt incorecte, puteti seta manual informatiile despre cont folosind platforma de management. Pentru detalii, va rugam sa contactati producatorul: suport@pni.ro Dupa autentificarea cu succes in cont, puteti folosi functia PTT si celelalte functii ale statiei.
- Page 70 Cand ecranul este aprins, apasati scurt tasta cu pictograma “lacatel“ pentru a stinge ecranul. Cand ecranul este stins, apasati scurt tasta cu pictograma “lacatel“ pentru a aprinde ecranul. Setari cont Cand ecranul statiei este aprins si statia este in standby, apasati tasta Sus sau Jos pentru a selecta optiunea de setari cont.
- Page 71 modul de apel. Apasati din nou tasta PTT pentru a initia un apel cu membrul selectat. Dupa ce ati terminat de vorbit, apasati tasta Inapoi pentru a reveni la grupul initial. Semnal SOS Apasati lung tasta MENU pentru a e ite un semnal SOS. Conectare la reteaua WLAN Accesati meniul si selectati optiunea Wireless network.
- Page 72 Specificatii tehnice GSM: Band 2/3/5/8 WCDMA: Band 1/2/5/8 Retea TDD-LTE: Band 38/40 FDD-LTE: band 1/2/3/5/7/8/20/28 Purtator TDD CAT4, FDD CAT4 Ecran LCD 1.77 inch Rezolutie ecran 160 x 128 px Tensiune de alimentare 13.8V Memorie ROM Memorie RAM 4GB LPDDR2 Difuzor 8 Ohmi 3W Bluetooth...
- Page 73 Declaración UE de conformiYesd simplificaYes ONLINESHOP SRL declara que el Radio GSM/LTE PNI PoC 1700 cumple con la Directiva EMC 2014/30/EU y la Directiva RED 2014/53/EU. El texto completo de la declaración de conformiYesd de la UE está disponible en la siguiente dirección de Internet: https://www.mypni.eu/products/10241/download/certifications...
- Page 74 Declaratie UE de conformitate simplificata ONLINESHOP SRL declara ca Statie radio mobila PNI PoC 1700, GSM 4G LTE este in conformitate cu Directiva EMC 2014/30/EU si Directiva RED 2014/53/UE. Textul integral al declaratiei UE de conformitate este disponibil la urmatoarea adresa de internet:...
- Page 75 English - CERTIFICATE OF QUALITY AND COMMERCIAL WARRANTY The products identified in this certificate based on the trade name and the sole series number S/N benefit by a commercial warranty as follows: The warranty period for natural persons is 24 months as of the delivery Yeste for the manufacturing and material defects.
- Page 76 Termenul de garantie se calculeaza de la Yesta facturarii fiecarui produs in parte. Durata medie de utilizare a produsului este de 48 luni cu conditia respectarii instructiunilor de montaj si utilizare care insotesc produsul. Garantia comerciala nu afecteaza drepturile consumatorului prevazute prin legislatia aplicabila in vigoare, respectiv Ordonanta de Urgenta 140/28.12.2021 privind anumite aspecte referitoare la contractele de vanzare de bunuri, OG 21/1992 privind protectia consumatorilor cu modificarile si completarile ulterioare si Legea 296/2004 privind...
Need help?
Do you have a question about the PoC 1700 and is the answer not in the manual?
Questions and answers