Table of Contents
Advertisement
Available languages
Available languages
Quick Links
Instrucciones de uso
Microscopio de laboratorio de luz
transmitida
KERN
Versión 1.0
01/2020
OBE-12_13-BA-es-2020
KERN & Sohn GmbH
Ziegelei 1
D-72336 Balingen
E-Mail: info@kern-sohn.com
OBE-12, OBE-13
OBE 121, OBE 122, OBE 124
OBE 131, OBE 132, OBE 134
Tel: +49-[0]7433- 9933-0
Fax: +49-[0]7433-9933-149
Internet: www.kern-sohn.com
Advertisement
Chapters
Table of Contents

Related Manuals for KERN Optics OBE-12


Summary of Contents for KERN Optics OBE-12
- Page 1 Ziegelei 1 Tel: +49-[0]7433- 9933-0 D-72336 Balingen Fax: +49-[0]7433-9933-149 E-Mail: info@kern-sohn.com Internet: www.kern-sohn.com Instrucciones de uso Microscopio de laboratorio de luz transmitida KERN OBE-12, OBE-13 OBE 121, OBE 122, OBE 124 OBE 131, OBE 132, OBE 134 Versión 1.0 01/2020 OBE-12_13-BA-es-2020...
-
Page 3: Table Of Contents
KERN OBE-12, OBE-13 Versión 1.0 01/2020 Instrucciones de uso Microscopio de luz transmitida Índice de contenidos Antes del uso ................. 3 Notas generales ........................3 Notas sobre el sistema eléctrico .................... 3 Almacenamiento ........................4 Mantenimiento y limpieza ......................5 Nomenclatura ................ -
Page 4: Antes Del Uso
1 Antes del uso 1.1 Información general El embalaje debe abrirse con cuidado para evitar que los accesorios del interior caigan al suelo y se rompan. En general, un microscopio debe manejarse siempre con mucho cuidado, ya que es un instrumento de precisión sensible. Por ello, es especialmente importante evitar los movimientos bruscos durante el funcionamiento o el transporte, sobre todo para no poner en peligro los componentes ópticos. -
Page 5: Almacenamiento
Toda manipulación del equipo que implique un contacto con la instalación eléctrica, como el cambio de lámparas o fusibles, sólo podrá realizarse con la alimentación desconectada. 1.3 Almacenamiento Evite exponer el dispositivo a la luz solar directa, a temperaturas altas o bajas, a golpes, al polvo y a la humedad elevada. -
Page 6: Mantenimiento Y Limpieza
1.4 Mantenimiento y limpieza En cualquier caso, el aparato debe mantenerse limpio y limpiarse regularmente de polvo. Antes de limpiar la unidad cuando está mojada, asegúrese de que la alimentación está desconectada. Los componentes de vidrio deben limpiarse preferentemente con un paño sin pelusas cuando estén contaminados. -
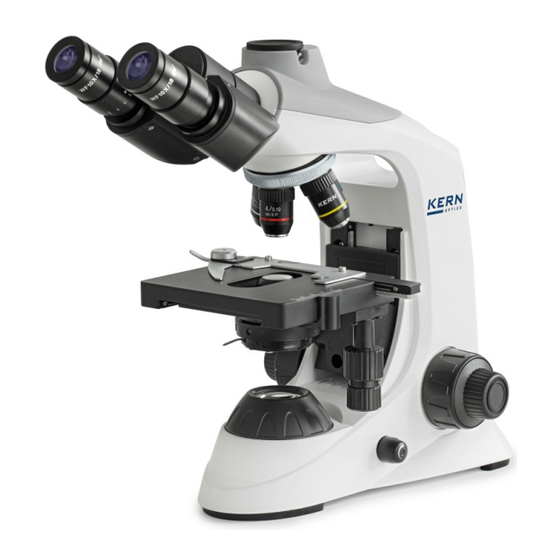
Page 7: Nomenclatura
2 Nomenclatura Conector del adaptador de la Boquilla de Ocular cámara tubo Cabezal / tubo del microscopio Puente nasal objetivo Portaobjetiv Portaobjetos Marque Tabla de objetos X - Y Condensador Etapa del objeto Acciona Lente de campo Dimmer Interruptor principal OBE-12_13-BA-es 2020... - Page 8 Conexión a la red eléctrica OBE-12_13-BA-es-2020...
-
Page 9: Datos Técnicos / Equipamiento
3 Datos técnicos / equipamiento Configuración estándar Modelo Sistema Tubo Oculares Objetivo Iluminación KERN óptico Acromático EFC 121 Finito Monocular WF 10x / Ø 18 mm LED de 3W (luz transmitida) 4x/10x/40x Acromático OBE 122 Finito Binocular WF 10x / Ø 18 mm LED de 3W (luz transmitida) 4x/10x/40x Acromático... - Page 10 OBE-12_13-BA-es-2020...
-
Page 11: Montaje
4 Montaje 4.1 Cabezal del microscopio El cabezal del microscopio está firmemente unido al resto del microscopio y, por lo tanto, no puede retirarse ni girarse. Sin embargo, el tubo puede girar 360° gracias al diseño de mariposa, que permite un ajuste flexible de los oculares. -
Page 12: Operación
5 Operación 5.1 Primeros pasos Lo primero que hay que hacer es conectar la fuente de alimentación mediante el enchufe de la red. Después de encender la iluminación mediante el interruptor principal/botón de regulación, la intensidad de la luz debe ajustarse primero a un nivel bajo para que los ojos no se expongan inmediatamente a demasiada luz al mirar por primera vez a los oculares. -
Page 13: Pre-) Focusing
5.2 (Pre-) Focusing Para poder observar un objeto, éste debe estar a la distancia correcta del objetivo para poder obtener una imagen nítida. Para encontrar esta distancia inicialmente (sin ningún otro preajuste del microscopio), lleve el objetivo con el menor aumento a la trayectoria del haz, mire con el ojo derecho a través del ocular derecho y gire el botón de ajuste grueso lentamente al principio (véase la ilustración). -
Page 14: Compensación Dióptrica
5.3 Ajuste del relieve ocular (para dispositivos binoculares y trinoculares) En la visión binocular, la distancia interpupilar debe ajustarse con precisión para que cada usuario obtenga una imagen clara del objeto. Mientras mira por los oculares, sujete las carcasas de los tubos izquierdo y derecho con una mano cada una. -
Page 15: Ajustar El Aumento
5.5 Ajustar el aumento Tras el preenfoque con el objetivo de menor aumento (véase el apartado 5.2), ahora se puede ajustar el aumento total en función de las necesidades mediante el revólver. Al girar el revólver, cualquiera de los otros cuatro objetivos puede entrar en la trayectoria del haz. -
Page 16: Ajuste De La Iluminación
El elemento de control que desempeña el papel más importante en este caso para los dispositivos de las series OBE-12 y OBE-13 es el condensador de altura regulable con diafragma de apertura. -
Page 17: Uso De Los Oculares
5.7 Uso de los oculares Los oculares incluidos en el volumen de suministro pueden utilizarse básicamente siempre, ya que protegen la luz molesta que se refleja de las fuentes de luz del entorno en el ocular, con lo que se obtiene una mejor calidad de imagen. Pero sobre todo, si se utilizan oculares con un punto de vista elevado (especialmente adecuados para los usuarios de gafas), puede ser útil para los usuarios sin gafas acoplar los oculares a los oculares. -
Page 18: Sustitución De Lámparas
Ver 1.4 Mantenimiento y limpieza. 6 Sustitución de lámparas Los dispositivos de las series OBE-12 y OBE-13 con iluminación están todos equipados con lámparas LED. Debido a la larga vida útil de la iluminación LED, no será necesario sustituir las lámparas de estos microscopios. -
Page 19: Uso De Accesorios Opcionales
7 Uso de accesorios opcionales 7.1 Unidad de campo oscuro Para realizar aplicaciones de campo oscuro existe la siguiente posibilidad. En el condensador estándar del microscopio se puede enroscar desde abajo un inserto de campo oscuro con un disco negro integrado (véase la ilustración de la derecha). -
Page 20: Solución De Problemas
8 Solución de problemas Problema Posibles causas Enchufe de red no insertado correctamente No hay energía disponible en la toma de La lámpara no se quema corriente Lámpara defectuosa El diafragma de apertura y/o el diafragma de campo no están suficientemente abiertos El campo de visión es oscuro El condensador no está... - Page 21 Problema Posibles causas El diafragma de apertura no está suficientemente abierto El condensador está demasiado bajado El objetivo no pertenece a este microscopio La lente frontal del objetivo está sucia Detalles borrosos Una lente de inmersión se utiliza sin aceite Mala imagen de inmersión El aceite de inmersión contiene burbujas de...
-
Page 22: Servicio
9 Servicio Si a pesar de haber estudiado este manual de instrucciones sigue teniendo dudas sobre la puesta en marcha o el funcionamiento, o si, en contra de lo esperado, surge algún problema, póngase en contacto con su distribuidor especializado. El aparato sólo puede ser abierto por técnicos de servicio capacitados y autorizados por KERN. - Page 23 Notas OBE-12_13-BA-es 2020...
- Page 24 KERN & Sohn GmbH Ziegelei 1 Tel: +49-[0]7433- 9933-0 D-72336 Balingen Fax: +49-[0]7433-9933-149 E-mail: info@kern-sohn.com Internet: www.kern-sohn.com User Instructions Tablet camera for microscopes KERN ODC-24 ODC 241 Version 1.2 04/2024 ODC-24-BA-e-2412...
- Page 26 KERN ODC-24 Version 1.2 04/2024 User Instructions Tablet camera for microscopes Table of contents Before use ..................3 General notes ..........................3 Storage ............................3 Scope of supply ................4 Nomenclature ................5 Technical data ................9 Operation ..................11 Unpacking and setting up ......................
-
Page 27: Before Use
1 Before use 1.1 General notes You must open the packaging carefully, to make sure that none of the accessories in the packaging fall on the floor and get broken. You should also avoid getting dirt or fingerprints on the camera sensor, because in most cases this will reduce image clarity. -
Page 28: Scope Of Supply
2 Scope of supply Tablet camera Power adapter User Instructions ODC-24-BA-e-2412... -
Page 29: Nomenclature
3 Nomenclature ODC-24-BA-e-2412... - Page 30 ODC-24-BA-e-2412...
- Page 31 ODC-24-BA-e-2412...
- Page 32 Pos.No. Description Pos.No. Description USB port Tablet / Touch display PC mouse connection Connection socket Camera housing for headphones Camera sensor Loudspeaker Power connector Micro SD slot Microphone Micro HDMI port USB port On/Off switch ODC-24-BA-e-2412...
-
Page 33: Technical Data
4 Technical data Screen 9.7” LCD touchscreen Quad Core Cortex-A17; 1.8 GHz Screen resolution 2048 x 1536 pixels Sensor 1/2.5“ CMOS Frames per second (FPS) 15 FPS @ 2048 x 1536 Pixel size 2.2 µm x 2.2 µm Photo format JPEG Input voltage 12 V DC / 2A (no battery operation) - Page 34 ODC-24-BA-e-2412...
-
Page 35: Operation
5 Operation 5.1 Unpacking and setting up 1. Take the tablet camera and power adapter out of the packaging and remove the packaging sleeves 2. Remove the protective film from the display of the tablet 3. Undo the screws on the cover on the back of the camera and remove the protective film underneath 4. - Page 36 Tablet camera C-mount adapter Microscope ODC-24-BA-e-2412...
-
Page 37: Start Microscope Software (S-Eye)
5.2 Start microscope software (S-EYE) 1. Press the On/Off switch in order to start the tablet (operating system: Android) To do this the tablet must have a permanent power supply No battery operation! 2. The S-EYE microscope software usually starts automatically If this does not happen, then this App (from the desktop of the tablet) can be started manually (touchscreen) See figure below... -
Page 38: User Interface And Functions Of The S-Eye Microscope Software
5.3 User interface and functions of the S-EYE microscope software S-EYE offers its users an extensive range of functions and thereby guarantees the very best digital sample analysis. As well as live image transfer, the following tools are also included: (can be selected on the righthand edge of the scree) Effect Setting the camera parameters... - Page 39 5.3.1 Effect – Setting the camera parameters If the imaging from the live transfer is not satisfactory, then there are a few options to optimise this imaging, using the “Effect” program category. 1. Exposure Auto mode: • Exposure time adjusts automatically Manual mode: •...
-
Page 40: Capturing And Playing Back Images And Videos
5.3.2 Capturing and playing back images and videos Click on the Snap button to capture an image. You can set the image size in the “Setting” program category under “Picture Size”. Click on the Record button to record a video. Depending on the video size selected for live transfer (“Setting”... -
Page 41: Transferring Picture And Video Files To A Pc
5.3.3 Transferring picture and video files to a PC To transfer the created picture and video files to a PC, the following steps must be carried out: 1. Insert the USB-stick to the tablet (folder structure will be created) 2. Start the Explorer in the Android menu (minimise S-EYE software for this purpose) 3. -
Page 42: Measurements
5.3.4 Measurements In order to be able to take measurements, calibration must be carried out first, which will synchronise the magnification settings of the microscope and the image characteristics of live transfer on the tablet camera. Calibration: 1. Place the object holder with integrated scale onto the stage of the microscope 2. - Page 43 • Adjust the scale on the image to match the length of the physical scale ruler You can move the scale or alter the length using the touch function. In the example shown, a scale with a fine division of 0.01 mm (10 µm) is used.
- Page 44 Measuring tools: Symbol Function Description Adding points which are marked with the consecutive Counting numbers Line Measuring the distance between two points Rectangle Measuring the length, width and area of a rectangle Measuring the radius and area of a circle Circle Different methods are available for creating a circule Adding a cross line...
- Page 45 Example of a line measurement: 1. Select a saved calibration under the “Measure” program category. It is selected when you see white background with black text. 2. Click on the symbol for line measurement. Then the measuring line along with the measurements will be displayed in the live image transfer.
-
Page 46: Image Analysis
5.3.5 Image analysis The built-in image display program offers the user various options for image analysis. In order to be able to use this tool, it must first be activated in the “Setting” program category. Tick the box for “Enable built-in image viewer” As soon as an image is opened in the “Playback”... - Page 47 Four different instruments for image processing or image analysis can be implement with this program: 1. Greyscale “GREYSCALE” function 2. Contrast and brightness “CONTRAST” function ODC-24-BA-e-2412...
- Page 48 3. Threshold “THRESHOLD” function 4. Particle analysis “PARTICLES” function ODC-24-BA-e-2412...
-
Page 49: Service
6 Service If, after studying the user manual, you still have questions about commissioning or using the microscope, or if unforeseen problems should arise, please get in touch with your dealer. The device may only be opened by trained service engineers who have been authorised by KERN.
Need help?
Do you have a question about the OBE-12 and is the answer not in the manual?
Questions and answers