Advertisement
Quick Links
Advertisement

Related Manuals for Fortis FSMAGRWMCHA


Summary of Contents for Fortis FSMAGRWMCHA
- Page 1 MAGNETIC ROWING MACHINE FSMAGRWMCHA...
-
Page 2: Safety And Warnings
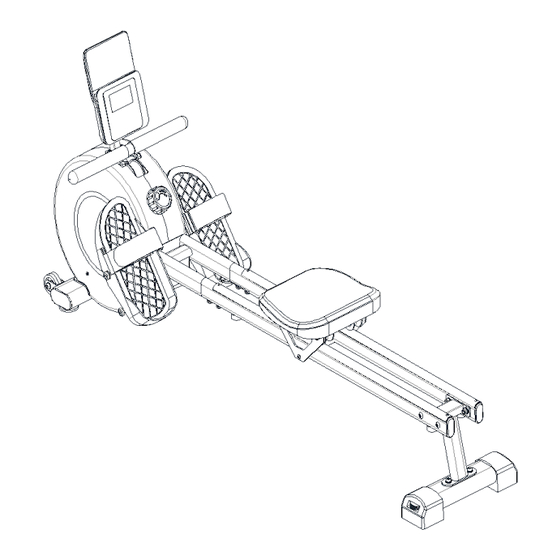
SAFETY & WARNINGS • Read all instructions before using the equipment and retain for reference. • Before starting any exercise programme, consult your physician to determine if you have any medical or physical conditions that could put your health and safety at risk or you are taking any medication that may affect your heart rate, blood pressure or cholesterol level. - Page 3 COMPONENTS A Main Frame B Rear Support C Front Support D Computer E Computer Support F Seat G Right Slide Rail H Left Slide Rail I Accessory bag J Limit Pad (x2) J Footrest Left K Footrest Right...
- Page 4 Accessories 1 screw (x2) 4 Screw (x4) 2 Cylindrical hex 3 Flat hex screw screws (x2) (x2) 5 Nut (x4) 6 Curved gasket (x4) 7 Screw (x4) 8 Split washer (x10) 9 Flat washer (x6) 11 Multi-tool 12 Allen Key (small) 13 Allen Key (large) 14 Spanner...
- Page 5 OVERVIEW...
- Page 6 ASSEMBLY Attach the right (G) and left rails (H) to the rear support (B), using x4 screws (4), x4 flat washers (9), x4 split washers (8) and x4 nuts (5). Use the Allen key (13) and Multi-tool (11) to tighten the fasteners. Note: Do not fully tighten the fasteners.
- Page 7 Insert the seat (F) into the slides on the rails in the direction shown. Flip the slide and seat assembly upside down and attach the x2 limit pads (J) using the x2 Cylindrical hex screws (2). Tighten the screws using the Allen key (13).
- Page 8 Attach the front support (C) to the main frame (A). Carefully place the assembly on a flat surface taking car not to crush any components. Remove the x2 screws (M) from the wooden block (N) using the Allen key (13). Using x2 Screws (1) x2 split washers (8) and x2 flat washers (9).
- Page 9 Stand up the main frame assembly and attach the seat assembly using x4 curved gaskets (6), x4 split washers (8) and x4 screws (7). Tighten the screws using the Allen Key (13). Use the Allen key to completely tighten the fasteners from Step 1.
- Page 10 Remove the left and right footrests (K & L) from the accessory bag. Attach the left and right footrests (K & L) secure them in place using the Allen key (13). Note: Pay close attention to ensure the correct footrest is attached.
- Page 11 Remove the screws (O) and the block (P) from the frame using the Allen Key (12). Route and connect the wires (76-3) and (76-4) through the computer support tube and attach the computer support (E) to the frame using x2 flat hex screws (3) and the Allen key (13).
-
Page 12: Operation
OPERATION Warming Up The warm-up phase plays a vital role in improving blood circulation throughout the trainer's body, preparing the muscles for effective training, and minimizing the risk of cramps or muscle strains during the workout. Prior to your training session, follow the recommended warm-up methods outlined below. - Page 13 Rowing Technique Starting position Straighten your arms forward, relax your shoulders, raise your head, look forward and compress your feet and lower legs vertically. Sliding Grasp the arm with your hands, keep the correct posture and angle of your body, slowly open your legs and climb forward.
- Page 14 Recovery Reducing the amplitude and speed of rowing for approximately 5 minutes. This gentle adjustment allows for a gradual cooldown and helps relax the muscles by regulating the body's temperature through controlled exercise. Avoid engaging in strenuous stretching activities during this recovery process to prevent potential muscle damage.
- Page 15 Functions: Scan (SCAN): In scanning mode, the five states are cycled every 4 seconds in order (time, calories, number, distance, total time). • (TMR) Keeps track of workout time. Range: 00:00-99:59 • (CAL) Measures calories burned during current workout. Range: 0-999.9 KCAL •...
- Page 16 Need more information?
Need help?
Do you have a question about the FSMAGRWMCHA and is the answer not in the manual?
Questions and answers