Table of Contents
Advertisement
Quick Links
LITEMAX
SLD0615
Sunlight Readable 6.4" LCD Display
(1st Edition 8/6/2008 )
All information is subject to change without notice.
Approved by
Checked by
Prepared by
David
Ming
Jack
LITEMAX
Electronics Inc.
8F-2, No.133, Lane 235, Bau-chiau Rd.,
Shin-dian City, Taipei County, Taiwan R.O.C.
Tel : 886-2-8919-1858
Fax: 886-2-8919-1300
Homepage:
http://www.litemax.com.tw
Page 1
Advertisement
Table of Contents

Related Manuals for LITEMAX SLD0615


Summary of Contents for LITEMAX SLD0615
- Page 1 LITEMAX SLD0615 Sunlight Readable 6.4” LCD Display (1st Edition 8/6/2008 ) All information is subject to change without notice. Approved by Checked by Prepared by David Ming Jack LITEMAX Electronics Inc. 8F-2, No.133, Lane 235, Bau-chiau Rd., Shin-dian City, Taipei County, Taiwan R.O.C.
-
Page 2: Record Of Revision
Record of Revision Version and Date Page Old Description New Description Remark Page 2... -
Page 3: Table Of Contents
Content Record of Revision......................2 Content ..........................3 Introduction ........................4 Hardware Installation ......................4 The Display Timing......................6 The Display Outline Dimensions ..................7 The Display Controls......................8 The Screen Adjustment..................... 9 Quick Installation......................15 Troubleshooting Tips ....................... 16 LCD Specification...................... -
Page 4: Introduction
Introduction Welcome to enjoy the fantastic sightseeing world. This new technology will bring you the whole new feeling about the “monitor”. We show here some of the major advantages of the LCD monitor. You will really find some other advantages when you use it. Hardware Installation This chapter will guide you the correct installation procedures of your LCD monitor. - Page 5 The following picture provides the connection outline Video Input Pin Assignment This section describes the pin assignment of the LCD’s video connector. It is called 15pin Mini D-sub connector. Pin No. Signal Connector Red Video Signal Green Video Signal Blue Video Signal N.C.
-
Page 6: The Display Timing
The Display Timing The following table displays optimum quality modes that the LCD monitor provides. If the other video modes are used, the monitor will stop working or display a poor quality picture. TIMMING MODE RESOLUTION 640x480@60Hz 640x480@72Hz 640x480@75Hz SVGA 800x600@56Hz 800x600@60Hz 800x600@72Hz... -
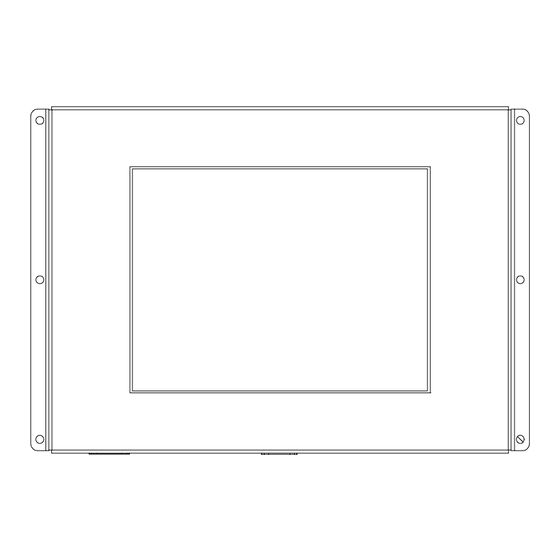
Page 7: The Display Outline Dimensions
The Display Outline Dimensions Unit: mm Page 7... -
Page 8: The Display Controls
The Display Controls Membrane Control Button POWER SWITCH: Pushing the power switch will turn the monitor on. Pushing it again to turn the monitor off. Power LED: Power ON-Green / Power off-No. Up Key >: Increase item number or value of the selected item. Menu Key: Enter to the OSD adjustment menu. -
Page 9: The Screen Adjustment
“100” Ambient light sensor: Press this Icon for auto dimming. (OPTION) To use this option, the Litemax ambient light sensor needs to have been installed Potentiometer: Navigate to this icon to adjust the VR function. (OPTION) Ambient light sensor with OSD offset: To set minimum brightness level based on ambient light. - Page 10 Contrast: Press “menu” and “right” buttons to adjust the contrast from “0” to “100”. To adjust from “100” to “0”, press “menu” and the “left” buttons. Exit: You can exit this sub menu back to normal screen. Analog: RGB/VGA input Digital: DVI input AV1: Composite input S-Video S-Video: S-Video input...
- Page 11 UnMute/Mute: You can mute the speaker by pressing this option Exit: back to the beginning menu. Auto Color: By navigating over to the “Auto Color” option, optimal color performance is invoked. SRGB: Windows standard color setting Color Temperature: You have 3 options in this selection Color Temperature User Define: Default is 100 for “R”, “G”, and “B”.
- Page 12 Color Tempture_6500K: Warm color scheme Color Tempture_93OOK: Cold color scheme Exit: back to the normal screen. Go to the “Image” page, and you will see the below picture Auto Adjust: Choose this option and the AD5766 will adjust to the optimal horizontal and vertical frequency.
- Page 13 OSD Control: Selecting this option, brings you to 4 more options: OSD _time: Select time for the OSD user interface to stay on screen, for 2 sec. to 16 sec. Default is 6 sec. OSD _HPos: Moves the OSD user interface horizontally on screen. OSD _VPos: Moves the OSD user interface vertically on screen.
- Page 14 Exit OSD Lock Function: It is possible to lock all the OSD buttons to prevent unauthorized changes to occur by pressing “Menu” and “right >” buttons simultaneously. You will see the “lock” icon below on the center of the screen for 3 seconds. If any button is pushed after the lock function is initiated, the below icon will appear on the screen.' To release the OSD lock, press “Menu”...
-
Page 15: Quick Installation
Quick Installation Please follow the following descriptions step by step. (The 7 diagrams can also be your references): Ste p 1 Ste p 2 Ste p 3 S tep 4 Step 5 Ste p 6 St ep 7 Step 1 Plug one terminal of the VGA cable to the signal connector at the rear of the LCD Monitor. -
Page 16: Troubleshooting Tips
Troubleshooting Tips In the event that you experience trouble with your Display, check the following items before contacting the dealer from whom the Display was purchased. The most common problems usually involve an incorrectly an incorrect connection from the Video Card to the Display. -
Page 17: Lcd Specification
LCD Specification Model No. SLD0615 LCD Display 6.4" LED Backlight LCD Display Area 129.6 (H) x 97.4 (V) mm Original Panel No. PVIPD064VT4 Display Surface Non-glare hard coated Luminance 1000 cd/m Resolution 640 x 480 (VGA) Contrast Ratio 400:1 Display Colors... -
Page 18: Product Safety Precautions
Product Safety Precautions Follow all warnings and instructions marked on the product. Do not use this product near water. This display should be installed on a solid horizontal base. When cleaning, use only a neutral detergent cleaner with a soft damp cloth. Do not spray with liquid or aerosol cleaners.
Need help?
Do you have a question about the SLD0615 and is the answer not in the manual?
Questions and answers