Advertisement
Advertisement
Table of Contents

Related Manuals for Idis DC-T4517WRXP-A


Summary of Contents for Idis DC-T4517WRXP-A
- Page 1 Network Camera Quick Guide DC-T4517WRXP-A DC-T4517WRX-A Powered by...
-
Page 2: Safety Precautions
Safety Precautions WARNING RISK OF ELECTRIC SHOCK DO NOT OPEN WARNING: TO REDUCE THE RISK OF ELECTRIC SHOCK, DO NOT REMOVE COVER (OR BACK). NO USER-SERVICEABLE PARTS INSIDE. REFER SERVICING TO QUALIFIED SERVICE PERSONNEL. Important Safeguards 1. Read Instructions 10. Overloading All the safety and operating instructions should be read before the Do not overload wall outlets and extension cords as this can result appliance is operated. -
Page 3: Fcc Compliance Statement
IDIS Co., Ltd. reserves all rights concerning this document. Use or duplication of this document in part or whole without the prior consent of IDIS Co., Ltd. is strictly prohibited. Contents of this document are subject to change without prior notice for reasons such as functionality enhancements. - Page 4 (DC-T4517WRXP-A: 2set, DC-T4517WRX-A: 1set) Screws, Anchors (each 3ea.) Quick Guide Please download software (IDIS Discovery, IDIS Center, IDIS Solution Suite Compact) and product manual from this link : -IDIS Website (www.idisglobal.com) - Search IDIS Discovery, IDIS Center, IDIS Solution Suite Compact.
-
Page 5: Camera Installation
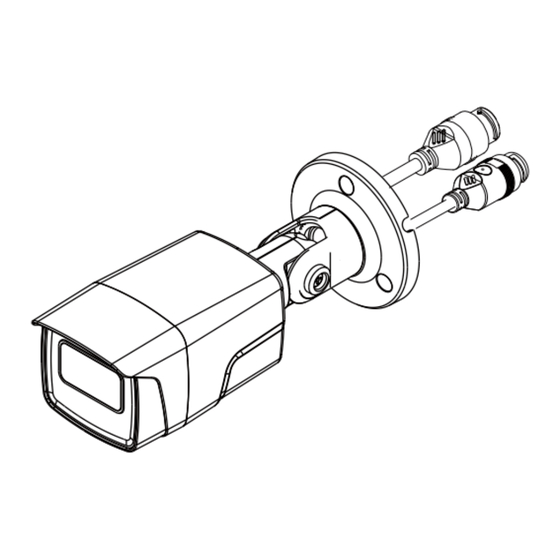
Camera Installation Waterproof Cable Installation RJ45 waterproof rubber ring RJ45 waterproof rubber ring PoE IN/OUT modular jack Plug in the network cable. PoE IN/OUT modular jack RJ45 connector protect cover cable waterproof rubber ring (2) (The waterproof rubber ring is fastened to the connector protect cover.) RJ45 connector protect cover RJ45 connector back cover (2) cable waterproof rubber ring (2) -
Page 6: Installation
Not pulling the cable back may cause water to seep in and damage the product. Installation Screw the mounting bracket to the wall or ceiling by using screws(3) provided with the camera. Adjust the camera angle by adjusting the joint part. -
Page 7: Specifications
-20°C ~ +55°C (-4°F ~ +131°F) (Starting temperature: 32°F to 131°F (0°C to 55°C)) Operating Humidity 0% ~ 90% Power Input DC-T4517WRXP-A PoE, IEEE 802.3at (Class 4) DC-T4517WRX-A PoE, IEEE 802.3af (Class 3) Power DC-T4517WRXP-A PoE, IEEE 802.3at(Class 4), 25.5W Consumption (DC OUT : 42.5-57V, 0.3A MAX) - Page 12 IDIS Co., Ltd. For more information, please visit www.idisglobal.com...
Need help?
Do you have a question about the DC-T4517WRXP-A and is the answer not in the manual?
Questions and answers