Table of Contents

Related Manuals for dynarex Bari+Max 10707


Summary of Contents for dynarex Bari+Max 10707
- Page 1 Reorder No. 10707 Bariatric HD Patient Lift 1000 lb. Weight Capacity User’s Manual 122ºF 50ºC 14ºF -10ºC Manufactured for: Dynarex Corporation 10 Glenshaw Street | Orangeburg, NY 10962 USA • www.dynarex.com | Made in China...
-
Page 2: Table Of Contents
TABLE OF CONTENTS TECHNICAL SPECIFICATION ........2 OPERATION INSTRUCTIONS GENERAL WARNINGS AND CAUTIONS Using the Hand Pendant or Control Box ....8 Intended Use ............3 Activating the Mechanical Emergency Release ...8 Assembling the Lift ..........3 Activating the Emergency Stop ......8 Operating the Lift .............3 Charging the Battery ..........9 Using the Slings ............3 Positioning the Lift for Use ........9... -
Page 3: Technical Specification
TECHNICAL SPECIFICATION Maximum Spreader Bar Height with Scale 69.8” Minimum Spreader Bar Height with Scale 29.7” Maximum Spreader Bar Height without Scale 76.5” Minimum Spreader Bar Height without Scale 36.5” Base Width (Open) 56.4” Base Width (Closed) 32.6” Base Height (Clearance) 4.5”... -
Page 4: General Warnings And Cautions
The maximum weight capacity Specific slings are made for the Bariatric HD Patient Lift. of the Dynarex Bari+Max HD Electric Patient Lift is 1000 lb. For the safety of the patient, do not intermix slings and Always ensure there is an audible click when mounting patient lifts of different manufacturers. -
Page 5: Performing Maintenance
GENERAL WARNINGS AND CAUTIONS DISPOSAL Make sure the wheelchair’s weight capacity can withstand the patient’s weight prior to loading the patient. Be sure to check the sling attachments each time the WARNING: This product has been supplied from an sling is removed and replaced, to ensure that it is environmentally aware manufacturer. -
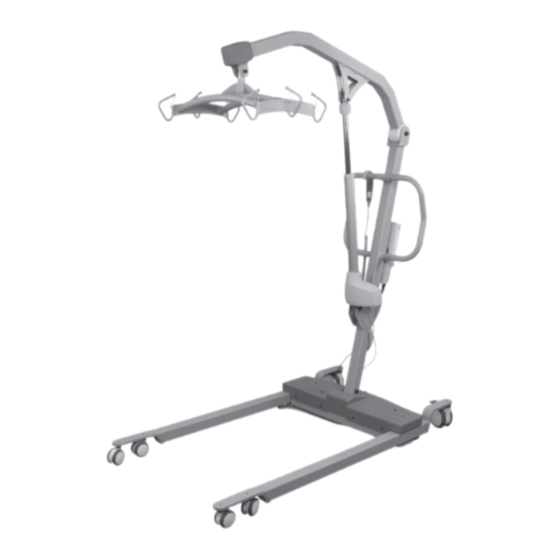
Page 6: Components
COMPONENTS WARNING: To avoid injury, do not attempt to remove the lift from the carton without assistance. Examine and inspect all components of the lift for nicks, dents, scratches or damages. NOTE: Not all items provided in the carton are shown. Pinch guards, bolts, washers and nuts are fastened to their intended locations and therefore omitted from the illustration. -
Page 7: Assembly Instructions
ASSEMBLY INSTRUCTIONS ASSEMBLING THE ELECTRIC ACTUATOR WARNING: Use only parts supplied by the manufacturer for assembly. The base legs, mast, boom, actuator assembly and swivel bar are manufactured to NOTE: The bottom of the actuator assembly will be specifications that assure correct alignment of all parts preassembled to the mast mounting bracket. -
Page 8: Assembling The Control Box To The Mast
ASSEMBLY INSTRUCTIONS ASSEMBLING THE INSTALLING THE HANGER BAR CONTROL BOX TO THE MAST Pass the rotating shaft through the center of the hanger and lift it to the end of the lifting arm. Slide the control box onto the mounting bracket on the boom. -
Page 9: Operation Instructions
OPERATION INSTRUCTIONS USING THE HAND PENDANT ACTIVATING THE MECHANICAL OR CONTROL BOX EMERGENCY RELEASE All lift actuators are built with a Mechanical Emergency Release. The mechanical release enables the actuator to retract without power. To activate the emergency release, continue to rotate the emergency release knob clockwise, at the top of the actuator. -
Page 10: Charging The Battery
OPERATION INSTRUCTIONS CHARGING THE BATTERY POSITIONING THE LIFT FOR USE With the legs of the base open and locked, use the NOTE: It is recommended that the battery should be steering handle to push the patient lift into position. recharged daily to prolong battery life. The battery Lower the patient lift for easy attachment of the sling. -
Page 11: Prepare The Sling At Seated Position
OPERATION INSTRUCTIONS PREPARE THE SLING AT SEATED POSITION LIFTING/MOVING THE PATIENT WARNING: Where the patient is seated in a WARNING: Before lifting or transferring the patient, wheelchair, the wheels must be locked when putting on the base legs must be locked in the open position for the sling. -
Page 12: Transferring The Patient
OPERATION INSTRUCTIONS TRANSFERRING THE PATIENT TRANSFERRING THE PATIENT TO A WHEELCHAIR WARNING: When the patient is elevated a few inches off a stationary surface and before moving the patient, WARNING: The wheelchair wheels must be locked check again to make sure that all hardware or straps are before lowering the patient into the wheelchair for properly connected. -
Page 13: Trouble Shooting Guide
TROUBLE SHOOTING GUIDE SYMPTOMS FAULTS SOLUTIONS Battery Low. Recharge battery with power cable or wall charger. Hand control or actuator Ensure tight connection of all connector loose. connectors to control box. RED emergency stop Rotate the emergency button button pressed in. Clockwise until it pops out. -
Page 14: Limited Warranty
If you have a question about your Dynarex device or this The Warranty shall not apply under the following warranty, please contact an authorized Dynarex dealer.
Need help?
Do you have a question about the Bari+Max 10707 and is the answer not in the manual?
Questions and answers