dynarex Resp-O2 User Manual
Handheld pulse oximeter
Hide thumbs
Also See for Resp-O2:
- User manual (10 pages) ,
- Quick start manual (6 pages) ,
- Instruction manual (2 pages)
Table of Contents
Advertisement
Quick Links
Advertisement
Table of Contents

Related Manuals for dynarex Resp-O2


Summary of Contents for dynarex Resp-O2
- Page 1 Reorder No. 36403 Manufactured for: Dynarex Corporation 10 Glenshaw Street Orangeburg, NY 10962 USA • www.dynarex.com Made in China Handheld Pulse Oximeter User Manual CAUTION: Federal (USA) Law +122°F +50°C restricts this device to sale by or -4°F on the order of a physician...
- Page 2 Handheld Pulse Oximeter (Reorder No. 36403)
- Page 3 All information contained in this publication is believed to be correct. We shall not be liable for errors contained herein nor for incidental or consequential damages in connection with the furnishing, performance, or use of this material. The information this publication refers to is protected by copyrights or patents and does not convey any license under the patent rights of our company, nor the rights of others.
-
Page 4: Table Of Contents
TABLE OF CONTENTS 1. Introduction ................6 1.1 Brief Introduction ..............6 1.2 Safety Information ............6 1.3 Equipment Symbols ............11 1.4 Equipment Classification..........12 1.5 Package Contents............12 2. General Descriptions............. 13 2.1 Front Panel ..............13 2.2 Rear Panel ..............15 2.3 Product Features ............ - Page 5 TABLE OF CONTENTS (Continued) 6. History Data Reviewing ............26 6.1 Character Definition ............26 6.2 Reviewing Operation............26 7. Alarm Setting.................27 7.1 Alarm Priority ..............27 7.2 Character Definition ............28 7.3 SpO Alarm Setting ............28 7.4 PR Alarm Setting............29 7.5 Alarm on/off ..............29 7.6 Alarm Activation .............30 8.
-
Page 6: Introduction
1. INTRODUCTION 1.1 Brief Introduction Thank you for purchasing the Handheld Pulse Oximeter. The device is designed to measure SpO and PR, delivering visual and audio alarm, sensor off alarm, data storage and review etc. Please read this manual carefully before using it. 1.2 Safety Information Conception of Warning, Precaution and Notice The Warning, Precaution and Notice in this document mean:... - Page 7 1. INTRODUCTION (Continued) • The Pulse Oximeter is specified for use by medical professionals only. • Prolonged use of the probe/sensor or the patient’s condition may require changing the sensor site periodically. Change the sensor site and check skin integrity, circulatory status, and correct alignment at least every 4 hours.
- Page 8 1. INTRODUCTION (Continued) • Worn out data cables may cause inaccurate data. If the data is being used as a reference to treat a patient, pay attention to the data cable and check it frequently. • When using the equipment with electrosurgical units (ESU), make sure the patient is safe.
- Page 9 1. INTRODUCTION (Continued) • Unplug the sensor from the oximeter before cleaning or disinfecting it. If liquid is accidentally spilled on the unit, clean and dry thoroughly before reuse. • Do not try to use the SpO and NIBP measurement on the same arm at the same time.
- Page 10 1. INTRODUCTION (Continued) • Any condition that restricts blood flow, such as use of a blood pressure cuff or extremes in systemic vascular resistance, may cause a failure to determine accurate pulse rate and SpO readings. • Remove fingernail polish or artificial fingernails before applying SpO sensors.
-
Page 11: Equipment Symbols
1. INTRODUCTION SECTION HEADER (Continued) 1.3 Equipment Symbols SYMBOL SYMBOL NOTES Type BF applied part. Attention! Refer to the relevant information. Read operator’s manual carefully before using the oximeter. Non-ionizing radiation Manufacture date Manufacturer Serial number Temperature Limitation Humidity Limitation IPX1 Degree of protection against liquid entry Fragile: Shows handle with care during... -
Page 12: Equipment Classification
1. INTRODUCTION SECTION HEADER (Continued) 1.4 Equipment Classification Classification according to IEC-60601 According to the type of Internal electrical power protection against electrical source equipment shock According to the degree of protection against electrical Type B equipment shock Ordinary equipment According to the degree of (enclosed equipment without protection against harmful protection against ingress of... -
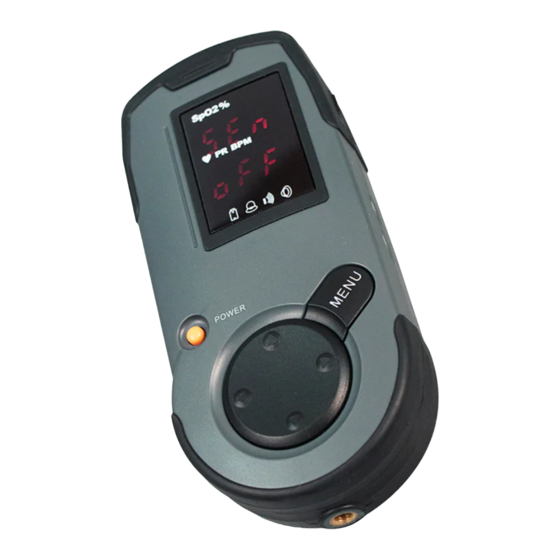
Page 13: General Descriptions
2. GENERAL DESCRIPTIONS SECTION HEADER The Handheld Pulse Oximeter has 8-segment digital LED for displaying data. It can display the SpO and pulse rate value, time & date, ID number, pulse bar as well as battery status etc. 2.1 Front Panel Please refer to Fig. - Page 14 2. GENERAL DESCRIPTIONS SECTION HEADER (Continued) Low power indicator. When the power is lower than 2.4V, the lamp indicated will be lighted, and the oximeter will power off automatically when the power is lower than 2.3V. Alarm Indicator: When technical alarm or physiological alarm occurs, the lamp indicated will turn red.
-
Page 15: Rear Panel
2. GENERAL DESCRIPTIONS SECTION HEADER (Continued) 2.2 Rear Panel Fig. 2 Rear panel Rear panel introduction 1. Battery compartment – Uses 2 AA-size alkaline batteries (not included) 2. Fixing hole 3. Fixing screw 4. Battery cover Battery Installation (Batteries Not Included): 1. - Page 16 2. GENERAL DESCRIPTIONS SECTION HEADER (Continued) 2. Install 2 batteries as indicated by the polarity sign. NOTE: Be sure to insert the batteries in the correct polarity, as indicated by polarity markings (+ and -) inside the battery cover. 3. Close battery cover: Close the battery cover and rotate the screw to the position, and the batteries are locked.
-
Page 17: Product Features
2. GENERAL DESCRIPTIONS SECTION HEADER (Continued) • Remove the batteries from this unit when you are not going to use it for a long period of time (approximately three months or more). • Do not use batteries of different types together. •... -
Page 18: Getting Started
3. GETTING STARTED SECTION HEADER 3.1 Unpacking and Checking Before unpacking, examine the packing case carefully for damage. If any damage is detected, contact your distributor. Open the package and remove the equipment and accessories carefully. Check all materials as per the packing list and check for any mechanical damage. -
Page 19: Connect The Sensor
3. GETTING STARTED (continued) unexpected consequences, e.g. may result in damage to the equipment. 3.3 Connect The Sensor 1. Before use, check the Pulse Oximeter for mechanical damage. 2. Install the alkaline batteries and ensure that the batteries have sufficient power. 3. -
Page 20: Starting Or Shutting Off The Oximeter
3. GETTING STARTED SECTION HEADER (Continued) 3.4 Starting or Shutting Off the Oximeter To start the Pulse Oximeter 1. Press and hold the Power button for 3 seconds. The LED and alarm lamp flashes, and then goes out. The system gives a beep and displays the startup screen. -
Page 21: Setting Id, Date And Time
4. SETTING ID, DATE & TIME Always set the date and time before using the unit for the first time. Set different ID numbers for different users. Check and make sure the date and time are correct before using the unit. Reset them if necessary. The date and time are important indicators when a measurement is taken. 4.1 Date &... -
Page 22: Id Number Setting
4. SETTING ID, DATE & TIME (continued) 4.2 ID Number Setting 1. After powering on, hit the menu button two times. You can enter into the ID setting screen. Press the up or down button to set the ID number and then press the menu button to confirm your setting. -
Page 23: Take A Measurement
5. TAKE A MEASUREMENT measuring is a non-invasive technique used to measure the amount of oxygenated hemoglobin and pulse rate by measuring the absorption of selected wavelengths of light. The light emitted by the red infrared light-emitting diodes passes through the tissue and is converted into electrical signals by a photodiode. -
Page 24: Factors That May Affect The Measurement
5. TAKE A MEASUREMENT (Continued) 5.1 Factors That May Affect The Measurement During operation, the accuracy of oximetry readings can be affected by the following factors: 5.1.1 Instrument performance depends on the pulsatile character of the artery. The display would not be considered reliable and accurate if the following conditions are present during measurement. - Page 25 5. TAKE A MEASUREMENT (Continued) 5.1.4 Other factors a. High-frequency electrosurgical interference from external devices, including defibrillators. b. Placement of a sensor on an extremity that currently has installed a blood pressure cuff, arterial catheter, or intravascular line. c. The patient has hypotension, severe vasoconstriction, severe anemia, or hypothermia.
-
Page 26: History Data Reviewing
5. TAKE A MEASUREMENT (Continued) NOTES: • Pulse sensor should obviate the light source, e.g. radial lamp or infrared lamp. • Set the upper limit of SpO alarm to 100% means cut off the upper alarm. High density of oxygen will cause adverse affection to the neonate. -
Page 27: Alarm Setting
6. HISTORY DATA REVIEWING (Continued) By using the right or down button, you can review the next or last group of measured data. If “S” displays on the screen after pressing the left button continuously, it means the last group is the newly measured data. -
Page 28: Character Definition
7. ALARM SETTING (Continued) Audible Alarm Indicators Audible alarms can be heard in a quiet environment. The audible alarm has different tone pitch and on-off beep patterns for each alarm priority. • High priority: SpO alarm “du-du-du ---------- du-du”, beeps every 8 seconds. •... -
Page 29: Pr Alarm Setting
7. ALARM SETTING (Continued) Low Alarm: After finishing the High Alarm setting, press the right button and you will see on the screen the SpO Low Alarm setting (refer to Fig. 10). Press the up or down button to adjust the number. The Low Alarm (SpO ) setting range is 70-99(%). -
Page 30: Alarm Activation
7. ALARM SETTING (Continued) Fig. 13 Fig. 14 7.6 Alarm Activation Alarm will be activated with the following conditions: Physiological alarm: • The alarm will work when the SpO value or pulse rate goes above the high-limit or goes below the low-limit. The difference is their priority;... -
Page 31: Beep On/Off
7. ALARM SETTING (Continued) E 11: The value of pulse rate is lower than the low limit. E 12: The value of pulse rate is higher than the high limit. E 13: Power supply is insufficient. When E9, E10, E11 or E12 occurs, the value of parameter will flash. -
Page 32: Maintain And Cleaning
9. MAINTAIN & CLEANING Use only the substances approved and methods listed in this chapter to clean or disinfect your equipment. Warranty does not cover damage caused by unapproved substances or methods. We make no claims regarding the efficacy of the listed chemicals or methods as a means for controlling infection. - Page 33 9. MAINTAIN & CLEANING (Continued) • Make sure that the environment and power supply meet the requirements. • Inspect the equipment and its accessories for mechanical damage. • Make sure that only specified accessories are applied. • Inspect if the alarm system functions correctly. •...
- Page 34 9. MAINTAIN & CLEANING (Continued) To clean your equipment, follow these instructions: 1. Shut down the Pulse Oximeter and take the batteries out of the battery cover. 2. Clean the display screen with soft, clean cloth dampened with a glass cleaner. 3.
-
Page 35: Calibration And Verification
9. MAINTAIN & CLEANING (Continued) 9.2 Calibration and Verification The performance should be checked every year and after any kind of maintenance or repair. Required Test Equipment: SpO signal simulator. NOTICE: The simulator cannot be used to assess the accuracy of a Pulse Oximeter probe or a Pulse Oximeter. 9.2.1 Control Key Verification Press Menu key to display the history data. -
Page 36: Trouble Shooting
9. MAINTAIN & CLEANING (Continued) 9.2.4 SpO & Pulse Rate Alarm Verification a. Connect SpO Probe to the SpO connector on the oximeter. b. Insert the operator’s finger into the finger sensor, the measured value of a healthy person should be more than 96%. c. -
Page 37: Warranty
(Continued) 9.4 Warranty 9.4.1 Exempt and Limitations (one year warranty) a. Dynarex isn’t responsible for such damage caused by a force of nature. For example: fire, thunder flash, flood, cyclone, hail, earthquake, house collapse, commotion, plane falling and traffic accident, deliberate damage, lack of fuel or water, labor and capital bother, strike and stop-working etc. - Page 38 9. MAINTAIN & CLEANING (Continued) 9.4.2 User Guarantees a. Please read user manual carefully before operation. b. Please operate and make daily maintenance as requested by the manual and warranty. c. Power supply and environment must be maintained under manual specifications. 9.4.3 What’s not Covered by Warranty •...
-
Page 39: Appendix A Specifications
9. MAINTAIN & CLEANING (Continued) • During measurement of SpO , principle leads to measuring value difficultly or inaccurate measurement. • Maintenance seal of Pulse Oximeter is not opened. 9.4.4 User’s Special Request for Warranty As indicated, according to the relevant electronic regulation of country, the warranty period is one year, limited warranty. - Page 40 APPENDIX A SPECIFICATIONS (Continued) Display range: 0%~100% Measurement range: 70%~100% Resolution: 1% Accuracy: ±3% (70-100%) Unspecified (0-69%) Measurement Wavelengths and Output Power Red 660nm @ 3mw nominal Infrared 940nm @ 3mw nominal Pulse Rate Display range: 0~254bpm Measurement range: 30~235bpm Resolution: 1bpm Accuracy: 30~99bpm: ±2bpm;...
- Page 41 APPENDIX A SPECIFICATIONS (Continued) Abbreviations CISPR International Special Committee on Radio Interference European Economic Community Electromagnetic Compatibility Identification International Electrotechnical Commission Light Emitting Diode Pulse Rate Radio Frequency SpO2 Arterial Oxygen Saturation from Pulse Oximeter Units ampere beats per minute °C centigrade gram...
- Page 42 APPENDIX A SPECIFICATIONS (Continued) Symbols – minus; negative © copyright percent per; divide; or plus equal to < less than > greater than ≤ less than or equal to ≥ greater than or equal to ± plus or minus × multiply APPENDIX B Guidance and manufacturer’s declaration –...
- Page 43 APPENDIX B (Continued) Guidance and manufacture’s declaration – Electromagnetic Immunity for Equipment and Systems that are not Life-Supporting 61000-4-6 3V/m Radiated 80Hz RF IEC to 2.5 GHz 61000-4-3 Where P is the maximum output power rating of the transmitter in Watts (W) according to the transmitter manufacture and d is the recommended separation distance in meters (m).
- Page 44 APPENDIX B (Continued) Recommended separation distances between portable and mobile RF communications equipment and the Handheld Pulse Oximeter The Handheld Pulse Oximeter is intended for use in an electromagnetic environment in which radiated RF disturbance are controlled. The customer or the user of the Handheld Pulse Oximeter can help prevent electromagnetic interference by maintaining a minimum distance between portable and mobile RF communication equipment (transmitters) and the Handheld Pulse Oximeter as recommended below, according to the...
Need help?
Do you have a question about the Resp-O2 and is the answer not in the manual?
Questions and answers