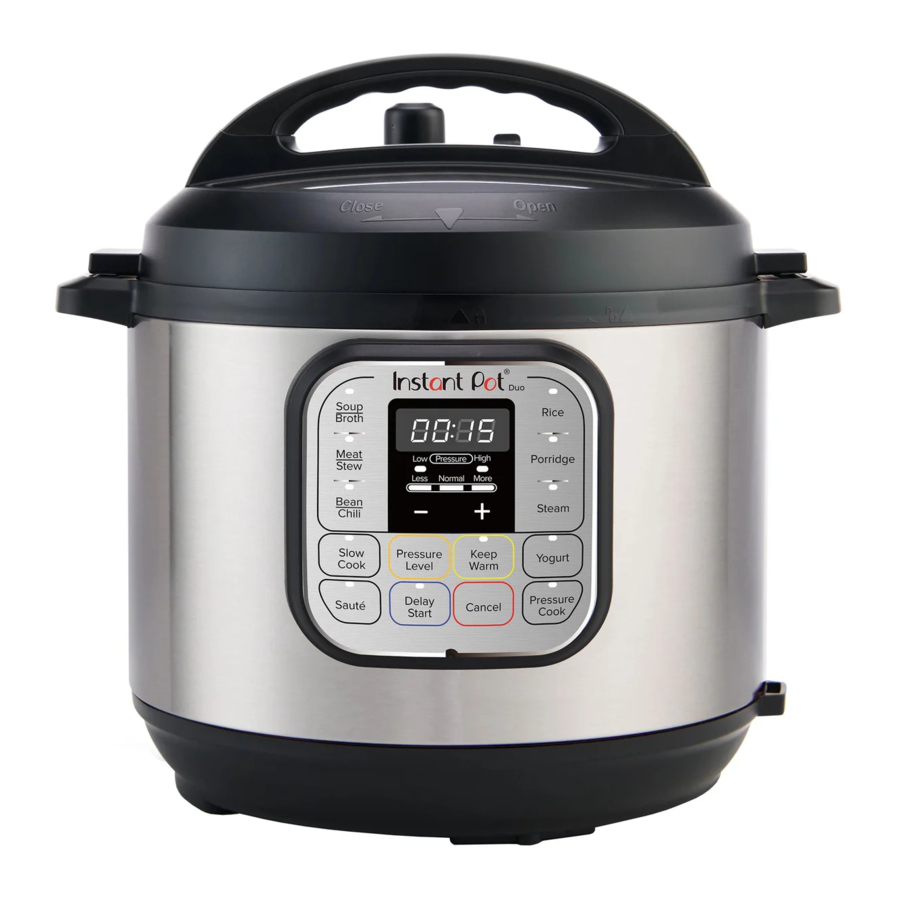
Instant Pot Duo Mini, Duo 60, Duo 80 - Pressure Cooker Manual
- Getting started manual (64 pages) ,
- User manual (57 pages) ,
- Safety, maintenance & warranty (12 pages)
Advertisement
- 1 Welcome to the world of Instant Cooking
- 2 Product, parts and accessories
- 3 Get started
- 4 Pressure cooking 101
- 5 Releasing pressure
- 6 Control panel
- 7 Status messages
- 8 Pressure control features (Your little bag of tricks!)
- 9 Pressure cooking
- 10 Other cooking styles
- 11 Care, cleaning and storage
- 12 IMPORTANT SAFEGUARDS
- 13 Documents / Resources
Welcome to the world of Instant Cooking
As the new owner of an Instant Pot® Duo™ 7-in-1 Multi Pressure Cooker, we'd like to welcome you to the Instant Community. At Instant Brands™, we are committed to helping homechefs worldwide to cook healthier, and get delicious meals on the table, quicker and easier than ever before. Our multifunctional cooking appliances will ignite your passion for making mealtimes amazing. We have created a world of cooking resources to help you on your journey to create a variety of culinary masterpieces at home.
Download the Instant Pot app to access 1000+ recipe ideas.

Subscribe to our e-newsletter to receive regular recipe e-books and find your next dinner favourite.

Join other Instant home chefs on the Instant Pot UK community on Facebook for tips, tricks, and inspiration from the recipes they have created.

And of course, we want to hear from you, so don't forget to tag us online @instantpotuk and share your experiences and the dishes you create using #InstantChefAtHome #instantpot.

The Instant Pot® simplifies the joys of home cooking. The Duo™ does everything you can do with 7 other appliances: pressure cooker, sauté pan, steamer, slow cooker, rice cooker, food warmer, and yogurt maker. Clear the clutter from your counter and do it all with just one tool. If you have any comments or queries, please get in touch with us via the helpdesk on www.instantpot.co.uk/support/instant-pot-help-desk/ or by sending an email to EUSupport@ instantbrands.com. You may also find the Frequently Asked Questions page on our website useful, which answers common Pressure Cooking questions. Finally, don't forget to register your appliance online, simply head to www.instantpot.co.uk.
Product, parts and accessories
Represents all Duo Mini, 5.7 and 8 Litre models. See Care, cleaning and storage: Removing and installing parts to find out how everything fits together.
Top of lid

Bottom of lid

 Stand the lid up in the multicooker base to keep it off your countertop! Insert the left or right lid fin into the corresponding slot in the multicooker base handles to stand it up and save some space.

Illustrations in this document are for reference only and may differ from the actual product. Always refer to the actual product.
Inner pot

Multicooker base

Get started
Initial set up (It won't bite!)
You — yes, you — can do this!
![]() "This is my invariable advice to people: Learn how to cook — try new recipes, learn from your mistakes, be fearless, and above all have fun!" – Julia Child
"This is my invariable advice to people: Learn how to cook — try new recipes, learn from your mistakes, be fearless, and above all have fun!" – Julia Child
- Take that Duo out of the box!
- Remove all packaging material and accessories from in and around the multicooker.
![]() Check under the inner pot!
Check under the inner pot! - Wash the inner pot in a dishwasher or with hot water and washing up liquid. Rinse with warm, clear water and use a soft cloth to thoroughly dry the outside of the inner pot.
- Wipe the heating element with a soft, dry cloth to make sure there are no stray packaging particles left in the multicooker base.
![]() Do not remove the safety warning stickers from the lid or the rating label from the back of the multicooker base.
Do not remove the safety warning stickers from the lid or the rating label from the back of the multicooker base. - You may be tempted to put the Duo on your hob — but don't do it!
Place the multicooker base on a stable, level surface, away from combustible material and external heat sources.
Is anything missing or damaged?
Get in touch with a Customer Care Advisor by email at EUSupport@instantbrands.com or by phone on +44 (0) 3331 230051 and we'll happily make some magic happen for you!
Feeling keen?
- Check outProduct, parts and accessories to get to know your Instant Pot's components, then read the Pressure control features for an in-depth look.
- While you're doing theInitial test run (water test), read Pressure cooking 101 to find out how the magic happens!

Read the Important safeguards before using the appliance. Failure to read and follow those instructions for safe use may result in damage to the appliance, property damage or personal injury.
Do not place the appliance on a hob or on another appliance.
Heat from an external source will damage the appliance.
Do not place anything on top of the appliance, and do not cover or block the steam release handle or anti-block shield, located on the appliance lid.
Initial test run (water test)
Do you have to do the water test? No — but getting to know the ins and outs of your Duo prepares you for success in the kitchen! Take a few minutes to get to know how this baby works.
Stage 1: Setting up the Duo for pressure cooking
- Remove the inner pot from the multicooker base and add 750 mL of water to the inner pot, then place it back inside the multicooker base.
- Secure the power lead to the base power socket at the back of the multicooker base. Make sure the connection is tight.
Connect the power lead to a 220–240V power source. The display shows OFF. - Place and close the lid as described in Pressure control features: Pressure cooking lid.
- Turn the steam release handle to the Sealing position.
Stage 2: "Cooking" (...hot water à la king, anyone?)
- Select Pressure Cook.
- Use the − / + buttons to adjust the cooking time to 5 minutes (00:05).
![]() Adjustments are saved when a Smart Programme starts, so the next time you use Pressure Cook, it will default to 5 minutes.
Adjustments are saved when a Smart Programme starts, so the next time you use Pressure Cook, it will default to 5 minutes. - Press Keep Warm to turn the automatic Keep Warm setting off.
- The multicooker beeps after 10 seconds and the display shows On.
While the multicooker does its thing, read Pressure cooking 101 on the next page to find out how the magic happens. - When the Smart Programme is complete, the display shows End.
 Adjustments are saved when a Smart Programme starts, so the next time you use Pressure Cook, it will default to 5 minutes.
Stage 3: Releasing pressure
- Follow instructions for a Quick Release in Releasing pressure: Venting methods.
- Wait for the float valve to drop, then carefully open and remove the lid as described in Pressure control features: Pressure cooking lid.
- Using proper hand protection, remove the inner pot from the multicooker base, discard the water and thoroughly dry the inner pot.

Pressurised steam is released through the top of the steam release handle. Keep exposed skin away from the steam release handle.

DO NOT attempt to remove the lid while the float valve is up and NEVER attempt to force the lid open. Contents are under extreme pressure. Float valve must be down before attempting to remove the lid. Failure to follow these instructions may result in serious personal injury and/or property damage.
The inner pot will be hot after cooking. Always use appropriate heat protection when handling a hot inner pot.
Pressure cooking 101
Pressure cooking uses steam to raise the boiling point of water above 100ºC. These high temperatures allow you to cook food much faster than normal.
Behind the magic curtain
When pressure cooking, the Instant Pot goes through 3 stages.
Pre-heating
| What you see | What you don't see | Tips |
| The display shows On. | While the multicooker pre-heats, it vaporises liquid to create steam. Once enough steam has built up, the float valve pops up and locks the lid in place. | The time it takes for the multicooker to pressurise depends on things like food and liquid temperature and volume. Frozen foods have the longest preheating time. For the fastest results, thaw your food before cooking it. No need to hang around during this stage — trust that IP magic! |
Cooking
| What you see | What you don't see | Tips |
| The float valve bobs up and down from all the steam, then pops up and stays flush with the lid. The display switches to the cooking countdown timer. | When it reaches the required pressure level, cooking begins. The Instant Pot automatically maintains the cooking pressure at High or Low pressure. | A higher pressure means a higher temperature. Smart Programme settings (e.g., cooking time, pressure level, etc.) can be adjusted at any time during cooking. |
Releasing pressure
| What you see | What you don't see | Tips |
| If Keep Warm is on after cooking, the timer counts up from 00:00. If not, the multicooker goes back to standby and the display shows End. The float valve is still popped up. | Although food has finished cooking, the multicooker is still pressurised and hot, which is why the float valve is up. Releasing pressure lowers the temperature inside the multicooker, which allows you to safely remove the lid once the float valve has dropped. | See Releasing pressure for information on safe venting techniques and what they're used for. Follow your recipe instructions to choose the best venting method for your meal. The Instant Pot cools faster if Keep Warm is turned off. |
For Troubleshooting tips, view the full user manual online at instantpot.co.uk.
Releasing pressure
You must release pressure after pressure cooking before attempting to open the lid. Follow your recipe's instructions to choose a venting method, and always wait until the float valve drops into the lid before opening.
Venting methods

- Natural Release (NR or NPR)
- Quick Release (QR or QPR)
- Timed Natural Release
Steam ejected from the steam release handle is hot. DO NOT place hands, face or any exposed skin over the steam release handle when releasing pressure.
DO NOT cover the steam release handle.
DO NOT attempt to remove the lid while the float valve is up and NEVER attempt to force the lid open. Contents are under extreme pressure. Float valve must be down before attempting to remove the lid. Failure to follow these instructions may result in serious personal injury and/or property damage.
Natural Release (NR or NPR)
Cooking stops gradually. As the temperature within the multicooker drops, the Instant Pot depressurises naturally over time.
| What to do | What to expect |
Once cooking is finished, leave the steam release handle in the Sealing position until all pressure is released. | Your meal continues to cook even after the Smart Programme has ended.This is called "carryover cooking" or "resting", and it's great for large cuts of meat. The depressurisation time may vary based on the volume, type and temperature of food and liquid. It can take up to 40 minutes with some dishes, so plan ahead — it's well worth the wait! When the pressure has been fully released, the float valve drops into the lid. |
NOTICE
Use NR to depressurise the multicooker after cooking high-starch foods (e.g., soups, stews, chilis, pasta, oatmeal and congee) or after cooking foods that expand when cooked (e.g., beans and grains).
Quick Release (QR or QPR)
Stops cooking quickly and prevents overcooking. Perfect for quick-cooking vegetables and delicate seafood!
| What to do | What to expect |
Carefully, quickly and confidently, turn the steam release handle to Venting and wait for all pressure inside the multicooker to be released. | A jet of steam is ejected through the top of the steam release handle. This is normal! When the pressure has been fully released, the float valve drops into the lid.  |
Timed natural release
The carryover cooking continues for a specific amount of time, then stops quickly when you release the remaining pressure. Perfect for finishing rice and grains.
| What to do | What to expect |
| Leave the steam release handle in the Sealing position for a while (according to your recipe) then turn it to Venting and wait for all pressure inside the multicooker to be released. | A jet of steam is ejected through the top of the steam release handle. The temperature within the multicooker drops, so the steam release may not be as powerful as a normal QR. The temperature within the multicooker drops, so the steam release may not be as powerful as a normal QR.When the pressure has been fully released, the float valve drops into the lid. |
If there is substantial spatter while venting, turn the steam release handle back to Sealing. Wait a few minutes before trying to release pressure again. If spatter continues, use NR to safely release the remaining pressure.
Steam ejected from the steam release handle is hot. DO NOT place hands, face or any exposed skin over the steam release handle when releasing pressure.
NOTICE
Do not use QR when cooking fatty, oily, thick or high-starch foods (e.g., stews, chilis, pasta and congee) or when cooking foods that expand when cooked (e.g., beans and grains).
Illustrations in this document are for reference only and may differ from the actual product.
Always refer to the actual product.
Control panel

| 1 | Smart Programmes | Pressure cooking
| Non-pressure cooking
|
| 2 | Time display | Shows the time in HH:MM format. Counts up or down, depending on the Smart Programme. | |
| 3 | Pressure fields | LEDs show if the multicooker is using Low or High pressure during pressure cooking. | |
| 4 | Less / Normal / More | Pre-set cooking time or temperature levels, depending on the Smart Programme. | |
| 5 | − / + buttons | Adjust time for cooking, Delay Start and Keep Warm. | |
| 6 | Pressure level | Toggle between Low Pressure and High Pressure. | |
| 7 | Keep Warm | Turns the Keep Warm setting on or off. | |
| 8 | Delay Start | Delay the start of cooking. | |
| 9 | Cancel | Stop a Smart Programme at any time. | |
Status messages
 | The Instant Pot is in standby mode, ready for action! |
 | May indicate that the lid is missing or is not properly secured. |
 | The multicooker is pre-heating. |
 | The Rice Smart Programme is running. |
 | The Yogurt Smart Programme is in the process of pasteurising milk (i.e., the Yogurt Smart Programme is set to More). |
 | The inner pot has reached the perfect temperature and is ready to start cooking your food. Only applies to Sauté. Only applies to Sauté. |
 | Display shows one of the following:
|
 | The Smart Programme has finished and Keep Warm is off. |
 | The multicooker is overheating due to insufficient liquid. See Troubleshooting for more information. |
Can you see something else? See Troubleshooting for more information.
Pressure control features (Your little bag of tricks!)
See Care, cleaning and storage for installation and removal of parts.
Pressure cooking lid
| What we love about it | What you should know about it |
| The lid was designed with lid fins that fit perfectly inside the handles on the left and right sides of the multicooker base to help keep your countertop dry! When the Instant Pot is plugged in, it plays a little jingle when you open and close the lid. | The lid is removable during non-pressure cooking so you can taste-test as you go. When you're pressure cooking, the lid only locks into place once the multicooker is pressurised. Try not to remove the lid unnecessarily! |
Removing the lid

- Grip the lid handle and turn it anticlockwise to align the symbol on the lid
![]() with the symbol on the rim of the multicooker base
with the symbol on the rim of the multicooker base ![]() .
. - Lift the lid up and off the multicooker base towards your body.


Closing the lid

- Align the symbol on the lid
![]() with the symbol on the multicooker base
with the symbol on the multicooker base ![]() , then lower the lid onto the track.
, then lower the lid onto the track. - Turn the lid clockwise until the symbol on the lid
![]() aligns with the symbol on the multicooker base.
aligns with the symbol on the multicooker base.
Illustrations in this document are for reference only and may differ from the actual product.
Always refer to the actual product.
Only use a compatible Instant Pot Duo lid with the Instant Pot Duo multicooker base. Using any other pressure cooker lids may cause injury and/or damage.
Always check the lid for damage and excessive wear prior to cooking.
Steam release handle
The steam release handle controls the steam, venting it from the top of the steam release handle, or sealing it inside the Instant Pot.
| What we love about it | What you should know about it |
It's easy to tell when the handle is in the Sealing or Venting position. | The steam release handle sits loosely on the steam release pipe to pivot easily while under pressure, so it may feel a bit wobbly. This is normal! |
The steam release handle is integral to product safety and necessary for pressure cooking. It should be installed before use and cleaned regularly.
See Releasing pressure for safe venting methods and information on pressurisation and depressurisation.
Do not cover or block the steam release handle in any way.
Sealing ring
When the pressure cooking lid is closed, the sealing ring creates an airtight seal between the lid and the inner pot.
The sealing ring must be installed before using the multicooker. Only one sealing ring should be installed in the lid at a time.
Silicone is porous, so it absorbs strong aromas and certain flavours. Keep extra sealing rings on hand to limit the transfer of aromas and flavours between dishes.

Only use authorised Instant Pot sealing rings. DO NOT use a stretched or damaged sealing ring.
- Always check for cuts, deformation and correct installation of the sealing ring before cooking.
- Sealing rings stretch over time with normal use. The sealing ring should be replaced every 12–18 months or sooner if you notice stretching, deformation or damage.
Failure to follow these instructions may cause food to discharge, which may lead to personal injury or property damage.
Float valve
The float valve is a visual indication of whether there is pressure in the multicooker (pressurised) or not (depressurised). It appears in two positions:
Pressurised
The float valve has visibly popped up and is flush with the lid.

Depressurised
The float valve has dropped down into the lid.

DO NOT attempt to remove the lid while the float valve is up and NEVER attempt to force the lid open. Contents are under extreme pressure. Float valve must be down before attempting to remove the lid. Failure to follow these instructions may result in serious personal injury and/or property damage.
Anti-block shield
The anti-block shield prevents food particles from coming up through the steam release pipe, assisting with pressure regulation.
The anti-block shield is integral to product safety and necessary for pressure cooking.

Illustrations in this document are for reference only and may differ from the actual product.
Always refer to the actual product.
Pressure cooking
Whether you're a whiz in the kitchen or a complete newbie, these Smart Programmes help you get cooking at the touch of a button.

- Soup/Broth
- Meat/Stew
- Bean/Chili
- Poultry*
- Rice
- Multigrain*
- Porridge
- Steam
- Pressure Cook
• *Not available on 3 Litre model. Use Pressure Cook instead.
Using pressurised steam guarantees your dish is cooked evenly and deeply, for the delicious results you expect every time.
| Pressure level | Suggested use | Notes |
| Low Pressure 5.8 – 7.2 psi (35–55 kPa) | Fish and seafood, soft vegetables and rice. | The pressure level controls the temperature, so a higher pressure results in a higher cooking temperature. |
| High Pressure 10.2 – 11.6 psi (65–85 kPa) | Eggs, meat, poultry, root vegetables, oats, beans, grains, bone broth, stew, chili. |
To avoid scorching or scalding injuries, be cautious when cooking with more than 60 mL of oil, oil-based sauces, condensed cream-based soups and thick sauces. Add suitable liquid to thin sauces. Avoid recipes that call for more than 60 mL of oil or fat content.
Always cook with the inner pot in place. Food must be placed in the inner pot. DO NOT pour food or liquid into the multicooker base. To avoid risk of personal injury and/or property damage, place food and liquid ingredients in the inner pot, then insert the inner pot into the multicooker base.
Do not fill inner pot higher than the PC MAX — 2/3 (Pressure Cooking Maximum) line as indicated on the inner pot. When cooking foods that foam or froth (e.g., stewed apples, cranberries or split peas) or expand (e.g., oats, rice, beans, pasta) do not fill the inner pot higher than the — 1/2 line as indicated on the inner pot.
Always inspect the lid and inner pot carefully to make sure they are clean and in good working order before use.
- To avoid personal injury or damage to the appliance, replace the inner pot if it is dented, distorted or damaged.
- Use only authorised Instant Pot inner pots made for this model when cooking. Always make sure the inner pot and heating element are clean and dry before inserting the inner pot into the multicooker base.
Failure to follow these instructions may damage the multicooker. Replace damaged parts to make sure it is safe to use.
To create steam, pressure cooking liquids should be water-based, such as broth, stock, soup or juice. If using tinned, condensed or cream-based soup, add water as directed below.
| Instant pot size | Minimum liquid for pressure cooking |
| 3 Litres | 250 mL |
| 5.7 Litres | 375 mL |
| 8 Litres | 500 mL |
*Unless otherwise specified by your recipe.
To get pressure cooking, follow the same basic steps as you did in the Initial test run (water test) — but add food this time!
Using the multi-functional rack will ensure your food items are steamed and not boiled. It helps to heat food evenly, prevents nutrients from leeching into the cooking liquid, and stops food items from scorching on the bottom of the inner pot.
When the Smart Programme is complete, follow your recipe to select the appropriate venting method. See Releasing pressure: Venting methods for safe venting techniques. Find full instructions for use and pressure cooking timetables online at instantpot.co.uk.
Find tried and trusted recipes as well as pressure cooking timetables under the Recipes tab at instantpot.co.uk, and download the Instant Pot app from instantpot.com/app!
DO NOT attempt to remove the lid while the float valve is up and NEVER attempt to force the lid open. Contents are under extreme pressure. Float valve must be down before attempting to remove the lid. Failure to follow these instructions may result in serious personal injury and/or property damage.
Use a meat thermometer to ensure meat reaches a safe minimum internal temperature. Refer to the WHO (World Health Organization) website at https://www.who.int/foodsafety/publications/consumer/en/5keys_en.pdf?ua=1 and/or review your local government's food safety recommendations for more information.
Other cooking styles
The Duo is much more than a pressure cooker. These Smart Programmes don't cook with pressure but are just as easy to use.

- Slow Cook
- Sauté
- Yogurt
Always inspect your Instant Pot pressure cooking lid, inner pot and multicooker base carefully to make sure they are clean and in good working order before use.
Always cook with the inner pot in place. Food must be placed in the inner pot. DO NOT pour food or liquid into the multicooker base. To avoid risk of personal injury and/or property damage, place food and liquid ingredients in the inner pot, then insert the inner pot into the multicooker base.
Do not fill inner pot higher than the PC MAX — 2/3 (Pressure Cooking Maximum) line as indicated on the inner pot. When cooking foods that foam or froth (e.g., stewed apples, cranberries or split peas) or expand (e.g., oats, rice, beans, pasta) do not fill the inner pot higher than the — 1/2 line as indicated on the inner pot.
Always inspect the lid and inner pot carefully to make sure they are clean and in good working order before use.
- To avoid personal injury or damage to the appliance, replace the inner pot if it is dented, distorted or damaged.
- Use only authorised Instant Pot inner pots made for this model when cooking. Always make sure the inner pot and heating element are clean and dry before inserting the inner pot into the multicooker base.
Failure to follow these instructions may damage the multicooker. Replace damaged parts to make sure it is safe to use.
Slow Cook
Slow Cook is compatible for use with any standard slow cooker recipe, so you can keep cooking your classics!
![]() If the float valve rises, make sure the steam release handle is set to the Venting position. See Pressure control features: Steam release handle.
If the float valve rises, make sure the steam release handle is set to the Venting position. See Pressure control features: Steam release handle.
| Setting | Suggested Use | Notes |
| Less | Low setting on standard slow cookers. | Less is commonly used for low and slow, all-day cooking and should be set for a minimum of 10 hours (10:00) for best results. You can use a glass lid for slow cooking if it has a venting hole. Make sure the steam release handle is set to Venting. |
| Normal | Medium setting on standard slow cookers. | |
| More | High setting on standard slow cookers. |
Find full instructions for use online at instantpot.co.uk.
Sauté
Sauté can be used in place of a frying pan, griddle or flat-top grill.
| Setting | Suggested Use | Notes |
| Less | Simmering, thickening and reducing liquids. | The display switching from Hot to On indicates that the multicooker is maintaining the cooking temperature. As a safety precaution, 30 minutes is the maximum cooking time. |
| Normal | Pan searing or sautéing. | |
| More | Stir-frying or browning meat. |
When pressure cooking after using Sauté, deglaze the inner pot to make sure food items do not scorch.
To deglaze: Remove food items from the inner pot and add a thin liquid (e.g., water, broth, wine) to the hot surface. Use a wooden or silicone scraper to loosen anything that may be stuck to the bottom of the inner pot.
The Sauté Smart Programme reaches high temperatures. If unmonitored, food may burn on this setting. Do not use the lid and do not leave your multicooker unattended while using Sauté.
Yogurt
Yogurt is designed to effortlessly produce delicious fermented dairy and non-dairy recipes.
| Instant Pot Size | Minimum Milk Volume | Maximum Milk Volume |
| 3 Litres | 500 mL | 1.9 L |
| 5.7 Litres | 1000 mL | 3.8 L |
| 8 Litres | 1500 mL | 5.8 L |
| Setting | Suggested Use | Notes |
| Less | For lower temperature fermentation (e.g., Jiu Niang, a sweet fermented glutinous rice dessert). | Default fermentation time is 24 hours (24:00). Adjust fermentation time based on recipe. |
| Normal | Fermenting milk after culture has been added. | A longer fermentation will result in tangier yogurt. Adjust as desired up to 99 hours and 30 minutes (99:30). |
| More | Pasteurising milk. | Pasteurisation time is pre-set and cannot be adjusted. Display shows boiL while pasteurisation is running. For extra thick yogurt, pasteurise milk twice! |
Care, cleaning and storage
Clean your Duo and its parts after each use. Failure to follow these cleaning instructions may result in catastrophic failure, which may lead to property damage and/or severe personal injury.
Always unplug your multicooker and allow it to cool to room temperature before cleaning. Never use metal scouring pads, abrasive powders or harsh chemical detergents on any of the Instant Pot's parts or accessories.
Allow all surfaces to dry thoroughly before use and before storage.
| Parts | Cleaning methods and instructions |
Accessories
| Dishwasher safe if placed on the top rack. |
Lid and parts
| Dishwasher safe if placed on the top rack. Remove all the parts from the lid before cleaning. See Care, cleaning and storage: Removing and installing parts.
|
| Inner pot | Dishwasher safe.
|
| Detachable power lead | Hand wash only. Do not wash in a dishwasher.
|
| Multicooker base | Hand wash only. Do not wash in a dishwasher.
|
Some discolouration may occur after washing in a dishwasher, but this will not affect the cooker's safety or performance.
The Instant Pot multicooker base contains electrical components. To avoid fire, electrical leakage or personal injury, make sure the multicooker base stays dry.
- DO NOT immerse the multicooker base in water or other liquid, or attempt to run it through a dishwasher.
- DO NOT rinse the heating element.
- DO NOT submerge or rinse the power lead or plug.
Removing and installing parts
Silicone sealing ring
Remove the sealing ring
Grip the edge of the silicone and pull the sealing ring out from behind the circular stainless steel sealing ring rack. With the sealing ring removed, inspect the steel rack to make sure it is secured, centred and an even height all the way around the lid. Do not attempt to repair a deformed sealing ring rack.

Install the sealing ring
Place the sealing ring over the sealing ring rack and press it into place. Press down firmly to prevent puckering. When installed properly, the sealing ring is snug behind the sealing ring rack and should not fall out when the lid is turned over.

Steam release handle
Remove the steam release handle
Pull the steam release handle up and off the steam release pipe.
The steam release handle must be installed before using the multicooker.

Install the steam release handle
Place the steam release handle on the steam release pipe and press down firmly.
The steam release handle sits loosely on the steam release pipe when installed properly but should remain in place when the lid is turned over.

Anti-block shield
Remove the anti-block shield
Grip the lid like a steering wheel and use your thumbs to press firmly against the side of the anti-block shield (pressing towards the side of the lid and up) until it pops off the prongs underneath.

Install the anti-block shield
Place the anti-block shield over the prongs and press down until it snaps into position.
Do not attempt to operate the pressure cooker without the anti-block shield installed.

Float valve and silicone cap
Remove the float valve
Place one finger on the flat top of the float valve, then turn the lid over. Detach the silicone cap from the bottom side of the float valve. Remove the float valve from the top of the lid.
![]() Do not discard the float valve or silicone cap.
Do not discard the float valve or silicone cap.

Install the float valve
Drop the narrow end of the float valve into the float valve hole on the top of the lid. Place one finger on the flat top of the float valve, then turn the lid over. Firmly attach the silicone cap to the bottom of the float valve.
Do not attempt to operate the pressure cooker without having the float valve and/ or silicone cap properly installed in the pressure cooking lid.

Condensation collector
The condensation collector sits at the back of the multicooker base and catches any overflow from the condensation rim.
It should be installed before cooking, then emptied and rinsed out after each use.
Remove the condensation collector
Pull the condensation collector away from the multicooker base; do not pull down. Note the tabs on the multicooker base and the grooves on the condensation collector.
Install the condensation collector
Align the grooves on the condensation collector over the tabs on the back of the multicooker base and slide the condensation collector into place.

IMPORTANT SAFEGUARDS
At Instant Brands™ your safety always comes first. The Instant Pot® Duo™ was designed with your safety in mind, and we mean business. Check out this Instant Pot's long list of safety mechanisms at instantpot.co.uk to see what we mean. As always, be careful when using electrical appliances and follow basic safety precautions.
- READ THE GETTING STARTED GUIDE AND ALL INSTRUCTIONS, SAFEGUARDS AND WARNINGS BEFORE OPERATING THE APPLIANCE. FAILURE TO FOLLOW THESE SAFEGUARDS AND INSTRUCTIONS MAY RESULT IN INJURY AND/OR PROPERTY DAMAGE.
- Using any other pressure cooker lids may cause injury and/or damage. The Instant Pot tempered glass lid, which can be purchased separately, may be used for nonpressure cooking.
- Do not allow children near the pressure cooker when in use. Children should not play with the appliance. Use only the Instant Pot Duo lid with the Instant Pot Duo pressure cooker base.
- Do not put the pressure cooker into a hot oven or on any heated surface.
- Do not move the pressure cooker while under pressure.
- Do not use the pressure cooker for any purpose other than that for which it is intended.
- This appliance cooks under pressure. Scalds may result from inappropriate use of the pressure cooker. Make sure the cooker is properly closed before applying heat. Refer to the Getting Started Guide.
- Never force open the pressure cooker. Do not open before making sure that its internal pressure has completely dropped. Refer to the Getting Started Guide.
- Never use your pressure cooker without adding water as this would seriously damage it.
- Do not fill the cooker beyond 2/3 of its capacity. When cooking foodstuffs which expand during cooking, such as rice or dehydrated vegetables, do not fill the cooker to more than 1/2 of its capacity.
- When cooking doughy food, use caution when removing the lid to avoid food being ejected.
![]()
Read this manual carefully and completely and retain for future reference. Failure to adhere to safety instructions may result in serious injury or damage. - Use the appropriate heat source(s) according to the Getting Started Guide.
- After cooking meat with a skin (such as ox tongue), which may swell under the effect of pressure, do not prick the meat while the skin is swollen as you may be scalded.
- The heating element surface inside the Instant Pot base is subject to residual heat after use; do not touch.
- Before each use, check that the valves are not obstructed. Refer to the Getting Started Guide.
- Never use the pressure cooker in its pressurised mode for deep or shallow frying of food.
- Do not tamper with any of the safety systems beyond the maintenance instructions specified in the instructions for use.
- Only use Instant Pot spare parts and accessories in accordance with the relevant model. In particular, use a body and a lid from the same manufacturer indicated as being compatible.
- Do not operate any appliance with a damaged lead or plug, or after the appliance malfunctions or has been damaged in any way. If the power supply lead is damaged, users should contact Customer Care for further assistance.
- For domestic use only. Not intended for commercial or outdoor use.
- Be aware that certain foods such as stewed apples, cranberries, pearl barley, oatmeal or other cereals, split peas, noodles, macaroni, rhubarb or spaghetti can foam, froth and clog the steam release. These foods should not be cooked under pressure cooking settings unless as directed in Instant Pot cooker recipes.
- This appliance should not be used by children, by individuals whose physical, sensory or mental abilities prevent safe use of the appliance, or by individuals with limited knowledge of how to use a pressure cooker. Close supervision is needed when using this appliance near these individuals.
- Spilled food can cause serious burns. A short power-supply lead is provided to reduce the hazards resulting from grabbing, entanglement and tripping.
- Keep the appliance and lead away from children.
- Never drape the power lead over edges of tables or counters.
- Never use below-counter power sockets, and never use with an extension lead.
- Unplug your Instant Pot and let it cool before cleaning. Allow all surfaces to dry thoroughly before use.
- The appliance is not intended to be operated by means of an external timer or a separate remote-control system.
- Do not immerse the cooker base in water. To protect against electric shock, do not immerse the lead, power plug or cooker base in any liquid.
- Always make sure the sealing ring is completely set in the groove on the inside of the sealing ring rack.
- Avoid spillage on the connector.
SAVE THESE INSTRUCTIONS.
To avoid injury, read and understand the instructions in this user manual before attempting to use this appliance.

Electric shock hazard. Use earthed socket only.
- DO NOT remove earthing.
- DO NOT use an adapter.
- DO NOT use an extension lead. Failure to follow these instructions may result in electric shock and/or serious injury.
THE FAILURE TO FOLLOW ANY OF THE IMPORTANT SAFEGUARDS AND/OR THE INSTRUCTIONS FOR SAFE USE IS A MISUSE OF YOUR APPLIANCE THAT CAN VOID YOUR WARRANTY AND CREATE THE RISK OF SERIOUS INJURY.
Special lead set instructions
As per CE safety requirements, a short power supply lead is provided to reduce the hazards resulting from grabbing, entanglement and tripping.
This appliance has an earthed plug. To reduce the risk of electric shock, plug the power lead into an earthed and easily accessible electric socket.
Product specifications
The tables below represent all available models in the 7-in-1 Duo family. To view a full list of sizes, colours and patterns, go to instantpot.co.uk.
 |  |  |  |  | ||
| Duo Mini | 700 W | 220–240V~ 50/60 Hz | 3 Litres | 3.9 kg | ||
| Duo 60 | 1000 W | 220–240V~ 50/60 Hz | 5.7 Litres | 5.4 kg | ||
| Duo 80 | 1200 W | 220–240V~ 50/60 Hz | 8 Litres | 7.2 kg | ||
 | Duo Mini | Duo 60 | Duo 80 |
| cm: 29 L x 25.5 W x 28.5 H | cm: 33.5 L x 31 W x 31.7 H | cm: 37.6 L x 33.8 W x 36.1 H |
*Not all models and sizes are available in all countries.
Find your model name and serial number
Model name: Find it on the label on the back of the multicooker base, near the power lead.
Serial number: Turn the multicooker base over — you'll find this info on a sticker on the bottom.
Full how-to videos, FAQs and more available at instantpot.co.uk.
Download the Instant Pot app with 1000+ recipes at instantpot.com/app.

Documents / Resources
References
![instantbrands.com]() Corelle Brands
Corelle Brands![www.instantpot.co.uk]() Instant Pot Brands Kitchen Appliances - Official Instant UK Site
Instant Pot Brands Kitchen Appliances - Official Instant UK Site![instantpot.co.uk]() Instant Pot Brands Kitchen Appliances - Official Instant UK Site
Instant Pot Brands Kitchen Appliances - Official Instant UK Site
Download manual
Here you can download full pdf version of manual, it may contain additional safety instructions, warranty information, FCC rules, etc.
Download Instant Pot Duo Mini, Duo 60, Duo 80 - Pressure Cooker Manual
Advertisement


Need help?
Do you have a question about the Duo Mini and is the answer not in the manual?
Questions and answers