PetSafe Healthy Pet Simply Feed PFD00-14574 - Automatic Feeder Manual
- Operating manual (24 pages) ,
- Quick manual (2 pages)
Advertisement
- 1 Components
- 2 How the System Works
- 3 Features, Controls and Indicators
- 4 Key Definitions
- 5 Icon and Button Quick Guides
- 6 Specifications
- 7 OPERATING GUIDE
- 8 Operating Mode
- 9 Care and Cleaning
- 10 Power Adapter Operation
- 11 Troubleshooting
- 12 IMPORTANT SAFETY INFORMATION
- 13 Replacement Parts and Accessories
- 14 Customer Care International
- 15 Documents / Resources
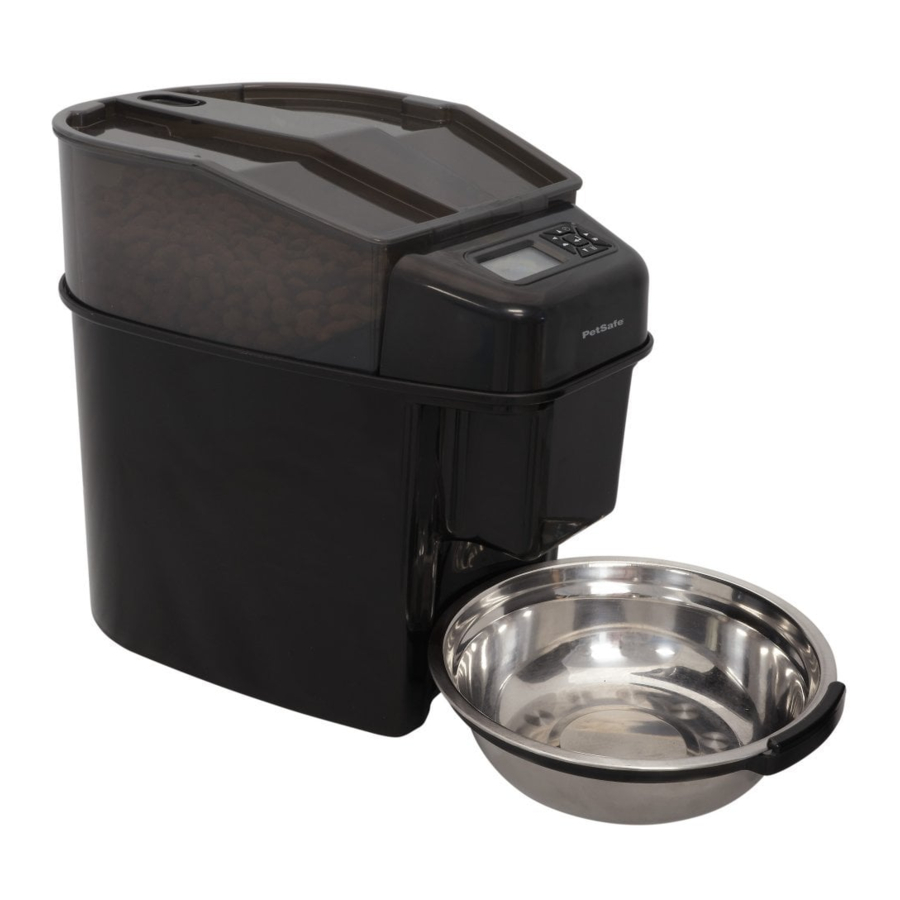
Components
Note: Bowl and bowl holder are shipped inside feeder.

4 D-cell alkaline batteries required. Batteries NOT included.
How the System Works
With its stylish and advanced design, the Healthy Pet Simply Feed™ gives you peace of mind knowing your pet is fed the right portion at the right time whether you are home or away---all while complementing your home décor. Using an innovative conveyor, the Healthy Pet Simply Feed™ consistently controls the food dispensed for your pet, per the portion and schedule you set. Setup is quick with the dog or cat feeding schedules, with preset meal portions dispensed twice a day. The user option allows you to customize your feeding schedule for up to 12 meals each day, giving you the best way to manage your pet's feeding routine. This is especially useful if specialized, smaller portions are required more frequently each day. Fewer refills are needed with the 24-cup capacity hopper, which is translucent for monitoring the food level. Additionally, the unique Slow Feed option is a perfect solution to help with a pet that gulps or eats too fast by slowly dispensing each meal. A scheduled meal can easily be dispensed at the touch of a button with the Immediate Feed option. The Pause Feed option temporarily stops the feeder from dispensing food until pause is removed. This is useful if you want to skip a meal or if going away with your pet for a few days. Programming is easy using the LCD screen and 5-Button Navigation. Ideally, through collaboration with your veterinarian on portions and feeding frequency, the Healthy Pet Simply Feed™ aids you with your pet's proper weight management by providing a consistent, portion-controlled feeding routine for a healthier, happier pet!
Features, Controls and Indicators

Key Definitions
5-Button Navigation: Group of 5 buttons on control panel with up arrow key, down arrow key, left arrow key, right arrow key, and enter/select key used to navigate LCD screen to program feeder.
Battery Compartment: Located on bottom of feeder hopper base and holds 4 D-cell alkaline batteries.
Battery Cover: Covers and protects the battery compartment.
Bowl Holder: Removable plastic piece which attaches to feeder hopper base and is used to hold stainless steel bowl in place.
Button Lock: The 5-Button Navigation automatically locks after 2 minutes of inactivity and the lock icon appears on LCD screen.
Cat Mode: Default feeding schedule for a cat. Feeder is automatically scheduled to two 1/4-cup (59 ml) meals per day at 8 am (08:00) and 5 pm (17:00).
Control Panel: Area on front of feeder with the 5-Button Navigation and LCD screen.
Conveyor: Moves food through hopper at 1/8-cup increments and dispenses food through food chute into stainless steel bowl.
Dog Mode: Default feeding schedule for a dog. Feeder is automatically scheduled to two 2-cup (473 ml) meals per day at 8 am (08:00) and 5 pm (17:00).
Food Chute: Opening in hopper base and conveyor where food passes through and dispenses into stainless steel bowl.
Food Grade: Material approved to come in direct contact with food without harming the food or changing the color, odor or taste.
Hopper: Holds dry or semi-moist pet food with a 24-cup capacity.
Hopper Base: Holds hopper and bowl. Main part of feeder with the control panel.
Hopper Lid: Fits on top of hopper to cover the pet food.
Hopper Release Button: Allows hopper to be removed for cleaning.
Immediate Feed Mode: Allows next scheduled meal to be dispensed using 5-Button Navigation.
LCD Screen: Liquid crystal display screen to visually display text and images to easily program the pet feeder. Located in the control panel on the hopper base.
Meal Number: Indicates which meal is being programmed. Up to 12 meals can be scheduled.
Meal Size: Indicates portion for meal being programmed or portion for next scheduled meal. Can be set to cups if using 12 hour time format or milliliters if using 24 hour time format. Minimum meal size is 1/8-cup (30 ml) and maximum meal size is 4-cups (946 ml).
Pause Feed Mode: Allows feeding schedule to be temporarily stopped without the need to reprogram or disable power. No food will be dispensed until pause is removed. Picks up as programmed with next scheduled meal when pause is removed.
Power Connector: For connecting the pet feeder to the power adapter (sold separately).
Serial Number: Unique identification number assigned to each pet feeder during manufacturing and is located inside the battery compartment.
Slow Feed Mode: Slows down rate conveyor dispenses food into bowl. Each scheduled meal is slowly dispensed over a 15 minute period. This is useful for a pet that gulps or eats too quickly, causing them to get sick. If Slow Feed is set, it applies to all scheduled meals.
Stainless Steel Bowl: Catches dry pet food when dispensed from feeder food chute with 5-cup capacity.
Time Indicator: Displays the current time or time of next scheduled meal. Can be set to 12 hour or 24 hour format.
Note: If time is set to 12 hour format, meal size is automatically set to cups. If time is set to 24 hour format, meal size is automatically set to milliliters.
User Mode: Allows feeding schedule to be customized by setting number of meals (up to 12 each day), meal times and meal sizes (from 1/8-cup (30 ml) up to 4 cups (946 ml).
Icon and Button Quick Guides
ICONS QUICK GUIDE
| ICON | FUNCTION |
| 05:30 pm 18:00 | TIME INDICATOR - Displays current time or time of next scheduled meal. Can be set to 12 hour or 24 hour format. |
 | BUTTON LOCK INDICATOR - Displays when 5-Button Navigation is disabled. Buttons automatically lock when not in use. |
 | BATTERY INDICATOR - Displays when D-cell alkaline batteries are in use and life status. |
 | POWER ADAPTER INDICATOR - Displays when power adapter is connected to pet feeder. |
| 2 | MEAL NUMBER INDICATOR - Displays which meal is being programmed. Up to 12 meals can be scheduled. |
| 1-1/8 cup 30 ml | MEAL SIZE INDICATOR - Displays portion for meal number being programmed or portion for next scheduled meal to be dispensed. Can be set to cups if using 12 hour time format or milliliters if using 24 hour time format. |
| dog | DOG - Feeding schedule is set to default dog, which is two 2-cup (473 ml) meals per day at 8 am (08:00) and 5 pm (17:00). |
| cat | CAT - Feeding schedule is set to default cat, which is two ¼-cup (59 ml) meals per day at 8 am (08:00) and 5 pm (17:00). |
| usr | USER MODE - Feeding schedule is set to user mode with customized meal numbers, times and portions. |
 | SLOW FEED INDICATOR - Displays if feeder is set to Slow Feed Mode, which dispenses all scheduled meals at a slower rate over a 15 minute period. |
 | PAUSE FEED INDICATOR - Feeding schedules are suspended and feeder will not dispense food until pause is removed. |
 | IMMEDIATE FEED - Push to immediately dispense next scheduled meal. Only one meal in a row can be immediately fed. A meal must be automatically dispensed before immediate feed can be used again. |
 | TIME - Push to view current time or push and hold to set clock. |
5-BUTTON NAVIGATION QUICK GUIDE
| BUTTON | DESCRIPTION | SETUP MODE FUNCTION | OPERATING MODE FUNCTION |
 | UP | Increases Selection | View Time/Change Time (hold for 5 seconds) |
 | DOWN | Decreases Selection | Pause Feed to temporarily suspend meals |
 | LEFT | Moves Right to Left through editable fields on the LCD screen | Enter/Exit Slow Feed Mode |
 | RIGHT | Moves Left to Right through editable fields on the LCD screen. | Immediate Feed |
 | ENTER | Press to program Setup settings to feeder. | Returns to Setup Mode to change feeding schedule (hold for 5 seconds) |
 | ENTER + UP | N/A | Unlock 5- Button Navigation |
 | ENTER + LEFT | N/A | Prepares conveyor with food |
Specifications
Programming
- Three feeding schedule options available:
Dog -Feeder is preset to (2) 2-cup (473 ml) meals per day at 8 am (08:00) and 5 pm (17:00),
Cat -Feeder is preset to (2) 1/4-cup (59 ml) meals per day at 8 am (08:00) and 5 pm (17:00),
User -allows feeding schedule to be customized by setting number of meals, meal times, and meal sizes. - Up to 12 meal times can be set each day (every 24 hours) within 15 minute increments.
- Meal portions adjustable from 1/8-cup up to 4-cups (30 ml up to 946 ml), in 1/8-cup (30 ml) increments.
- Slow Feed Mode – slowly dispenses scheduled food portion over a 15 minute period to help prevent pet from gulping or eating too fast.
- Immediate Feed – dispenses next scheduled meal with the touch of a button using 5-Button Navigation. Programming then picks up with scheduled meal after the meal dispensed.
- Pause Feed Mode – temporarily stops feeding schedule and will not dispense food until pause is removed. When paused is removed it picks up with next scheduled feeding.
Food Types
- Use only dry or semi-moist dog or cat food.
- Do NOT use canned, wet or moist dog or cat food.
Capacity
- Hopper holds approximately 24-cups of dry or semi-moist food.
- Bowl holds up to 5-cups of dry or semi-moist pet food.
- Conveyor dispensing capacity is 1/8-cup (30 ml) increments.
Power
- Requires 4 D-cell alkaline batteries. Batteries NOT included.
- Estimated battery life is 1 year.
- Optional power adapter available (sold separately, see "Replacement Parts & Accessories").
OPERATING GUIDE
- Prepare and Assemble Feeder
- Remove From Package
After removing feeder from box and packaging, remove components located inside feeder hopper. Open lid by pulling back finger latch then lifting lid up using finger grips. Remove all components from packaging.
![]()
![]()
Dispose of all packaging materials properly. Some items may be packed in polybags; these bags could cause suffocation; keep away from children and pets. - Clean Removable Parts
All parts which contact pet food are made of BPA-free, food grade materials and should be cleaned prior to initial use. These parts easily remove for cleaning. The washable parts are: stainless steel bowl, bowl holder, hopper lid, hopper and conveyor. The stainless steel bowl, bowl holder, hopper lid and hopper are dishwasher safe. Only clean the conveyor by hand-washing using cool or warm soapy water. These washable parts can be submerged in water. Rinse and let all parts air dry completely before assembling feeder. Stand conveyor upright with front chute on flat surface for best drying results. DO NOT use hot water, submerge the hopper base in water or clean conveyor in an automatic dishwasher.
![]()
Do NOT immerse control panel in water. Base unit should NOT be submerged in water at any time, as this may damage electronic components.
To Remove Hopper: Press hopper release button on back of feeder then lift to remove.
![]()
To Remove Conveyor: Pull back red conveyor latch to unlock. Lift to remove.

- Assemble Feeder
Before assembling feeder, make sure all parts are clean and completely dry. DO NOT program or use buttons until feeder is completely assembled. DO NOT fill with food until instructed in Step 2C.
To Install Batteries: Push in and lift tabs to remove battery compartment door on bottom of feeder. Install 4 D-cell alkaline batteries into battery compartment, matching battery outlines. Replace battery door.
![]()
To Install Conveyor: Before installing conveyor, align one lip on conveyor belt with alignment arrows on side of conveyor housing. Install conveyor by first aligning food chute on conveyor front with food chute on front of hopper base. Lower back of conveyor and align with gear in hopper base. Push red conveyor latch to lock in place.
![]()
Note: If conveyor is not installed correctly, red latch will not lock and conveyor will move up and down. Also if conveyor belt is not aligned as instructed, incorrect meal sizes will be dispensed. Ensure conveyor is installed properly before installing hopper.
 To Install Hopper: Align back food chute on hopper over conveyor agitator. Ensure conveyor agitator is inside back chute and lower hopper into base. Gently push hopper until release button snaps into place.

Note: If hopper is not installed correctly with agitator inside back food chute, agitator can break. Also incorrect meal sizes or no food at all will be dispensed.
To Install Bowl: Slide tabs on bowl holder into slots on front of feeder until tabs lock into place. Insert bowl into holder by placing back of bowl under food chute and tilting front of bowl forward, sliding under lip on holder. Lower back of bowl into place.

- Remove From Package
- Initial Setup
- Time Setup:
The feeder automatically enters into Setup Mode after batteries are installed or power is connected. The LCD will show a blinking 12 to set time format.
Note: If time is set to 12 hour format, meal size measurement is automatically set to cups. If time is set to 24 hour format, meal size measurement is automatically set to milliliters.
To Set Time:- After powering feeder, the LCD will show a blinking 12 for time format setup. Use UP or DOWN buttons to scroll to select 12 hour or 24 hour time format. Press RIGHT button to set time.
![]()
- After powering feeder, the LCD will show a blinking 12 for time format setup. Use UP or DOWN buttons to scroll to select 12 hour or 24 hour time format. Press RIGHT button to set time.
- Time Setup:


12 Hour Format:
- For 12 hour format, the screen will show 12:00 AM with the hour field blinking. Use UP or DOWN buttons to scroll through numbers to set current hour with current AM or PM. Press RIGHT button to move to minute field.
![]()
- Use UP or DOWN buttons to scroll through numbers to set current minute. After current minute is set, press RIGHT button to setup feeding schedule.

24 Hour Format:
- For 24 hour format, the screen will show 0:00 with the hour field blinking. Use UP or DOWN buttons to scroll through numbers to set current hour. Press RIGHT button to move to minute field.
![]()
- Use UP or DOWN buttons to scroll through numbers to set current minute. After current minute is set, press RIGHT button to setup feeding schedule.

- Feeding Schedule Setup:
After pressing RIGHT button in Time Setup, the LCD screen shows the time just set and blinks the word dog prompting for the feeding schedule to be set. The Healthy Pet Simply Feed™ has three feeding schedule options: default dog (dog), default cat (cat) or a user option to customize the schedule for your pet (usr).
dog: Default feeding schedule for a dog. Feeder is preset to (2) 2-cup (473 ml) meals per day at 8 am (08:00) and 5 pm (17:00).
cat: Default feeding schedule for a cat. Feeder is preset to (2) 1/4-cup (59 ml) meals per day at 8 am (08:00) and 5 pm (17:00).
usr: User option allows the feeding schedule to be customized by setting number of meals, meal times and meal sizes. Up to 12 meals can be scheduled each day (within a 24 hour period). The meal times can be set in 15 minute increments. Meal sizes can be set in 1/8-cup (30 ml) increments, with a minimum portion of 1/8-cup (30 ml) to a maximum portion of 4-cups (946 ml).
To Set Default Feeding Schedule (Dog or Cat):- After pressing the RIGHT button when Time Setup is complete, the LCD screen shows the time set and blinks the word dog. Press UP or DOWN buttons to scroll to dog or cat to select desired default feeding schedule.
![]()
- Once desired option is displayed, press RIGHT or ENTER button to select and enter Operating Mode (see "Operating Mode" for more details). The LCD screen will then display the time and size of next scheduled meal.
- After pressing the RIGHT button when Time Setup is complete, the LCD screen shows the time set and blinks the word dog. Press UP or DOWN buttons to scroll to dog or cat to select desired default feeding schedule.

To Set Custom Feeding Schedule (User):
- To set your own feeding schedule, press UP or DOWN buttons to scroll to usr.
![]()
- Press RIGHT or ENTER button to enter customizable meal menu. This is shown by the number 1 blinking at top of LCD screen, which is meal 1. The time indicator of 8:00 AM (08:00 if set to 24 hour format) should show in middle of screen and meal size of 2 cup (473 ml if set to 24 hour format) should show in lower left corner of screen. If a different meal was previously setup, then the time and size of that meal will display.
![]()
- Press RIGHT button to move to the hour field to set the time for meal 1.
- Use UP or DOWN buttons to set hour for meal 1. If in 12 hour time format, set hour with desired AM or PM setting. Press RIGHT button to move to minute field.
- Use UP or DOWN buttons to set minute. Each meal time can be set in 15 minute increments. Press RIGHT button to move to meal size field.
- Use UP or DOWN buttons to set desired meal size. Meal size can be adjusted in 1/8-cup (30 ml) increments, with a minimum portion of 1/8-cup (30 ml) to maximum portion of 4-cups (946 ml).
- Press RIGHT button to move back to meal number field. Use UP button to move to next meal, which is meal 2. The LCD screen should show time of 5:00 PM (17:00 if in 24 hour format) and meal size of 2 cup, unless a different meal was previously setup. To schedule a second meal, press RIGHT button to move to hour field to set time. Repeat steps 4 through 7 for as many meals (up to 12) you want to schedule.
Example Meal:
![]()
Note: Up to 12 meals can be scheduled. For any of the 12 meal options you do not want to schedule, leave the meal size fields blank or set to "--- cup" or "--- ml". - After programming desired number of meals, return to the meal number field. Press and HOLD ENTER button for 5 seconds to program feeding schedule and enter Operating Mode (see "Operating Mode" for more details). The LCD screen will then display the time and size of next scheduled meal.


- Fill With Food:
![]()
Do NOT use outdoors. FOR INDOOR HOUSEHOLD USE ONLY. Check operation frequently to be sure the pet feeder is dispensing properly. For dry food use only. DO NOT use wet, canned or moist food. Pet feeder should be placed on a level surface.
![]()
Do not install or store pet feeder where it will be exposed to weather or temperatures below 40°F.
Place feeder in desired location. Fill feeder hopper with dry or semi-moist pet food, allowing room to replace lid.
To Replace Lid: Align front tab on lid into slot behind the control panel. Lower back of lid and push down until lid latch snaps into place.

To Prepare Conveyor with Food: If buttons are locked, press ENTER and UP buttons AT SAME TIME to unlock. Next press ENTER and LEFT buttons AT SAME TIME to prepare feeder conveyor to dispense food. Release buttons when you hear conveyor moving and filling each section with food getting ready for the first scheduled meal. Pieces of food may be dispensed into the bowl. Pour any dispensed food back into hopper. Every time the hopper is empty or almost empty and is refilled with food, the conveyor must be prepared.
Note: If conveyor is not prepared as instructed, no meal or incorrect meal sizes will be dispensed. Ensure conveyor is properly prepared with food every time hopper is refilled.


Operating Mode
When you enter Operating Mode, the LCD screen will display the time and size of the next scheduled meal. The additional modes available in Operating Mode are: Slow Feed Mode, Immediate Feed Mode, and Pause Feed Mode. Also you can unlock the 5-Button Navigation, view the current set time, change the time or time format and return to Setup Mode to change the feeding schedule.
Button Lock
After 2 minutes of inactivity, the 5-Button Navigation will lock to prevent it from accidentally being used. The lock icon will show in the upper left corner indicating the buttons are locked.

To Unlock Buttons:
- Press ENTER and UP buttons AT SAME TIME to unlock the 5-Button Navigation. The lock icon will disappear from the LCD screen.
Slow Feed Mode
Slow Feed Mode. Slow Feed Mode slows down the rate the conveyor dispenses food into the bowl. The conveyor slowly dispenses each meal over a 15 minute period. This mode is applied to all scheduled meals. This is useful if you have a pet that tends to eat their food too quickly, which causes them to get sick.
To Set Slow Feed Mode:
- If buttons are locked, press ENTER and UP buttons AT SAME TIME to unlock.
- Press the LEFT button. The Slow Feed icon (turtle) will appear in the lower right corner.
![]()

To Cancel Slow Feed Mode:
- If buttons are locked, press ENTER and UP buttons AT SAME TIME to unlock.
- Press the LEFT button. The Slow Feed icon will disappear from LCD screen.
Immediate Feed Mode
If you wish to feed your pet before the next scheduled meal, you can use Immediate Feed Mode. This immediately dispenses the next scheduled meal with a push of a button. The feeder keeps track of this activity and two consecutive meals CANNOT be immediately fed. Another immediate feeding cannot be given until the scheduled meal-after-next is dispensed as programmed.
To Set Immediate Feed Mode:
- If buttons are locked, press ENTER and UP buttons AT SAME TIME to unlock.
- Press the RIGHT button and the feeder will immediately dispense the next meal scheduled. The LCD screen will display the meal-after-next that is scheduled.
Pause Feed Mode
The Healthy Pet Simply Feed™ allows scheduled meals to be temporarily stopped without the need to reprogram or disable power by setting feeder to Pause Feed Mode. While in Pause Feed Mode, the hopper will not dispense any food into bowl. Also Pause Feed Mode is used during cleaning to keep the feeder conveyor in sync with the feeding schedule. Pause Feed Mode must be canceled for the feeder to resume dispensing the scheduled meals.
To Set Pause Feed Mode:
- If buttons are locked, press ENTER and UP buttons AT THE SAME to unlock.
- Press the DOWN button and the LCD screen will display "
![]() " indicating Pause Feeding Mode is set.
" indicating Pause Feeding Mode is set.
![]()
 " indicating Pause Feeding Mode is set.
To Cancel Pause Feed Mode:
- If buttons are locked, press ENTER and UP buttons AT SAME TIME to unlock.
- Press the DOWN button until the pause indicator "
![]() " is removed from the LCD screen and displays the next scheduled meal.
" is removed from the LCD screen and displays the next scheduled meal.
View/Change Time
While in Operating Mode you can view the time set during the Initial Setup steps. Also you can change the time or time format if you move to a different time zone or country or during Daylight Saving Time.
To View Time:
- If buttons are locked, press ENTER and UP buttons AT SAME TIME to unlock.
- Press the UP button and the time will display on the LCD screen. DO NOT HOLD button for 5 seconds or more, or you will enter the time setup menu.
To Change Time Format:
- If buttons are locked, unlock by pressing and holding ENTER and UP buttons AT SAME TIME.
- Press and HOLD the UP button for 5 seconds. The time setup menu will display with the hour field blinking.
- Press LEFT button and LCD screen will display a blinking 12. Use UP and DOWN buttons to scroll to select 12 hour or 24 hour format. Use steps 3 and 4 under "To Change/Set Time" below to set the current hour and minute.
To Change/Set Time:
- If buttons are locked, press ENTER and UP buttons AT SAME TIME to unlock.
- Press and HOLD the UP button for 5 seconds. The time setup menu will display with the hour field blinking.
- Use UP or DOWN buttons to scroll through numbers to set current hour with current AM or PM if in 12 hour format. Press RIGHT button to move to minute field.
- Use UP or DOWN buttons to scroll through numbers to set current minute. After current minute is set, press ENTER or RIGHT button to program new time.
Setup Mode
If you wish to change, add or remove a scheduled meal, you will need to return to Setup Mode. You can even adjust meals if you are set to the default dog or default cat feeding schedule.
Note:
The default dog and cat options are intended as quick setup for first time use. The only way to return to a default feeding schedule is to remove batteries or power adapter from feeder, wait 10 seconds and reinstall. This will take you back through the Initial Setup steps.
To Return to Setup Mode:
- While in Operating Mode, press and HOLD the ENTER button for approximately 5 seconds. The LCD screen will return to the meal menu and display the first meal currently scheduled.
- See steps 2 through 8 under "To Set Custom Feeding Schedule (User)" for details on changing the meal settings.
To Exit Setup Mode:
- After programming desired number of meals, return to meal number field. Press and HOLD ENTER button for 5 seconds to program feeding schedule. This returns feeder to Operating Mode and the screen will display the next scheduled meal.
Care and Cleaning
The Healthy Pet Simply Feed™ comes apart for easy cleaning. The washable parts are: stainless steel bowl, bowl holder, hopper lid, hopper and conveyor. The stainless steel bowl, bowl holder, hopper lid and hopper are dishwasher safe. Only clean the conveyor by hand-washing using cool or warm soapy water. These washable parts can be submerged in water. Rinse and let all parts air dry completely before assembling feeder. DO NOT use hot water, submerge the hopper base in water or clean the conveyor in an automatic dishwasher.

Do NOT immerse control panel in water. Base unit should NOT be submerged in water at any time, as this may damage electronic components.
To Clean Feeder:
- If you have any food in the feeder, press UP and ENTER buttons AT SAME TIME to unlock 5-Button Navigation. Next run the "To Prepare Conveyor with Food" cycle by pressing the ENTER and LEFT buttons AT SAME TIME. This will dispense any food remaining in the conveyor and hopper into the bowl. Repeat the "To Prepare Conveyor with Food" until no more food is dispensed or just a few pieces of food are dispensed from the feeder.
- Set feeder to PAUSE FEED MODE. This keeps the conveyor in sync with the feeding schedule when reassembled.
![]()
- Remove stainless steel bowl from bowl holder by first lifting up back of bowl and then front.
- Remove lid by pulling back finger latch then lifting up using finger grips (see "Remove From Package").
- Remove hopper by pressing hopper release button on back of feeder then lift to remove (see "Clean Removable Parts").
- Remove conveyor by pulling back red conveyor latch to unlock. Lift to remove (see "Clean Removable Parts").
- Remove conveyor crumb catcher by gently pressing insides and pulling down.

- Remove bowl holder by releasing one tab on inside of feeder base using a fingernail or screwdriver while gently pulling down on same side of bowl holder from the outside. Release other tab and pull down other side of bowl holder.

- The stainless steel bowl, bowl holder, hopper lid and hopper are dishwasher safe. The conveyor must only be washed by hand. Submerge conveyor and crumb catcher in cool or warm soapy water and hand-wash. Use a cleaning brush or toothbrush to clean food debris and residue from conveyor belt. Rinse and let air dry completely. Stand conveyor upright with front chute on flat surface for best drying results.
- Make sure all parts are completely dry. Reinstall crumb catcher on conveyor. Reassemble feeder ensuring conveyor is aligned and installed correctly (see "Assemble Feeder").
- After reassembling, make sure to cancel PAUSE FEED MODE (see "Pause Feed Mode").
- After refilling with food, make sure to push ENTER and LEFT buttons AT SAME TIME to prepare feeder conveyor to dispense food. You should hear the conveyor moving and filling each section with food getting ready for the first scheduled meal.


Power Adapter Operation
The Healthy Pet Simply Feed ™ is battery operated, but has a power adapter connection located on the back of the feeder (power adapter sold separately, see "Replacement Parts and Accessories" page 20). If the power adapter is used to operate the feeder, the batteries function as a back-up power source in case of a power loss. When power adapter is being used as power source, the power adapter icon will appear at the top of the LCD screen.

Troubleshooting
The answers to these questions should help you solve most problems you may have with the pet feeder. If they do not, please contact our Customer Care Center at 1-800-732-2677.
| PROBLEM | SOLUTION |
| 5-Button Navigation is locked/ buttons do not work. |
|
| Hopper lid is not fitting properly. |
|
| Hopper is not fitting properly. |
|
| Red conveyor latch will not lock. |
|
| Not dispensing meal sizes programmed or no food at all. |
|
| Dispensing extra meals. |
|
| Dispensing food slowly. |
|
| Not dispensing meals at scheduled times. |
|
| Error Screen F01 |
|
| Error Screen F02 |
|
IMPORTANT SAFETY INFORMATION
Explanation of Attention Words and Symbols used in this guide
 This is the safety alert symbol. It is used to alert you to potential personal injury hazards. Obey all safety messages that follow this symbol to avoid possible injury or death.
WARNING indicates a hazardous situation which, if not avoided, could result in death or serious injury.

CAUTION, used without the safety alert symbol, indicates a hazardous situation which, if not avoided, could result in harm to your pet.

NOTICE is used to address safe use practices not related to personal injury.
- Do NOT immerse control panel in water. Base unit should NOT be submerged in water at any time, as this may damage electronic components.
- Do NOT place anything on top of the pet feeder. The unit starts automatically. Keep clear.
- Dispose of all packaging materials properly. Some items may be packed in poly bags; these bags could cause suffocation; keep away from children and pets.
- Do NOT allow small children to play with, in or around pet feeder.
- To reduce the risk of injury, close supervision is necessary when an appliance is used by or near children.
- Intended for use with dogs or cats only.
- Do NOT use this pet feeder with puppies, kittens, dogs or cats not able to reach the food tray or with any physical disability.
- Do NOT use outdoors. FOR INDOOR HOUSEHOLD USE ONLY. Check operation frequently to be sure the pet feeder is dispensing properly.
- For dry food use only.
- DO NOT use wet, canned or moist food.
- Pet feeder should be placed on a level surface.
- Before leaving for extended time, always replace batteries with new batteries.
- Do NOT place any foreign object in the pet feeder.
- Do NOT disassemble the pet feeder other than components as instructed in this operating guide.
- To protect against electric shock, if using power cord do not place power cord or plug in water or other liquids.
- Only use attachments recommended or sold by the manufacturer.
- Do not unplug by pulling on power cord. To unplug, grasp the plug, not the power cord.
- Do not operate any appliance if it has a damaged power cord or plug, or if it is malfunctioning or has been damaged. Call the Customer Care Center immediately for further instructions.
- For a portable appliance - To reduce the risk of electrical shock, do not place or store an appliance where it can fall or be pulled into a tub or sink.
- Always unplug any appliance when not in use, before putting on or taking off parts and before cleaning. Never pull on the electrical power cord to remove the plug from the wall outlet.
- Do not use an appliance for anything other than its intended use.
- If the plug of this device gets wet, turn off the electricity to that wall outlet. Do not attempt to unplug.
- Examine this appliance after installation. Do not plug in if there is water on the Power Cord or plug.
- To avoid tripping, always position power cord out of the way of foot traffic.
- Do not allow pets to chew on or swallow any parts. If you are concerned about the power cord, purchase a cord conduit (a hard plastic protector) at any hardware store to protect the power cord.

- Do not attempt repairs on the pet feeder yourself.
- If an extension cord is necessary, an extension cord with a proper rating should be used.
- Do not use pet feeder for anything other than intended use. The use of attachments not recommended or sold by the manufacturer may cause an unsafe condition. Do not modify the pet feeder.
- Do not install or store pet feeder where it will be exposed to weather or temperatures below 40°F.
- Do not lift pet feeder by lid, hopper, bowl or bowl holder. Lift and carry feeder using both hands and hopper base, while keeping unit in upright position.
- Read and observe all important notices listed on the pet feeder and in the packaging.
Replacement Parts and Accessories
Replacement parts or accessories for your pet feeder can be purchased by visiting www.petsafe.net or by contacting our Customer Care Center at 1-800-732-2677.
| Part Description | Replacement Part Number |
| Power Adapter | PAC00-15035 |
| Hopper Lid | PAC00-15033 |
| Bowl and Bowl Holder Kit | PAC00-15034 |
| Battery Door, Hopper Door and Conveyor Cover Kit | PAC00-15036 |
Customer Care International
USA & Canada - Tel: 800-732-2677
Monday - Friday 8 AM - 8 PM / Saturday 9 AM – 5 PM
Australia - Tel: 1800 786 608
Monday - Friday 8:30 AM - 5 PM
New Zealand - Tel: 0800 543 054
Monday - Friday 10:30 AM - 7 PM
Radio Systems® Corporation
10427 PetSafe Way
Knoxville, TN 37932 USA
1-800-732-2677
www.petsafe.net
Documents / Resources
References
Download manual
Here you can download full pdf version of manual, it may contain additional safety instructions, warranty information, FCC rules, etc.
Download PetSafe Healthy Pet Simply Feed PFD00-14574 - Automatic Feeder Manual
Advertisement


Need help?
Do you have a question about the Healthy Pet Simply Feed PFD00-14574 and is the answer not in the manual?
Questions and answers