Advertisement
- 1 Connected Pet Door
- 2 Setup at a glance
- 3 What you have
- 4 What you need
- 5 Get to know your new pet door
- 6 Install batteries in the pet door
- 7 Download and set up the app
- 8 Plan your installation
- 9 Install the SmartDoor in a door
- 10 Mark the pet door location
- 11 Check for metal in your door
- 12 Position the cutting template
- 13 Cut the opening
- 14 Install the pet door in a non-metal door
- 15 Install the pet door in a metal door
- 16 Complete the door installation
- 17 Documents / Resources
Connected Pet Door
Your new SmartDoor ™ provides the ultimate in freedom and convenience while keeping you connected to your pet. It connects to your home's Wi-Fi network and the My PetSafe ® app on your smartphone, allowing you to:
- Let your pet come and go while keeping wildlife and your neighbor's pets out.
- Set up individual access schedules for each of your pets.
- Receive alerts for pet activity so you'll know when each pet is in or out.
- Change the schedule or access mode from your smartphone, even when you are not home.
Setup at a glance
This guide will lead you through the following steps:
- Unbox the SmartDoor ™ and start gathering what you will need to use it
- Get to know the SmartDoor ™ buttons and indicator lights
- Install batteries in the SmartDoor ™
- Download the My PetSafe ® app and use it to connect the SmartDoor ™ to Wi-Fi and pair it to each of your pets
- Install the SmartDoor ™ in your home
Once you have completed the steps in this guide, remember to take the time to train your pet to use the SmartDoor ™. The included training guide will walk you through our recommended training procedure step by step.
Now you can stay connected with your pet even as you both come and go.
What you have

What you need
To connect the pet door to Wi-Fi and get set up in the app, you will need:
- Wireless router (2.4 GHz)
- High-speed internet connection
- Smartphone
- Four alkaline batteries: C cell for the medium SmartDoor large SmartDoor ™
- Additional PetSafe ® Pet Door Keys (optional): If you have more than one pet who will be using the SmartDoor ™
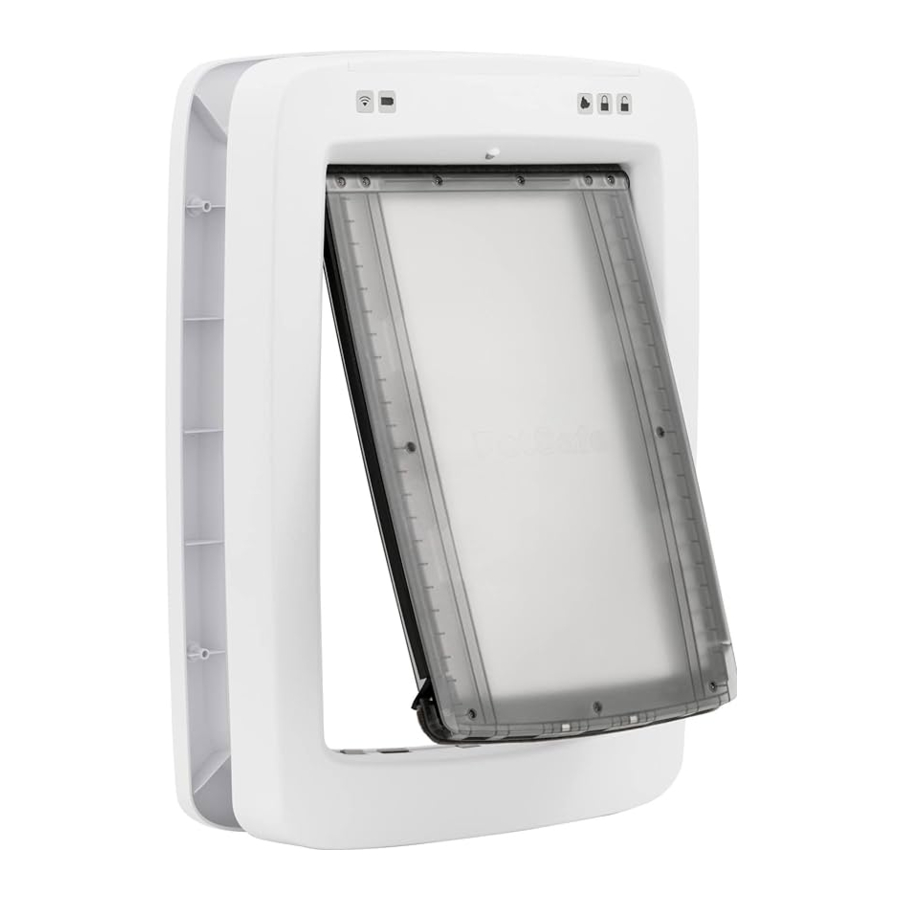
Get to know your new pet door
Although you will control most of the pet door functionality through the My PetSafe lights on the pet door that are important to understand.
Buttons
There are three buttons inside the battery compartment that allow you to reset the Wi-Fi, turn Smart Mode on and off, and lock or unlock the door manually.

| Button icon | Button name | Usage |
 | Wi-Fi connect button | Press and release this button to reset Wi-Fi but retain your Wi-Fi credentials. Press this button for more than 8 seconds to erase your Wi-Fi credentials and return the pet door to factory settings. |
 | Smart Mode button | Press and release this button to put the pet door in Smart Mode. In Smart Mode, the pet door will only unlock for pets who have been paired to the pet door with a Pet Door Key or implanted microchip. |
 | Standard Mode Lock/Unlock button | Press and release this button to put the pet door in Standard Mode and toggle the pet door between locked and unlocked. In Standard Mode, the pet door operates like a standard pet door and will be locked or unlocked for all pets regardless of whether they are paired with the pet door. |
Indicator lights
Indicator lights on the interior side of the pet door provide information about the Wi-Fi and internet connection, battery life and current operating mode of the door. To save battery power, the indicator lights illuminate only when the pet door motion sensor is activated or when you change a setting.

| Indicator | Light color | Meaning |
 | Yellow, slow blinking | The SmartDoor ™ is powered on but not yet connected to the app, Wi-Fi, or the internet. |
| Yellow, solid | The SmartDoor ™ is connected to the app, but not Wi-Fi or the internet. | |
| Blue, fast blinking | The SmartDoor ™ is attempting to connect to Wi-Fi. | |
| Blue, slow blinking | The SmartDoor ™ is connected to Wi-Fi but not internet. | |
| Blue, solid | The SmartDoor ™ is connected to Wi-Fi and internet. | |
| Red, fast blinking | The SmartDoor ™ was unable to connect to the Wi-Fi network. | |
 | Red, slow blinking | Batteries are weak; replace batteries. |
| Red, fast blinking | Batteries are exhausted or dead; replace batteries immediately. | |
 | Blue | The pet door is in Smart Mode. In this mode, the pet door will activate only when a paired pet approaches it. |
 | Blue | The pet door is currently locked. |
 | Blue | The pet door is currently unlocked. |
Install batteries in the pet door
- Locate the battery door on the top edge of the interior frame.

- Remove the battery door by pressing down and sliding it in the direction of the arrow. Insert four alkaline batteries (C cell for the medium SmartDoor ™, D cell for the large SmartDoor ™ Replace the battery door. The Wi-Fi icon
![]() ) on the front of the pet door will start blinking yellow.
) on the front of the pet door will start blinking yellow.


 ) on the front of the pet door will start blinking yellow.
Download and set up the app
- Download the My PetSafe ® app from your phone's app store. Open the app and follow the on-screen prompts to:
![]()
![www.apple.com]()
![play.google.com]()


- Create an account and sign into the app. You will need a valid email address.
- Add your SmartDoor ™ to the app. You will need your home Wi-Fi password.
- Create a pet profile for each pet that will use the SmartDoor ™.
- Continuing in the app, add each pet to the SmartDoor scanning their Pet Door Key. During the pairing process, move the Pet Door Key a little to activate the motion sensor. If you have a cat and a medium SmartDoor ™, you also have the option of pairing the door to your cat's implanted microchip. If you choose this option, do a little additional testing after pairing to make sure the pet door consistently senses your cat as she passes near the pet door. The location of your cat's microchip can affect how well the pet door detects her presence. If you find that the pet door is not reliably responding to your cat's microchip, you may need to pair her to the pet door with a Pet Door Key instead.


Plan your installation
You are now ready to install the SmartDoor ™ in your home. Some installation locations require additional PetSafe ® accessories and professional assistance; see the table below to find out what you need to install your pet door and where to go for step-by-step installation instructions.
You can purchase PetSafe ® accessories at petsafe.com or by contacting our Customer Care team.
| To install the SmartDoor ™ in: | You will need: | Follow the step-by-step installation instructions: |
| A door with little or no metal (see how to check for metal in your door) | No additional accessories required | "Install the SmartDoor ™ in a door" |
| A door with a significant amount of metal | SmartDoor ™ Connected Pet Door Installation Adaptors (1 set) | In the guide provided with the installation adaptors |
| A wall | SmartDoor ™ Connected Pet Door Installation Adaptors (1 set) | In the guide provided with the installation adaptors |
SmartDoor ™ Connected Pet Door Tunnel Extensions (enough to span the thickness of your wall plus at least 1 1/4 inches):
| ||
| In glass (medium SmartDoor ™ only) | SmartDoor ™ Connected Pet Door Installation Adaptors (1 set) A new pre-cut pane of glass (double-paned only), prepared by a professional glass worker and installed in your home | In the guide provided with the installation adaptors |
| In an opening larger than the frame of the pet door | SmartDoor ™ Connected Pet Door Installation Adaptors (1 set) | In the guide provided with the installation adaptors |
Install the SmartDoor ™ in a door
Before installing the SmartDoor ™, make sure you have paired each of your pets to the SmartDoor ™ in the My PetSafe ® app. It is best to resolve any pairing issues before installing the pet door in your home.

Remove the batteries from the pet door prior to installation.
Tools and materials (door installation)
You will need the following tools and materials to install the SmartDoor
- Tape measure
- Pencil
- Level
- Hammer (optional)
- Flat blade (slotted) screwdriver (optional)
- A raised, level surface, such as two sawhorses (optional)
- Scissors
- Tape
- Safety glasses
- Dust mask
- Hearing protection
- Work gloves
- Drill
- 1/2-inch (12 mm) drill bit
- 5/16-inch (8 mm) drill bit
- Jigsaw
- Jigsaw blade appropriate for the material you will be cutting (wood, PVC, or metal), and at least 1 inch longer than the thickness of the door
- #2 Phillips (crosshead) screwdriver
- Exterior-grade caulk
Mark the pet door location
- Measure your pet's shoulder height when standing. If you have more than one pet, measure the tallest one. Make a note of this measurement. Make a mark at your pet's shoulder height on the interior side of the door. Using a level, extend the line several inches in both directions. This will help you place the cutting template correctly. The pet door must be installed level to work properly.

- Draw a vertical line where you want the center of the pet door to be. If your door has inset panels, consider how best to position the pet door to avoid gaps between the pet door frames and the door. Using a level, extend the line several inches in both directions. This will help you place the cutting template correctly.


Check for metal in your door
It is important to check for metal in your door before installing the pet door. If not planned for, metallic materials in your door can interfere with the sensor in the SmartDoor ™, affecting performance. To check for metal:

Drill a 5/16-inch (8 mm) hole at the center of where you expect the pet door opening to be. You don't need to drill all the way through your door, just far enough to determine whether the door contains metal. Inspect the shavings that came out of the hole you created. If the shavings:
- Do not contain any metal at all, you will cut the opening for your pet door using the cutting template for non-metal doors.
- Contain metal or foil, even in small amounts, you will need to create a slightly larger cutout opening for the pet door, using the cutting template for metal doors. Installing the SmartDoor ™ within a larger cutout opening increases the distance between the metal in your door and the sensor in the SmartDoor ™ and improves performance.
If your door contains a significant amount of metal, we recommend you install your SmartDoor ™ using SmartDoor ™ Connected Pet Door Installation Adaptors (sold separately). Installation adaptors make it possible to install the pet door within the largest cutout opening, optimizing the performance of the SmartDoor ™ sensor in the metal door. Step-by-step instructions for this installation are provided with the installation adaptors.
Position the cutting template
- Cut out the appropriate cutting template, based on what you found when you drilled the test hole in your door. If your door:


- Does not contain metal, cut out the template for non-metal doors.
- Contains metal or foil, cut out the template for metal doors. Tape the cutting template to the interior side of the door, matching the shoulder and center lines on the template with the horizontal and vertical lines you drew on the door.
- Check the position of the cutting template and adjust it as needed:


- If you have both large and small pets, make sure your shorter pets will be able to step up over the bottom edge of the pet door. It can be helpful to measure the length of your shorter pet's legs and compare it to the distance between the lower edge of the cutting template and the floor. Ideally all pets should be able to use the pet door without having to jump up or slouch down.
- If there is an immediate step down outside the door, you may need to mount the pet door a little lower or provide an outdoor step for your pets to ensure they can use the pet door easily, both coming and going.
To maintain the structural integrity of your door, make sure the cutting template is at least 3 inches from the edge of the door on all sides.
- Once you are satisfied with the placement of the template, use a pencil to trace the outside of the cutting template. Make sure to connect the corners.

- Make sure the cutting line is clearly marked on the door. Remove the cutting template and excess tape from the door.


Cut the opening
- If desired, remove your door from its hinges and place it on a raised, level surface, such as two sawhorses. The interior side of the door should face up. Removing the door from its hinges makes it a bit easier to cut the opening for the pet door, but you can install the pet door without removing your door from its hinges if you prefer.
![]()
Make sure there is nothing behind or underneath the door where you will cut the opening.

- Drill 1/2-inch (12 mm) holes through the door, just inside the corners of the cutting line. Hold the drill steady, straight and level. These will be the pilot holes for the jigsaw blade.

- Using a jigsaw, cut between the holes you just drilled, along the cutting line. Make sure your jigsaw blade is appropriate for the door material you are cutting through (wood, PVC, metal, etc.) and at least 1 inch longer than the thickness of the door. Use both hands to hold the jigsaw firmly against the door.

- If you removed your door from its hinges, rehang it now. Now that you have cut the opening for the pet door, you are ready to install it. To install the pet door in a:


- Non-metal door, see "Install the pet door in a non-metal door".
- Metal door, see "Install the pet door in a metal door".
Install the pet door in a non-metal door
- Insert the interior frame into the opening on the interior side of the door. Make sure the interior frame is level in the opening. Have a helper hold it for you, or tape it in place while you go to the exterior side of the door to fit the exterior frame.

- Place the exterior frame on the exterior side of the door, fitting it over the tunnel of the interior frame. Make sure the exterior frame is level. Hold the exterior frame in place and mark the holes for the screws with a pencil.

- Remove the interior and exterior frames. Drill 5/16-inch (8 mm) holes through the door at the marked locations. Hold the drill steady, straight and level.

- Place the interior and exterior frames back in the opening. Make sure both frames are level. Holding both frames in place, insert screws through the holes in the exterior frame, through the holes in the door, and into the holes on the back of the exterior frame. Choose the screws that best fit the thickness of your door. If your door is:


- Less than 1 inch thick, use the 1 9/16-inch (40 mm) screws.
- Between 1 inch and 2 1/4 inches thick, use the 3 5/32-inch (80 mm) screws.
Tighten the screws with a manual #2 Phillips (crosshead) screwdriver. Do not overtighten. Reinstall the batteries in the pet door. Proceed to "Complete the door installation".
Install the pet door in a metal door
- Place the spacer at the bottom of the cut opening, in the middle.

- Insert the interior frame into the opening on the interior side of the door, on top of the spacer. Make sure the interior frame is horizontally centered and level in the opening. Have a helper hold it for you, or tape it in place while you go to the exterior side of the door to fit the exterior frame.

- Place the exterior frame on the exterior side of the door, fitting it over the tunnel of the interior frame. Make sure the exterior frame is level. Holding both frames in place, insert screws through the holes in the exterior frame, through the cutout opening, and into the holes on the back of the exterior frame. Choose the screws that best fit the thickness of your door. If your door is:


- Less than 1 inch thick, use the 1 9/16-inch (40 mm) screws.
- Between 1 inch and 2 1/4 inches thick, use the 3 5/32-inch (80 mm) screws.
Using a manual #2 Phillips (crosshead) screwdriver, tighten the screws just until the frames are attached.
- Check the position of the pet door and adjust it if needed. It should be resting on the spacer, centered horizontally in the opening, and level. Once you are satisfied that the pet door is positioned correctly, finish tightening the screws. Do not overtighten.
- Reinstall the batteries in the pet door. Verify that the pet door is recognizing your pets' Pet Door Keys or microchips as they pass near the door. Once you are satisfied your pet door is operating correctly, proceed to "Complete the door installation". If the pet door sensor does not reliably respond to your pet's microchip or Pet Door Key, the metal in your door may be interfering with the operation of the sensor. If this is the case, you will need to increase the space between the pet door and the metal in your door by reinstalling the pet door with a larger cutout opening and SmartDoor ™ Connected Pet Door Installation Adaptors (sold separately). Step-by-step instructions for this installation are provided in the guide that comes with the installation adaptors.
Complete the door installation
- Insert blanking plugs into the holes in the exterior frame.

- On the exterior side of the door, apply exterior-grade caulk around the edge of:


- The pet door tunnel where it meets the exterior frame.
- The exterior frame, making sure to leave the weep hole open at the bottom of the exterior frame.
Now that your pet door is installed, it is time to train your pet to use it! See the training guide provided with your SmartDoor for step-by-step instructions. With a little patience and a lot of praise, both you and your pet will soon be enjoying the security and freedom provided by your new pet door.
See our installation video

We're here to help!

For questions or additional tips: +1 (800) 732-2677
support.petsafe.com
Documents / Resources
References
Download manual
Here you can download full pdf version of manual, it may contain additional safety instructions, warranty information, FCC rules, etc.
Download PetSafe SmartDoor PPA00-17254, PPA00-17255, ZPA19-17252 - Connected Pet Door Manual
Advertisement


Need help?
Do you have a question about the SmartDoor PPA00-17254 and is the answer not in the manual?
Questions and answers