Rational iVario Pro L Operating Instructions Manual
Hide thumbs
Also See for iVario Pro L:
- Original installation manual (72 pages) ,
- Original installation instructions (64 pages) ,
- Original instructions for use (96 pages)
Table of Contents
Advertisement
Advertisement
Table of Contents

Related Manuals for Rational iVario Pro L


Summary of Contents for Rational iVario Pro L
- Page 1 ® iVario Operating instructions...
-
Page 3: Table Of Contents
Table of contents 1 Introduction ......................................... Help displayed on the unit ..................................Product liability ......................................Target group ........................................Intended use........................................Working with this manual..................................1.5.1 Explanation of symbols..................................1.5.2 Explanation of pictograms................................1.5.3 Explanation of safety messages ..............................1.5.4 Images ........................................1.5.5 Technical changes.................................... - Page 4 5.2.5 Soups and sauces....................................30 5.2.6 Dairy foods and desserts................................. 31 5.2.7 Finishing....................................... 32 Conditions, information and warnings..............................32 Cooking food intelligently ..................................33 5.4.1 Calling up intelligent cooking process ............................33 5.4.2 Starting intelligent cooking process ............................34 Adjusting cooking result to own requirements........................... 34 5.5.1 Cooking parameters ..................................
- Page 5 8.1.2 Creating your own tickets ................................51 8.1.3 Editing the ticket board ................................... 52 Pan division ........................................53 8.2.1 Presetting pan divisions .................................. 53 8.2.2 Creating your own pan divisions ..............................54 8.2.3 Divide the pan into zones ................................55 Pan allocation.........................................
- Page 6 11.7.2 Cooking programs .................................... 70 11.7.3 User profile......................................71 11.7.4 User images ......................................71 11.7.5 User data: Delete all ..................................72 11.7.6 Basic unit settings ..................................... 72 11.7.7 HACCP data ......................................72 11.7.8 Service ........................................72 11.8 Network settings ......................................73 11.8.1 WiFi ........................................
- Page 7 14.1 Search assistant ......................................89 14.2 Help displayed on the unit ..................................89 14.3 Telephone help......................................89 14.4 Help in a service call..................................... 90 14.4.1 Automatically transferring service data to ConnectedCooking ..................90 14.4.2 Retrieving service data ..................................90 14.5 Problem resolution ......................................
-
Page 8: Introduction
This unit may not be used outdoors. This unit may not be used for continuous industrial mass production of food. All other uses are contrary to the intended purpose, and may be dangerous. RATIONAL AG assumes no liability for the consequences of using the unit contrary to the intended use. -
Page 9: Explanation Of Pictograms
1 | Introduction 1.5.2 Explanation of pictograms The following pictograms are used in this document: Caution! Read the operating instructions before using the unit. General warning symbol Useful tips for simple use of your unit. 1.5.3 Explanation of safety messages If you see the following safety messages, you are being warned about hazardous situations and instructed to avoid these situations. -
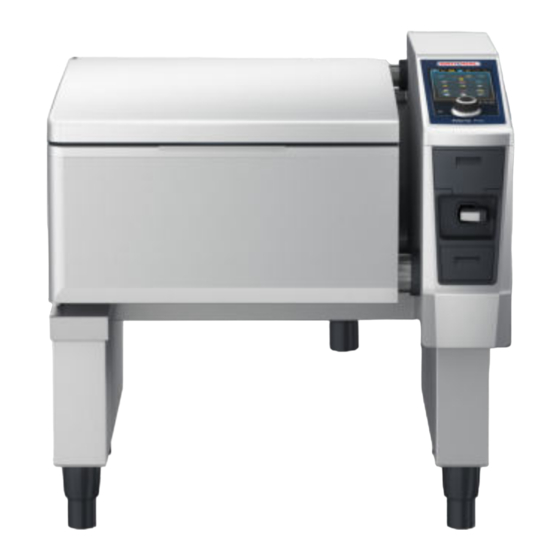
Page 10: The Ivario
2 | The iVario The iVario Gasket Core temperature probes Pan lid Steam nozzles Arm for automatic raising and lowering mechanism (accessory) Automatic water refill Locking system (optional) Display Central dial Power outlet (optional) Pan valve USB port Hand shower (optional) L model XL model Please note that units without a pressure cooking function have a steam nozzle. -
Page 11: General Safety Instructions
Your unit must be maintained by your RATIONAL Service Partner. Do not modify the unit or the unit installation undertaken by your RATIONAL Service Partner. Do not use the cooking system if it is damaged or if the connection cable is damaged. A damaged unit is not safe and can cause injury or fire. -
Page 12: Personal Protective Equipment
3 | General safety instructions Safety instructions after use Clean the unit after every use. Never use the integrated heating function to dry the pan. To prevent corrosion in the pan, leave the pan lid and pan drain valve slightly open if the unit is going to be idle for a prolonged period and overnight. -
Page 13: How To Work With The Unit
Initial start-up When starting up your unit for the first time, it has already been properly installed by a RATIONAL Service Partner. The unit is therefore ready for operation. You can find all the information on installation in the installation manual enclosed. -
Page 14: Start Screen
4 | How to work with the unit Start screen iZoneControl Programming mode iCookingSuite Height adjustment Home Manual operating modes Favourites Intelligent modes Cooking methods Actions Back / Cancel Help Date, time, status Settings iZoneControl [} 50] Intelligent cooking - iCookingSuite [} 26] Home If you press this button, you will be navigated to the start screen. -
Page 15: Favourite
4 | How to work with the unit 4.3.1 Favourite You can save intelligent cooking paths and programs you use often as favourites and call them up from the home screen. This can give you fast access to the dishes on a seasonal menu, for example. 1. -
Page 16: Help Displayed On The Unit
4 | How to work with the unit Energy optimisation The symbol will appear in the footer on the start screen as soon as there is a heating request that cannot be met. The purpose of energy optimisation is to make maximum use of the electrical power in the kitchen. Power failure In the event of a power failure, the following symbol will be displayed in the footer. -
Page 17: Central Dial
4 | How to work with the unit Press Swipe Scroll Drag-and-drop 4.4.2 Central dial Instead of using these moves, you can modify settings by turning the central dial. You can pause actions such as opening the pan lid automatically, automatically lowering the pan or the integrated water filling function using the central dial. -
Page 18: Maximum Load Sizes
The pan lid can be opened and closed only with jerky movements If the pan lid mechanism is defective, there is a risk of injury. 1. Open the pan lid fully and leave open. 2. Contact your RATIONAL Service Partner. Open pan lid 1. Press and hold the button: >... - Page 19 4 | How to work with the unit 1. Press the button 2. Set the desired water quantity. Observe the maximum fill volumes. Your setting will be applied automatically after just a few seconds. > The unit will be filled with the set water quantity. The water quantity still to be filled will be displayed. >...
-
Page 20: Tilting And Lowering Pan
4 | How to work with the unit Tilting and lowering pan Tilt pan WARNING Hot food may overflow if the pan is tilted You could burn yourself if you touch hot overflowing food. 1. Wear personal protective equipment to prevent burns and scalding. 2. -
Page 21: Inserting Core Temperature Probe
4 | How to work with the unit 1. To open the pan drain valve, press and hold the button: > The pan drain valve will open. 2. To close the pan drain valve, press the button: > The pan drain valve will close. >... - Page 22 4 | How to work with the unit 1. Insert the core probe up to the handle into the thickest point of the food. Small food item, e.g. goulash 1. Insert the core probe into as many pieces of food until the core probe is full with food from the tip to the handle.
-
Page 23: Using The Hand Shower
4 | How to work with the unit Food of different sizes 1. First insert the core probe into the smallest piece of the food. 2. Once the desired core temperature has been reached, remove the small pieces of food from the core probe and from the pan. -
Page 24: Adjusting The Unit Height (Optional)
If the height adjustment mechanism is defective, the unit may sink to the lowest point. There is a risk of injury. 1. Do not adjust the height of the unit any more. 2. Contact your RATIONAL Service Partner. 24 / 100... - Page 25 4 | How to work with the unit NOTICE Objects have been placed under the height-adjustable stand or under the unit with height-adjustable feet If there are objects underneath the height-adjustable stand or the unit with height-adjustable feet and you set the unit height, the stand and the unit could be damaged.
-
Page 26: Intelligent Cooking - Icookingsuite
5 | Intelligent cooking - iCookingSuite Intelligent cooking - iCookingSuite The iCookingSuite is the cooking intelligence in the iVario. You select which food is to be cooked with which cooking method. With this selection, a wide range of cooking processes will be offered so you can achieve the ideal cooking result. -
Page 27: Intelligent Cooking Processes
5 | Intelligent cooking - iCookingSuite Soups and sauces Egg dishes Dairy foods and desserts A specific set of intelligent cooking paths is assigned to each operating mode. Intelligent cooking processes You can find extensive information on all intelligent cooking paths via the help button [?]. This includes tips & tricks for a successful and safe cooking result, explanations of all setting options and application examples that you can start directly with the appropriate settings for the food. -
Page 28: Fish
5 | Intelligent cooking - iCookingSuite Chinese-style braises Select this cooking path if you want to braise meat Chinese style. (Available in Chinese country cuisine) Braise under pressure Select this cooking path if you want to braise larger pieces of meat under pressure. Sous vide Select this cooking process if you want to cook meat pieces sous-vide. -
Page 29: Vegetables And Side Dishes
5 | Intelligent cooking - iCookingSuite 5.2.3 Vegetables and side dishes Roasting Select this cooking process if you want to fry vegetables and side dishes. Congee Select this cooking path if you want to cook congee or Chinese rice. (Available in Chinese or Southeast Asian country cuisine) Convenience mashed potato Select this cooking path if you want to prepare convenience mashed potato. -
Page 30: Egg Dishes
5 | Intelligent cooking - iCookingSuite Braise / stew Select this cooking process if you want to braise or stew vegetables and side dishes. Sous-vide Select this cooking process if you want to cook vegetables and side dishes sous-vide. The cooking process is ideal for portioned food. -
Page 31: Dairy Foods And Desserts
5 | Intelligent cooking - iCookingSuite Convenience Select this cooking path if you want to cook soups or sauces from convenience products such as pastes, powders or reductions. Stock Select this cooking process if you want to cook poultry, game, fish or vegetable stock. Stock under pressure Select this cooking path if you want to prepare stock under pressure. -
Page 32: Finishing
5 | Intelligent cooking - iCookingSuite Rice pudding Select this cooking process if you want to cook rice pudding. Roast nuts and seeds Select this cooking process if you want to roast nuts and seeds. Pudding and sauce Select this cooking path if you want to cook pudding with fresh eggs, sauces and soups with a high proportion of milk and cream or convenience products in which milk is stirred. -
Page 33: Cooking Food Intelligently
5 | Intelligent cooking - iCookingSuite Close pan drain valve immediately You have deep-fried food in the pan and have opened the pan drain valve even though you have not tilted the pan fully to drain the frying oil. 1. Close the pan drain valve immediately [} 20]. 2. -
Page 34: Starting Intelligent Cooking Process
5 | Intelligent cooking - iCookingSuite > All stored intelligent cooking paths will be displayed. 5.4.2 Starting intelligent cooking process In this section, the Braise / stew cooking process will be used to show how an intelligent cooking process runs. Please note that every intelligent cooking process leads to the desired result with different cooking parameters and the ideal sequence of cooking steps. - Page 35 5 | Intelligent cooking - iCookingSuite NOTICE There are cooking paths where even the lowest level is a searing level, such as “Meat large roast”. The “without searing” option is not available here. The very high searing temperatures safely kill the bacteria on the exterior of the food. This means that food is cooked hygienically even at a lower core temperature.
-
Page 36: Prompts
5 | Intelligent cooking - iCookingSuite Basket With this cooking parameter, you can set whether the food is to be cooked with or without a basket. Temperature With this cooking parameter, you can set the temperature to which cooking liquids or food in cooking liquids are to be heated. -
Page 37: Information
5 | Intelligent cooking - iCookingSuite Turn You will be prompted to turn the food. Chop You will be prompted to chop the food. Skip preheating You will be prompted to confirm that you want to skip the preheating step. 1. - Page 38 5 | Intelligent cooking - iCookingSuite 1. To display the options, press the button:+ New batch With this option, you can load the unit with a new batch and continue the cooking process with the defined cooking parameters. Time continued With this option, the cooking process will continue for a certain time.
-
Page 39: Monitor The Intelligent Cooking Path
5 | Intelligent cooking - iCookingSuite Monitor the intelligent cooking path If you have started an intelligent cooking path, the display changes to the cockpit after a short time. All cooking steps that the intelligent cooking path processes are displayed here one after the other. The active cooking step is highlighted. -
Page 40: Manual Cooking
6 | Manual cooking Manual cooking DANGER Risk of explosion and burns due to high percentage alcohol Never use high-percentage alcohol for cooking. Alcohol vapours and oxygen form explosive mixtures. There is a risk of explosion and burns. 1. Never cook with high-percentage alcohol. 2. -
Page 41: Additional Functions
6 | Manual cooking 1. If you want to operate your unit in continuous operation, press either on or slide the cooking time regulator fully to the right until the following message is displayed: Continuous operation Core temperature With this cooking parameter, you can set how high the core temperature of the food should be. If you have set the core temperature, the cooking time cooking parameter will not be available. -
Page 42: Cooking
6 | Manual cooking Cooking 6.3.1 Temperature range Minimum temperature cooking liquid Maximum temperature cooking liquid Default setting 30 °C Boiling temperature Boiling point; corresponds to PowerBoost level 1 6.3.2 Cooking food 1. Press the button in the menu bar: 2. Press the button 3. -
Page 43: Frying
6 | Manual cooking Frying 6.4.1 General safety instructions This will prevent scalding and burns: – Wear personal protective equipment to prevent burns and scalding. – Adhere to the minimum and maximum fill levels in the pan. – Make sure that the core temperature probe has dried before you start frying. –... -
Page 44: Frying
6 | Manual cooking > If the cooking time has elapsed or the core temperature has been reached, an acoustic signal will ask you to check whether the food has reached the desired result. 10. If the cooking result meets your requirements, take the food out of the pan. Frying 6.5.1 General safety instructions... -
Page 45: Melt Solid Fat
6 | Manual cooking 2. Fill the oil cart with the desired amount of oil or fat. Observe the minimum and maximum permissible fill quantities of the oil cart of 15 – 49 litres. Melt solid fat There is at least 15 litres of solid fat in the oil cart. 1. -
Page 46: Abort Manual Cooking
7. Set the temperature of the pan base. NOTICE! If the oil or fat reaches a temperature of 230 °C due to a technical problem, the cooking system will automatically switch off for your safety. Contact your RATIONAL Service Partner to put the cooking system back into operation. -
Page 47: Pressure Cooking (Optional)
In this case, RATIONAL recommends you start a cooking process with pressure and with the minimum fill volume of water once per week. This will help to maintain the pressure cooking functionality. -
Page 48: Information
7 | Pressure cooking (optional) DANGER Risk of scalding and burns when pressure cooking with alcohol The system is designed for pressure cooking with water. If you pressure cook food in liquids whose boiling point is lower than that of water, such as alcohol, when you unlock the pan lid, the hot liquid can vaporise or spray out of the pan together with the food at high speed. -
Page 49: Pressure Cooking Food
7 | Pressure cooking (optional) Pressure cooking food DANGER Risk of scalding and burns when pressure cooking with alcohol The system is designed for pressure cooking with water. If you pressure cook food in liquids whose boiling point is lower than that of water, such as alcohol, when you unlock the pan lid, the hot liquid can vaporise or spray out of the pan together with the food at high speed. -
Page 50: Izonecontrol
8 | iZoneControl iZoneControl With iZoneControl you can divide the pan base into individual heating zones and operate these with different temperatures; unused surfaces can even stay cold. You specify the desired result and start the cooking process for each heating zone. The heating zone will now be heated to the optimal temperature leading to your desired result. NOTICE The temperature difference between zones should not be more than 130 °C. -
Page 51: Creating Your Own Tickets
8 | iZoneControl 1. Press the button in the menu bar: 2. Press the button > The preset tickets are displayed. >> You can now place [} 57] the tickets or create your own tickets [} 51]. 8.1.2 Creating your own tickets You can add any manual cooking mode, intelligent cooking path or program you want to the ticket board. -
Page 52: Editing The Ticket Board
8 | iZoneControl 5. Either scroll through the list of cooking paths or filter by product category (meat, fish soup, etc.). 1. To add a manual program to the ticket board, press the button: 2. To add an intelligent program to the ticket board, press this button: Deleting tickets from ticket board 1. -
Page 53: Pan Division
8 | iZoneControl Programming mode 1. Press the button in the menu bar: 2. Press the button underneath the desired program: 3. Press the button 4. Press the button in the menu bar: > The programs are displayed in the ticket board. Pan division With iZoneControl, you can divide the pan base into 4 zones. -
Page 54: Creating Your Own Pan Divisions
8 | iZoneControl >> The pan base is automatically divided into zones. You can now allocate tickets to the zones. 8.2.2 Creating your own pan divisions 1. Press the button in the menu bar: 2. Press the button 3. Press the button 4. -
Page 55: Divide The Pan Into Zones
8 | iZoneControl 6. Press the button > The screen for editing will open. 7. Press the button 8. Press the button 9. Press on the desired areas in the pan. > The zone is adapted to your requirements. 10. To confirm the zone, press the button: 11. -
Page 56: Pan Allocation
8 | iZoneControl 7. To confirm the zone, press the button: > The zone is confirmed. 8. To add another zone, tap on the area in the pan that is not yet allocated or wait briefly. 9. To delete a confirmed zone, press the button: 10. -
Page 57: Cooking Food With Izonecontrol
8 | iZoneControl Save pan allocations 1. To give the new pan allocation a name, press the button: 2. To save the pan allocation, press the button: >> The pan allocations are displayed. Cooking food with iZoneControl You can cook food in the 4 following ways: Preset tickets [} 50] Preset pan allocations [} 56] Manual operating modes [} 57]... - Page 58 8 | iZoneControl > The zone will be preheated. 3. Alternatively, press the desired ticket and then the desired zone. > The ticket is assigned to the zone and the zone is preheated. >> Once the temperature has been reached, you will be prompted to load the unit. 58 / 100 Operating instructions...
-
Page 59: Programming Mode
9 | Programming mode Programming mode In the programming mode, you can create, save and manage your own manual programs [} 60], pan allocation [} 60], pan division [} 60], intelligent cooking paths [} 61] and shopping baskets [} 59]. All the manual cooking modes [} 40], intelligent cooking paths [} 26] and preset shopping baskets are available for this. Create new program Manual operating modes iZoneControl... -
Page 60: Create Manual Programme
9 | Programming mode 3. To save the shopping basket, press the button: >> The shopping basket is displayed in the program list. Create manual programme The following modes are available: Cook Roasting Deep-frying Gentle cooking You cannot combine cooking steps of the cooking modes boil, fry, pressure cook (option) or sensitive boil with cooking steps of the deep-fry cooking mode. -
Page 61: Create An Intelligent Program
9 | Programming mode 5. To edit a cooking step, press the button: > Depending on the selected mode, the adjustable cooking parameters and additional functions will be displayed. 1. Adjust the cooking step as required. 2. To save your changes, press the button: Save program 1. - Page 62 9 | Programming mode 1. Press the button in the menu bar: 2. Press the button + New element 3. Press the button > You will be asked what you want to program. 4. Select one of the following options: Cooking mode Mode and cooking method Cooking methods...
-
Page 63: Edit And Delete Programmes
9 | Programming mode > Depending on the selected cooking process, the adjustable cooking parameters and additional functions will be displayed. The standard settings of the cooking path are marked with the following symbol: 3. Adjust the cooking parameters as required. 4. -
Page 64: Pre-Program Start Time
9 | Programming mode >> Now you can select a pan division. Pan allocation 1. Press the button >> Now you can select a pan allocation. Pre-program start time With the pre-programmed start time, you can set the start time for a manual program to the minute. This means you can make use of cheaper night electricity rates and fully utilise your unit for up to 24 hours per day. -
Page 65: Switch Between Operating Modes
10 | Switch between operating modes Switch between operating modes With the iVario you can easily switch between the cooking modes manual cooking, iCookingSuite and iProductionManager at any time. This means that you have the optimal mix of automatic, labour-saving cooking intelligence and individually desired control options. -
Page 66: Settings
11 | Settings Settings Change settings by scrolling through the list and pressing on the desired category. A selection of setting options is assigned to each category, which can be changed using simple gestures [} 16] or the central dial [} 17]. You can permanently change the factory settings on your unit to suit your requirements. -
Page 67: Temperature Format
11 | Settings >> The date is automatically adopted. Time 1. Press the button Time > The time is displayed. 2. Press the time. 3. Set the desired time. >> The time is automatically adopted. Toggle 24h/12h 1. Select 12 to set the 12-hour format and 24 to set the 24-hour format. ConnectedCooking You can also synchronise the time automatically via ConnectedCooking. -
Page 68: Display Brightness
11 | Settings 2. Press the button Light 11.3.1 Display brightness Here you can adjust the display brightness on a scale from 0 - 100%. 1. Press the button Display brightness 2. Select the desired value on the scale or set it using the dial. >>... -
Page 69: End Of Cooking Time
11 | Settings 1. Press the button Program step end 2. Press the button Sound 3. Press on the desired sound. > The sound will play. 4. To apply the setting, press the following button in the icon bar: >> You will return to the overview. -
Page 70: Secondary Country Cuisine
11 | Settings >> The country cuisine is immediately adopted. In the iCookingSuite, the intelligent cooking paths that correspond to the national cuisine are displayed. The cooking parameters, cooking times and core temperatures of the intelligent cooking paths are adapted to the cultural eating habits. 11.6.2 Secondary country cuisine You can add an additional country cuisine to the primary country cuisine. -
Page 71: User Profile
11 | Settings Programs: Delete all own Here you can delete all programs you have created. 1. Press the button > You will be asked if you really want to delete the programs. 2. To confirm the action, press the button: >>... -
Page 72: User Data: Delete All
11 | Settings Delete all own images Here you can delete all images you have imported. 1. Press the button Delete all own images > You will be asked if you really want to delete the images. 2. To confirm the action, press the button: >>... -
Page 73: Network Settings
11 | Settings Developer logs: Export via time period You have connected a USB flash drive to the unit. 1. Press the button Developer logs: Export via time period >> You can now download the developer logs for a certain period of time. Service report: Export all You have connected a USB flash drive to the unit. -
Page 74: Wifi
11 | Settings The Network status button can be used to check whether there is a connection to the router and to the Internet. 11.8.1 WiFi Here you can include your unit in a WiFi network. Click here for more information: Establish a wireless connection [} 80] 11.8.2 LAN (optional) -
Page 75: Service
Serial number information Hotline - Chef [} 89] Hotline - Service [} 89] Service levels This function is only available to RATIONAL Service Partners. Software update info [} 75] Installed software version [} 75] Service messages of the last 14 days Open source licences 11.10.1 Information on unit model... - Page 76 11 | Settings You can find out how to connect your cooking system to ConnectedCooking and which functions are available here: ConnectedCooking [} 81] If your cooking system is connected to ConnectedCooking, you have the following setting options. 1. Press the button >>...
-
Page 77: Kitchen Management
5. Enter a password and press the Enter key on the keyboard. Document the password and protect it against access from unauthorised third parties. If you forget the password, you can no longer access the settings. In this case, please contact your RATIONAL Service Partner. >... -
Page 78: Activate Profile
12 | Kitchen management 16. In the icon bar, press on to return to the overview of user profiles. Customise the menu bar Define which functions and intelligent assistants should be displayed in the menu bar. 1. Press the button Customise the menu bar 2. -
Page 79: Hygiene Management
12 | Kitchen management >> The profile is deleted. 12.2 Hygiene management 12.2.1 Logged HACCP data The following HACCP data is logged for each batch: Batch number Unit model Serial number Software and Help Version Date and time Hand shower rinse Set core temperature Measured core temperature Time (hh:mm:ss) -
Page 80: Establish Network Connection
12 | Kitchen management Maximum plug length of 45 mm Plug diameter of 18.5 mm Cable diameter of 5.5 – 7.5 mm CAUTION The functional parts around the network connection can heat up to over 60 °C You can burn yourself if you connect a network cable to a unit that is currently in use or has just been in use. 1. -
Page 81: Monitoring Units Remotely With Connectedcooking
RATIONAL units, ConnectedCooking offers you completely new and convenient application options. The only thing you need to do is connect your RATIONAL unit to a network and register at connectedcooking.com. In ConnectedCooking you can see the online status, the operational statistics and whether the HACCP requirements are complied with at a glance. -
Page 82: Connect Unit With Connectedcooking
12 | Kitchen management Push notifications Whether it’s a loading, ready-to-eat or service message, you will receive all the information you need in real time, no matter where you are. Transfer and manage cooking paths Automatically transfer tried and tested cooking paths to all units in your business. Automatic software updates Software updates are always provided to you free and automatically. -
Page 83: Perform Software Update
12 | Kitchen management 12.5 Perform software update Automatic software updates with ConnectedCooking Your unit is connected with ConnectedCooking. 1. Press the button 2. Press the button ConnectedCooking 3. To activate the Download software updates automatically function, press the button: 4. -
Page 84: Care
Clean the unit with lukewarm water and a sponge. Clean the interior of the pan with diluted vinegar if there is limescale or discolouration. Clean stubborn dirt on the inside of the pan with a brush or sponge (see RATIONAL accessories) and, if necessary, with a scouring agent. - Page 85 13 | Care NOTICE Reduction of the corrosion resistance of the pan due to inadequate cleaning The high quality stainless steel of the pan surface forms a protective layer (called a chromium dioxide layer) together with the oxygen from the air. Cleaning with a brush or sponge does not affect this protective layer, as the oxygen from the air reconnects with the stainless steel and thus forms a new protective layer.
-
Page 86: Cleaning The Hand Shower
13 | Care Cleaning the steam vent Please note that units without a pressure cooking system have one steam vent. Units with a pressure cooking system have two steam vents. 1. Remove the steam vent by hand without using tools. 2. -
Page 87: Cleaning The Control Panel
13 | Care 13.6 Cleaning the control panel CAUTION! Risk of cuts! The central dial has sharp edges. Wear protective gloves when cleaning the central dial and the surfaces below it. 1. Pull off the central dial by hand and without tools. 2. - Page 88 13 | Care Cleaning the locking system 1. Open the pan lid. 2. Clean the locking system and the indentations with a damp brush. Cleaning the steam nozzles 1. Remove the steam nozzles by hand without using tools. 2. Clean the recess in the steam nozzles with the hand shower. 3.
-
Page 89: Inspiration And Help
Our units are reliable and have a long service life. Should customers ever encounter technical issues; our RATIONAL Service Partners will provide fast, efficient assistance. Guaranteed spare parts supply and a weekend call-out team included. You can find the number under Settings > Service or at rational-online.com. -
Page 90: Help In A Service Call
Serial number Software version For all error messages, please contact your RATIONAL Service Partner. Always keep the serial number of your unit and the version number of the installed software to hand. Both can be found in the error message. -
Page 91: Messages During Cooking
14 | Inspiration and help 14.5.1 Messages during cooking Error report Message text Temperature measurement system error – Temperature measurement system error Heating not possible. Pan temperature measurement system error Only frying applications possible. Core temperature probe error Cooking without a core temperature probe is possible. -
Page 92: Maintenance
You can perform the following maintenance work yourself: Replacing the pan lid gasket [} 92] Replacing the pan drain valve gasket [} 92] If the network cable on your unit is defective, it may only be replaced by RATIONAL or your RATIONAL Service Partner. 15.1 General safety instructions Wear protective gloves to protect yourself from cuts from sharp edge on the metal housing. -
Page 93: Decommissioning And Disposal
16 | Decommissioning and disposal Decommissioning and disposal 16.1 Decommissioning Contact your RATIONAL Service Partner if you would like to decommission the unit. 16.2 Disposal Old units contain recyclable materials. Dispose of old units in an environmentally sound way using the appropriate disposal systems. -
Page 94: Technical Data
175 °C. As a manufacturer, RATIONAL guarantees that the set temperature is maintained to the exact degree and does not exceed its set point. - Page 95 17 | Technical data Directive 2011/65/EU Restriction of the use of certain hazardous substances in electrical and electronic equipment, including 2015/863/EU Regulation (EC) No. 1935/2004 on materials and articles intended to come into contact with food This unit meets the following European standards: EN 60335-1:2020 EN 60335-2-36:2017 EN 60335-2-37:2017...
-
Page 96: Regulatory Information
18 | Regulatory Information Regulatory Information This device complies with part 15 of the FCC Rules. Operation is subject to the following two conditions: (1) This device may not cause harmful interference, and (2) this device must accept any interference received, including interference that may cause undesired operation. This equipment has been tested and found to comply with the limits for a Class A digital device, pursuant to part 15 of the FCC Rules. -
Page 97: Index
Index Operate devices with smartphone 81 Operate units without smartphone 81 Deep-frying 44 Register the unit without smartphone 82 Register with smartphone 82 Consommés 31 Basket 36, 41 Continuous operation 35 boil 38 Control panel Eggs 30 Clean central dial 87 Meat 27... - Page 98 Gentle cooking 41 Ragout 27 Gyoza 29 Red meat 35 Reinsert core temperature probe 38 Residual time 37 Risotto 29 Hand shower 23 Roasting Spray 23 Nuts and seeds 32 Help displayed on the unit 16 Hold 38 Hold core temperature 38 Sauces Bound sauces...
- Page 99 Zongzi 30 Operating instructions 99 / 100...
- Page 100 RATIONAL UK Limited RATIONAL Wittenheim SAS Unit 4, Titan Court, Laporte Way 4 Rue de la Charente Luton, LU4 8EF F-68270 Wittenheim Tel. +44 (0)1582 480388 Tel. +33 (0)389 570135 Fax +44 (0)1582 485001 Fax +33 (0)389 570136 info@rational-online.co.uk info@rational-online.co.uk rational-online.com...
Need help?
Do you have a question about the iVario Pro L and is the answer not in the manual?
Questions and answers