Table of Contents
Advertisement
Quick Links
Advertisement
Table of Contents

Subscribe to Our Youtube Channel
Related Manuals for Genius G-NOTE 7000


Summary of Contents for Genius G-NOTE 7000
- Page 2 Welcome Dear user, thanks for purchasing this product. Much investment in time and effort has gone into its development, and it is our hope that it will give you many years of trouble-free service. Notice 1. Purchasing new ink cartridges: The dimension of the pen cartridge is 2.3~2.4mm (diameter) x 67mm...
-
Page 3: Getting Started
The digital pad is a handy device that captures your handwriting. While you take notes on paper, the digital pad also digitally records everything you write or draw, so that you can present or edit your work on the computer. Besides, the digital pad can also serve as a regular tablet as well. -
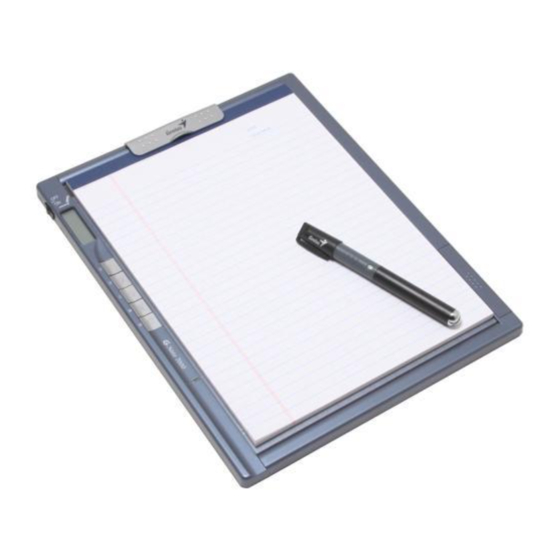
Page 4: The Parts Of Digital Pad
When writing with the digital pen, the valid detectable height above the digital pad is about 13mm (around 135 sheets), and the valid writing area is as large as a letter size paper, about Writing 216mm x 280mm (8.5”x11”). area... -
Page 5: Battery Installation - Digital Pad
Unscrew the rear tube from the front tube. Install one AAA battery into the rear tube and screw it onto the front tube until tight. Then you can take off the pen cap and start using the pen. Pen cap... -
Page 6: Inserting A Memory Card (Optional)
“Unlock” position before inserting the SD card. When a memory card is inserted, the digital pad will use the card as the main storage medium. Files stored in the internal memory will become inaccessible until the card is removed. -
Page 7: Placing A Paper Or Pad Cover
Clipping the pen to the digital pad When you are not using the digital pen, you can attach it to the digital pad by clipping the pen to the paper clip of the digital pad,... -
Page 8: Recording Your Handwriting
2. The batteries have enough power left. 3. The polar(+ -) directions of the installed batteries are correct. If a memory card is inserted, the digital pad will take more time (about 4~5 seconds) to boot up. After the digital pad is powered on, you can... -
Page 9: Start To Record Your Handwriting
When you are using the internal memory for storage, the M icon will display on the LCD panel. When a memory card is inserted, the SD icon will display and all of your writing will be saved in the memory card. -
Page 10: Page Numbering
When the batteries are exhausted, the icon will appear and the digital pad will be forced to shut down in a short period of time. Rechargeable batteries and alkaline batteries have different attributes. -
Page 11: Operation With The Function Buttons
Note that you cannot move to a page that is not yet created. When you switch the paper page, be sure to switch the digital page accordingly, so that the contents of both pages can stay aligned. Erase page contents To erase the digital contents of current page, press the button. -
Page 12: Turn Off The Digital Pad
Turn off the digital pad To turn off the digital pad, slide the power switch upward as indicated. Next time when you switch on the digital pad again, you will be automatically led to the last edited page. -
Page 13: Replace The Cartridge Of The Pen
Pull out the old cartridge. Insert the pen tip into the clip hole in the cartridge compartment. Tilt the pen to grip the pen tip, and then gently pull out the old cartridge. Or you can use the accessory tweezers to pull out the old cartridge. -
Page 14: Using The Digital Pad As A Tablet
Using the Digital Pad as a Tablet Driver installation Before using the digital pad as a tablet, you must install the tablet driver. Place the Driver CD into the CD-ROM drive. Place the accessory Driver CD into the CD-ROM drive of your computer, and the autorun screen will appear. -
Page 15: Connecting The Digital Pad To Your Pc
Do not connect two or more digital pads to your computer at the same time, as the computer may not be able to distinguish them. If the icons on the LCD do not display, please check if the USB cable is well connected at both ends. Unplug and re-plug the USB connector if you need to. -
Page 16: Operations In Tablet Mode
Detectable area When using the digital pad as a tablet, you can use the digital pen to navigate the mouse pointer. By default the detectable area is as indicated, and it is in proportion to the desktop screen. -
Page 17: Defining Tablet Functions
Double-click on the “USB Tablet” icon to bring up the settings window. If the icon does not display, please check and make sure: 1. the tablet driver is installed; 2. the USB cable is well connected at both ends. Unplug and re-plug the USB connector if you need to. -
Page 18: Working Area Setting
If you are using a regular tablet pen, the settings of the pen buttons are also adjustable in the control penal. If you change the pen you are using or the pressure of the pen appears abnormal, please cancel the “Auto Setting”... -
Page 19: Hot Key Setting
Hot key setting. F2 F3 Two of the five buttons on the digital Hot keys (F1~F3) pad are used for mouse-clicking; the rest three can be programmed here. By default they will create, open, or close a document when using an application. -
Page 20: Troubleshooting
Try using more force or slowing down your speed when writing. The pen strokes in the b. Try to keep the tilting angle of the pen digital page become and the pad more than 60 degrees. longer, shorter, or even missed in some parts. - Page 21 “M” instead of “SD”. switch is set to “unlock”. You can save up to 2574 (26x99) pages in Memory is full before all the digital pad. However, the actual number 26 folders are completely of pages can be saved is dependent on the taken up.
-
Page 22: Specifications - Digital Ink Pad
Specifications - digital ink pad Technology Electromagnetic Dimension ( 331.9 x 252.8 x 13.5 ) mm 8 1/2” x 11” (Portrait in Ink mode and Active Area Landscape in Tablet mode) Weight 704.0g (672.8g without battery) Writing height 13.5 mm (around 135 sheets) -
Page 23: Specifications - Digital Ink Pen
Specifications - digital ink pen Diameter 13.6 mm Length 147.0mm Weight 28.4g (20.4g without battery) Battery AAA x 1 Battery Life ( writing 15 months hours) LED Indicator Blinking if low power Rubber hold Ergonomic design...
Need help?
Do you have a question about the G-NOTE 7000 and is the answer not in the manual?
Questions and answers