Table of Contents
Advertisement
G-Note Series
Digital Note Recorder
User manual
www.geniusnet.com
Federal Communications Commission (FCC) Radio
Frequency Interference Statement
This equipment has been tested and found to comply within the limits of a Class B digital
device, pursuant to Part 15 of the FCC Rules. These limits are designed to provide
reasonable protection against harmful interference in a residential installation. This
equipment generates, uses, and can radiate radio frequency energy and, if not installed
and used in accordance with the instructions, may cause harmful interference to radio
communications. However, there is no guarantee that interference will not occur in a
particular installation. If this equipment does cause harmful interference to radio or
television reception, which can be determined by turning the equipment off and on, the
user is encouraged to try to correct the interference by one or more of the following
measures:
Reorient or relocate the receiving antenna.
Increase the separation between the equipment and receiver.
Connect the equipment to an outlet on a circuit different from that to which the
receiver is connected.
Consult the dealer or an experienced radio/TV technician for help.
Trademark Information
Genius and G-Note are registered trademarks of KYE SYSTEM Corporation.
Microsoft and Windows are registered trademarks of Microsoft Corporation.
Pentium is a registered trademark of Intel Corporation.
Adobe and Acrobat are registered trademarks of Adobe Systems Inc.
All other trademarks are the property of their respective owners.
Copyright Notice
© 2005 KYE SYSTEM Corp. All rights reserved. No part of this publication may be
reproduced, stored in a retrieval system, or transmitted, in any form or by any means
(electronic, mechanical, photocopying, recording, or otherwise), without the prior written
permission of the publisher.
Note: Specifications mentioned in this manual are subject to change without notice.
1
Advertisement
Table of Contents

Related Manuals for Genius G-NOTE 7100


Summary of Contents for Genius G-NOTE 7100
- Page 1 Federal Communications Commission (FCC) Radio Frequency Interference Statement This equipment has been tested and found to comply within the limits of a Class B digital device, pursuant to Part 15 of the FCC Rules. These limits are designed to provide reasonable protection against harmful interference in a residential installation.
-
Page 2: Table Of Contents
................16 ONFIGURING YOUR 3.6.1 The Rotate menu................17 3.6.2 The Workbook menu.................18 3.6.3 Setting the auto-suspend timer(3-60mins)......22 3.6.4 The remaining disk space / battery capacity display ...23 3.7 T ..................23 URNING OFF THE 4. THE DIGITAL ORGANIZER ............... 24 4.1 I ..........24... -
Page 3: P Ackage Contents
G-Note Series digital note recorder allows you to instantly capture notes or diagrams written in ink on normal paper, and then transfer a digital copy to a PC for viewing, editing, or sharing by email. G-Note supports both portrait and G-Note 5000:... -
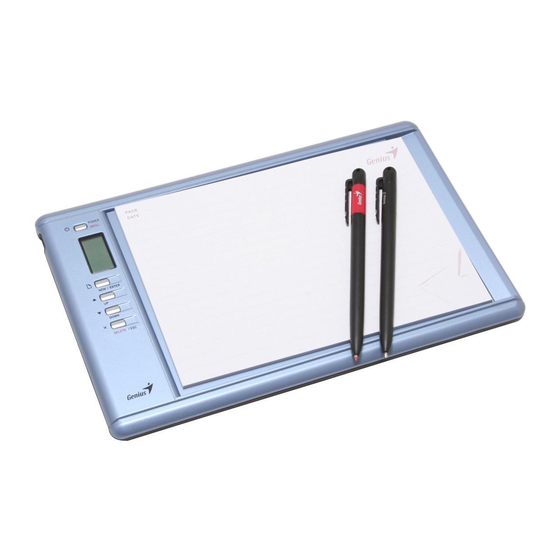
Page 4: Parts Of The G-Note
The writing area is the area on the G-Note 7100 where the notepad is placed Writing area and everything you write or draw with the digital ink pen is captured by its built The writing area is the area on the G-Note 5000 where the notepad is placed in digitizer. -
Page 5: Installation Of The Batteries
Close the battery compartment by snapping its cover into 2.2 Installation of the ink pen battery place. Unscrew the top part of the digital ink pen and insert the included button cell battery with the negative (-) pole facing the pen tip. Screw both barrel parts G-Note 5000 G-Note 7100 together until tight. -
Page 6: Attaching A Paper Notepad
2.3 Attaching a paper notepad The G-Note is equipped with a built-in 32MB flash memory to store your handwritten notes as a series of digital pages in a G-Note file (*.dnt). Windows Attach a standard will recognize the flash memory as a removable disk. -
Page 7: G-Note Operation Instructions
Your notes will instantly before proceeding with the following tests (see section 1.6 for battery be captured and stored in the memory of the G-Note as a series of digital pages installation instructions). -
Page 8: Starting A New Page
Page counter 3.5 Deleting pages The decimal two digits of the page counter are enlarged in the center of the screen, whereas the hundreds (0-1) are displayed behind the hyphen in the top row of the display. Pressing the Delete button equals tearing off or crossing out a paper sheet of the notepad. -
Page 9: Configuring Your G-Note
The G-Note is designed to be used in a wide variety of applications and environments. With its built-in menus you can easily configure the G-Note to your specific needs. The menus will allow you, for instance, to change the paper orientation from portrait to landscape, start a new workbook, or adjust battery power saving options. -
Page 10: The Workbook Menu
The Workbook-Format command will erase all data in the flash memory of the G-Note! Do not use the Format command of Windows to format the flash memory as this may cause incompatibility problems in the internal file system! - Page 11 Press to select the Version Information command. User can see the version information on LCD display. After 5 seconds, it will return to note taking mode. Press to open tablet function (default) or select to close tablet function, and then press to confirm the operation.
-
Page 12: Setting The Auto-Suspend Timer(3-60Mins)
Remaining battery capacity in % Press to return to the main menu 3. Press to increase or decrease the idle time (from 3 ~ 60 minutes) after which the G-Note will automatically switch off. Press to confirm and return to the main menu. -
Page 13: The Digital Organizer
If the setup screen did not appear after a while, double click my The G-Note will not be able to capture notes while it is in pen tablet mode. computer on the Windows desktop, and then the Compact Disc icon and Do not use the 32MB flash memory of the G-Note as a storage disk as file the Setup icon in succession. -
Page 14: Importing Digital
Press [OK] to confirm. Note will instantly double as a pen tablet. You can use the digital ink pen as input styluses in a much the same way as the stylus of a traditional pen tablet, a tablet PC, or hand-hold computer. -
Page 15: The Digital Organizer Main Screen
4.6 The standard toolbar 4.5 The Digital Organizer main screen To start the program in Windows 2000 (or XP), double click on the G-Note icon on the Windows desktop. Alternatively, click [Start] ► [Programs] ► [G-Note] ► [G-Note icon ]. The Digital Organizer’s main window will appear on your... - Page 16 Freeing up space on the flash memory 2. Hold down the Shift-key and move the You can free up space or even totally erase the flash memory of the G- cursor to the right to select consecutive Note by moving a selection or all digital pages to your hard disk: Select pages.
- Page 17 To add files to your selection from other places on your hard disk dialog box, and browse to the digital page click on the [Add File…] button in the dialog box, and browse to the files on your hard disk that you would like to files you want to add.
-
Page 18: The Annotate Toolbar
The Annotate toolbar lets you annotate your digital pages with pens and highlighters in various colors and shapes. A built-in eraser function is provided to easily make corrections. You can use the pen tablet functionality of the G- Note (see section 4.4) to quickly and conveniently annotate your digital pages. - Page 19 Annotate pen properties Result 1. Start with selecting the objects Click on the Pen tip shape icon to select the size and Pen tip shape you want to modify with the Select shape of the pen tip. Changing the pen tip shape (see above).
-
Page 20: The Digital
With the Untangle function you can track the recorded notes as a sequence of frames, and split the superimposed page at the point in time where you forgot to press the New page button. The result will be two separate and perfectly readable pages again:... -
Page 21: Others
Microsoft Word or Outlook express. 4.9 Others If full version or more languages requested, please contact with your retailers or 4.9.1 Insert background picture distributors. Start... - Page 22 Remove the button-cell battery from the digital ink pen if it is not expected to be used for long periods. Avoid placing magnetic media or hot or heavy items on the surface of the 1. Hold the digital pen upright and insert the cartridge tip into the center of the G-Note. notch.
- Page 23 A superimposed digital page is created. instructions). Make sure to press the new button on the front panel every time you turn a paper sheet on the notepad to start a new digital page, and make sure G-Note is working for store pages to Computer.
- Page 24 Glossary Technical specifications G-Note 5000: G-Note file – A proprietary file format used to store digitized pen movements in the flash memory of a G-Note digital note recorder. The source file can Digital notepad specifications generate captured objects as a series of digital pages. The file extension is...
- Page 25 One 1.4V button cell battery (PR48) Battery Life About 500 hours (continuous use) Ink cartridge Ø 67.16(L) x 2.3mm File formats DNT;dnt Proprietary Mainstream pdf ; bmp ; jpg;notes Specifications changed without prior advice, please go through our website at www.geniusnet.com for upgrade.
Need help?
Do you have a question about the G-NOTE 7100 and is the answer not in the manual?
Questions and answers